Welcome to ScapeCrunch

We are ScapeCrunch, the place where planted aquarium hobbyists come to build relationships and support each other. When you're tired of doom scrolling, you've found your home here.

Journal High-Tech 90P Build

What epoxy did you use on the elbow? A quick sarch reccommended XTC-3D brush-on epoxy specifically for 3D printed parts.but it doesn't appear to be a good option for water sealing.
I used JB Weld Clearweld (mostly because I already had a couple large bottles of it). It's not NSF61 rated or anything, but its a very low contact part, and epoxy should be reasonably safe once cured. I will definitely update here if it fails.
 
Make sure you have some water leak detectors in your cabinet! They've saved me so many times...
100% I have a hardwired one on either end of the cabinet tied directly to the controller as an interlock, and will keep a wireless battery unit in there too, as well as below the overflow box as an independent check as well.
 
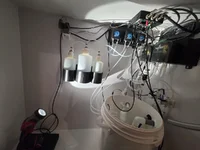
I managed to get the basement cabinet all setup for testing.

1792422568300.webp

I'll clean up the wiring and lines once everything is calibrated and tests okay. I did calibrate the pH meter and the Renke EC probes which btw are working very well so far. In the 1413µS/cm calibration solution, one probe read 1408 and the other 1413 prior to calibration, and each one stores its calibration on the probe - so firmware side is very easy to interface.

I did get the scale calibrated as well for the CO2 tank, and started feeding the Yugang reactor . One thing I've noticed is a lot of drift on the scale, so while it may be okay for knowing that a bottle is close to empty, I don't think I'll get great consumption data from it - so I'm extra glad I ordered the AMS01 sensor that @JacksonL reccomended.

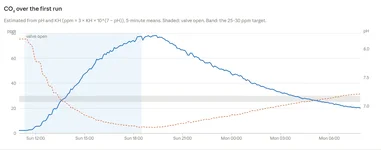
From the first CO2 run yesterday, I've also realized my Yugang is way overpowered. I think I estimated way more loss than I'm actually getting with the overflow and (loosely lidded) sump.

I started with the Yugang at the middle rotation so I could have room to move either way - and way overshot the 30ppm target I was aiming for.
1792422890417.webp

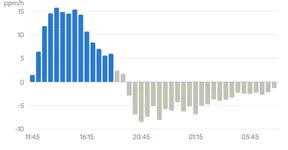
I also thought it was interesting how fast the Yugang loads the water, a testament to its efficiency is seeing the delta in ppm/h (in 30 minute chunks):

1792422967992.webp

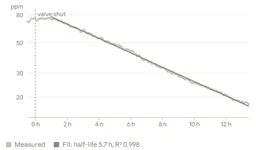
Also interesting is that the decay after shut off follows a fixed half-life on the log scale:

1792423038023.webp

All in all what i've learned from day 1:

  • Holding the target takes very little gas, but reaching the target does, so the valve needs to turn on sooner (or maybe an adjustable flow rate later?).
  • The reactor dissolves most of the gas - while the scale was tracking before it started drifting, the cylinder lost 8.5g, and the water gained 8.2g - thats > 96% efficiency!
  • Expect a huge lag after shut off - The co2 kept rising for 53 minutes after the valve was shut - probably due to my 25-30 feet of line between the regulator and the Yugang, so I need to actually shut off CO2 even sooner than most would.

I've rotated the reactor up about 5-10 degrees and will see how it goes.

Unfortunately, I'm away from home today, and the Emergency standpipe sensor picked up some flow, so it killed the pump and all peripherals. Sump level didn't lower when it was triggered, so I suspect a bit of loose plant matter might be stuck in the gate valve - as a reset triggered the same thing after a few minutes, so probably slightly reduced flow caused the OF box level to rise just enough to trickly into the emergency.

1792423875714.webp

The nice thing is the automation caught it, correctly responded and was a good real-world test. Downside is my cycle likely takes a hit since it will all be off for about 10-12 hours until I can get to it. I will add some interchangeable strainers in the OF box and make it a regular maintenance item so I don't have to open up and retune the gate valve every time this happens.

1792423759588.webp
This journal should really be called the 3D printed aquarium =D
 
Not a bot (we have to say that now, right? 🙃)

Some updates as promised on the build. Still not scaped btw - but hoping to get some time this weekend.

First thing is I knew I wanted a Time of Flight sensor in the sump for an accurate level measurement for the ATO, AWC trim, possibly see filter fouling, and as an extra safety layer. The big question was how to seal it from moisture.

I figured the easiest way would be to seal the sensor inside a printed case, with some desiccant, and a glass cover. Attempt 1 went horribly as the printhead collided with desiccant and then dragged it across the pcb destroying my first sensor.

Attempt 2 went much better as I made the box deeper, and siliconed a glass microscope cover slip to it.

View attachment 20566 View attachment 20565

But - this didn't work, since I increased the gap from the sensor to the glass - there was some crosstalk with the glass reflecting some of the signal. So on to attempt 3. This time I skipped the desiccant entirely having failed the first 2 times, and printed a small adapter to limit crosstalk, and covered it with an iphone camera glass, then expoxied the entire pcb.

View attachment 20562View attachment 20561

This worked, and no worry about moisture killing the sensor! I installed it in a stilling well so any turbulence is smoothed out, also pictured is a FSIR02 sensor for triggering an emergency if the sump level ever went too high. Also a mounting hole for the glass pH probe so its somewhat protected from me.

View attachment 20560View attachment 20559

I then also got these nice flood sensors from aliexpress that I mounted on both back corners of the cabinet. I like them a lot as they can be mounted with the pins in any position and they feed right back to the main controller to shut off the pump if needed.

View attachment 20558

Then began the wiring and testing....

View attachment 20564

This easily took many evenings to get done, but I finally (mostly) got everything in a state that I'm okay with.

View attachment 20568

ATO supply + fert dosing. Also not pictured is the liquid sensors on each of the 3 bean animal drains, and one on the chamber 1 glass to detect if the first filter is in need of cleaning.

View attachment 20555

ATO + flow sensor, extra mechanical float as backup layer, AWC Pickup, EC Probe, Return Pump, Low float sensor, temperature probe, and stilling well (FSIR02 high level, pH probe, ToF sensor).
View attachment 20554

I also got the first version of the weir box printed, and used a small o-ring to seal it against the bulkhead so its a press-fit and still removable.

View attachment 20556 View attachment 20552

After this - I really wanted to address the loc-line fittings that I showed before that I absolutely hated the look of.

View attachment 20567

I ended up ordering a bunch of different tubing and fittings from Aliexpress to try and put together something better. First up was clear acrylic - I didn't mind this too much, but it still looked bulky to me, and wasn't too sure about the clear.

View attachment 20550

I then tried a set of black - which was decent, and blended in a bit more - but still a bit obtrusive.

View attachment 20549

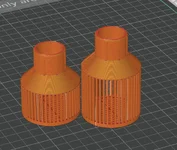
In the end, I went back to my trusty printer and modeled up something a lot sleeker. It's a 2 piece design, the first spins onto the bulkhead, and has a recess so it fits flush against the glass. The second has a tab and tightly clicks into place with 3x 6mm jets, with the top and bottom one angled upwards about 10degrees or so.

View attachment 20548View attachment 20547

A LOT sleeker IMO, time will tell if the flow will be adequate (orst case, I can fall back to one of the other options)- but the beauty is I can print out revisions as needed within a few hours. And as a bonus, if I see the need later - I put in small recesses on the side of the jet channel that will accept a moss holder if I really want to hide it more.

View attachment 20569

The sump area is pretty much done with the exception of lines to the fert bottles, and final overflow pvc pipe termination in the sump. I may also swap out the main LED power supply as my smart plug is showing an idle draw of about 7-8W being an older unit (modern units being <0.25W) - so less waste, less heat in the cabinet. It would be ideal to do it now before the plumbing has water in it.

I've also got a start on the home assistant dashboard - but still some things to sort out:

View attachment 20570

View attachment 20571

Also have a display of sorts in the works - probably not at all necessary, but for the fun factor. More on that next time. I think I'll need an entire thread to explain all the automations, and why certain sensors were picked.

Otherwise, substrate is in the tank - and the basement mixing/co2 cabinet is done and painted - so work will begin down there soon too. Starting to see the light at the end of the tunnel!
How is the ToF sensor going?
I went a hydrostatic pressure sensor to measure water level in my reservoir because I thought the moisture may kill a ToF sensor, but I am interested in using one now for live updates/controller tracking of tank water level during remote water changes.

Also, what brand/model 3D printer are you using for all these prints?
 
How is the ToF sensor going?
I went a hydrostatic pressure sensor to measure water level in my reservoir because I thought the moisture may kill a ToF sensor, but I am interested in using one now for live updates/controller tracking of tank water level during remote water changes.

Also, what brand/model 3D printer are you using for all these prints?
The ToF has probably been the best sensor in the system, super accurate and quick to respond. When troubleshooting some of the other systems, it usually helps solve other problems and acts as a backup check to the other float switches/sensors as well. Well worth the hassle that went into getting it working IMO.

Keep in mind, the ToF sensors don't work well against water - so it needs a float or something of that nature to bounce off of. I use a white float inside my matte black stilling well:

1792499321908.webp

As for printers, I use a Bambu Labs X1C and H2D for all my prints, and fusion 360 for drawing parts.

EDIT - Also be wary of the cone angle from different ToF sensors, I went with the VL53L4CD specifically for its smaller cone.
 
Last edited:
The ToF has probably been the best sensor in the system, super accurate and quick to respond. When troubleshooting some of the other systems, it usually helps solve other problems and acts as a backup check to the other float switches/sensors as well. Well worth the hassle that went into getting it working IMO.

Keep in mind, the ToF sensors don't work well against water - so it needs a float or something of that nature to bounce off of. I use a white float inside my matte black stilling well:

View attachment 20980

As for printers, I use a Bambu Labs X1C and H2D for all my prints, and fusion 360 for drawing parts.

EDIT - Also be wary of the cone angle from different ToF sensors, I went with the VL53L4CD specifically for its smaller cone.
Great info thanks. I think a float within a vented tube would be my solution for tank level. It will help add another remote problem solving piece and for the controller check-ins during water changes to ensure everything is as expected.
I would be using the same adafruit board you have, those StemmaQT connectors are just so convenient.

I’m eyeing off an X2D combo, but with new printer announcements expected and Black Friday coming up, I think I will be guided by the deals on offer.
The H systems print size is very attractive, but the price jump to those is too high for the basic stuff I will use it for.
 
Great info thanks. I think a float within a vented tube would be my solution for tank level. It will help add another remote problem solving piece and for the controller check-ins during water changes to ensure everything is as expected.
I would be using the same adafruit board you have, those StemmaQT connectors are just so convenient.

I’m eyeing off an X2D combo, but with new printer announcements expected and Black Friday coming up, I think I will be guided by the deals on offer.
The H systems print size is very attractive, but the price jump to those is too high for the basic stuff I will use it for.
The H size is great for efficiency, but most parts can be printed in multiple pieces if needed anyway.
 
Been a little while since my last update.

I had some Yugang reactor issues to solve first, but I finally got it under control.

I actually had multiple issues at once that were making it hard to figure out what was going on.

CO2 Issues:
1. My co2 solenoid was leaking, muddying up my degas rates.
2. My (aliexpress) flow meter float was sticking, and giving unreliable readings.
3. I was seeing a biofilm layer on top of the tank despite having the overflow + increased agitation by adding an upwards facing jet on my return.
4. Yugang is a bit oversized still, as my losses through the sump were nowhere near what I was expecting (almost negligible).

Electronic Issues:
5. My powerbar circuit kept resetting once or twice a night.
6. My UV light was no longer functional during powerbar testing.

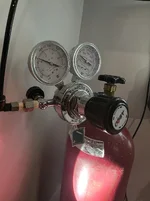
1. I replaced the leaky solenoid, and since I was in there anyway, I put in a second one in-line as well (not pictured) as a backstop. I also added an emergency air pump to the sump and connected it to the spare controlled outlet I still had - and set up an automation to kick in at 38ppm co2.
1793719445089.webp 1793720371661.webp

2. I haven't solved the flow meter yet - but after installing an AFS01 flowmeter, both disagree by a lot, though the AFS01 corresponds better with the co2 tank weight loss, so trusting that over the flowmeter for now. What flowmeters are you guys using?

3. So even though the surface was moving a lot, none was actually getting skimmed - this is my first time using an overflow, so I was a bit miffed at first. Even increasing the return flow would add agitation at first which would then get muted by the film.
1793719595269.webp
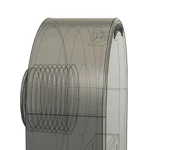
14º ~2x14mm jet on the return bulkhead transition

I ended up lowering the secondary standpipe in the BA overflow box, which dropped the level there, and inside the weir box, and suddenly the entire surface film got sucked in within seconds, and has stayed clear since. It turns out I was flooding the weir box, so increasing flow was actually making things worse. Its been solid now, and my co2 degas rate to -90% is about 4.5h now.

Before pic:
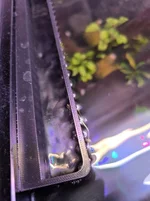
1793719655169.webp

After pic - didn't take one, so just trust me, but its essentially the same but the level in the weir box about 10-12mm lower, and no film.


4. I'm close to the top rotation my plumbing allows, and will likely trim my reactor a bit, but its not nearly as oversized as I thought initially, but I may still trim 8-10cm off so I'm more in the middle of the rotation rather than at the top. Currently, with lights on - co2 tops out at about 38ppm, and about 45 lights off without control. I'd like to top out a little bit lower for safety and be able to run in overflow mode rather than with the pH control.

5. After several days of testing, removing the heater/UV, thinking it was a current leak, etc, I also removed the fuse-sense circuitry I had that would detect a blown fuse thinking it was related to that. Still had resets.
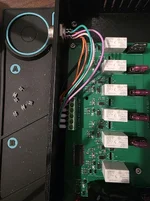
1793719776198.webp

I finally pulled the circuit board completely out to inspect, and of course it was a user error. One pin of the I2C leads was cold-jointed, so it would work until the heater turned on, warmed up the solid state relay, which warmed up the pcb, and split that joint momentarily which killed the connection to the controller. Its been rock solid since the repair and reinstall though.
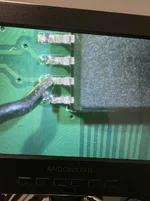
1793719790158.webp


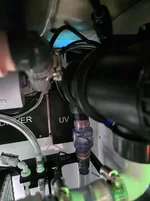
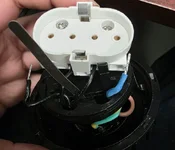
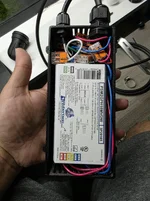
6. Cheap UV uses cheap parts. The built-in $2 starter the mft potted under the UV bulb was dead. I learnt how UV ballasts and starters work, so that's cool - and the mfr offered a replacement if I sent the old one back, but given that I cut the cable to shorten it, had it mounted, and wasn't going to switch to a different model given the trouble I went through to not only fit it, but print special elbow adapters for it...

I decided to get a softstart electric ballast, and replace everything between the lamp and the plug. Now it doesn't have that ping ping bzzzz on start, runs a little brighter, and should survive more on/off cycles if used intermittently.
1793719933008.webp1793719947616.webp
1793719962254.webp
And into the sump cabinet, working great.


On the positive side- plants are in, there was a lot of melt overall, but things are starting to grow back now - and the tank was fully cycled about a week ago, easily clearing 2ppm ammonia in 24 hours. Blue diamond shrimp are going in very soon and will get a head start before any other fish go in.

1793719998249.webp
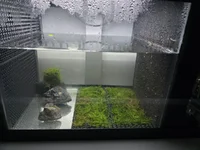
The sump got some java moss in, though some has started browning from the transition.
1793720017060.webp

I also got my hands on a borrowed PAR meter, but its an older quantum one - so not sure how useful/accurate it is, but will get some measurements soon on the DIY Leds.

Fertilizer pumps are primed and calibrated, and started on a small dose until I get the AWC system sorted in the next couple days.

The basement cabinet setup is nearly done as well - but haven't taken a recent pic.
 
The weir box flooding explains the high co2 retention. This is exactly what I experienced with the clogged filter pads in my overflow. It reduced overall flow in the tank because the overflow was flowing at a fraction of typical speed, keeping co2 laden water in the tank longer. Glad you got that figured out.
 
Holy hell you’re my kind of nerd lol. You’ve got all sorts of things going here I’ve been mulling over, and all controlled with home assistant through esphome like I was planning.

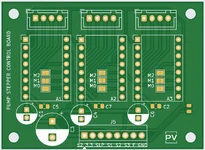
A few questions, what PCB CAD package are you using? Have you found that combination of peristaltic pump and stepper motor to make for an accurate auto doser?

Im definitely going to need to revisit this thread again and go over it in more detail. I’m certain I’ll have more questions 😆

Thanks for documenting all of this!
 
2. I haven't solved the flow meter yet - but after installing an AFS01 flowmeter, both disagree by a lot, though the AFS01 corresponds better with the co2 tank weight loss, so trusting that over the flowmeter for now. What flowmeters are you guys using?
Several of us use Dwyer RMA-151 flow meters. I got a great deal on a bunch of used ones early this year and sold a few to members here for what I paid. I can spare another if you're interested for the same deal. Message me if interested. I feel invested in this build since following it. 😁

Dwyer RMA-151 Deal

Edit: Umm, I just realized you may not be in the U.S.
 
Last edited:
Holy hell you’re my kind of nerd lol. You’ve got all sorts of things going here I’ve been mulling over, and all controlled with home assistant through esphome like I was planning.

A few questions, what PCB CAD package are you using? Have you found that combination of peristaltic pump and stepper motor to make for an accurate auto doser?

Im definitely going to need to revisit this thread again and go over it in more detail. I’m certain I’ll have more questions 😆

Thanks for documenting all of this!
Haha, glad to be of inspiration. Would love to see more automation builds.

I use Kicad for PCB layouts, and JLCPCB (and sometimes PCBWay) for production. The stepper boards ran me $5 for 10 as part of a bigger order.

I can make the files available to you - but I did keep them extremely basic. No DIR signal, 3 channels, just steps, sleep, fault, and power all fed from the main controller.

1793728991355.webp

I used pololu drv8825 boards, and pump heads from aliexpress. I haven't ran them long enough to speak to long term accuracy - but I've calibrated twice now, about a week apart when I changed the output tubing from 3/5 to 2/4 as the former was letting air in at the barb and dripping a little, but both calibrations were within about 1% of the previous. I will also recalibrate again a few weeks once they're in service as the tubing will bed in a little bit after use.


Several of us use Dwyer RMA-151 flow meters. I got a great deal on a bunch of used ones early this year and sold a few to members here for what I paid. I can spare another if you're interested for the same deal. Message me if interested. I feel invested in this build since following it. 😁

Dwyer RMA-151 Deal

Edit: Umm, I just realized you may not be in the U.S.

Not in the US, but would love to take you up on it if you are willing to ship a little bit further north to Canada?
 
Back
Top