
Welcome to ScapeCrunch
We are ScapeCrunch, the place where planted aquarium hobbyists come to build relationships and support each other. When you're tired of doom scrolling, you've found your home here.
Social Feed

Supporting
Hello folks!
This is my first journal on the forum though I've been active on TPT and some other venues online for a few years now. Having just found this place, it's the perfect time to post a journal on a tank I am just starting up!
I recently decided to consolidate 5 smaller tanks into one large tank. This gives me significantly more real estate to aquascape while simultaneously lowering my maintenance routine. I frankly much rather do one water change on a big tank then 5 much smaller water changes on different tanks, even if they are all in the same room.
When it came time to decide on which tank to use exactly, I was of two minds. On the one hand, a regular 75 gallon tank would likely do the trick, but the 'perfect' tank would be a 150cm tank as it would fit the available space. But a 150 cm tank would cost a lot more..... in the end The Wife gave a green light and I contacted "Aquarium and Terrarium Builder" of Yorktown Virginia, my only 'local' custom tank builder. The builder only works with acrylic, but for reasons that will be explained, that's not a bad thing.
Since this was a custom tank, I was not limited to standard dimensions and asked for a tank that would be 150cm x 50cm x 45cm. Or roughly 60 inches x 20 inches x 18 inches. Or roughly 90 gallons. Why these dimensions? Well the 150 for the length fit the available room. 20 inches wide because any wider and my short arms have trouble reaching the back wall, and 18 inches high in part for the same access issues and in part because I already had a tank 45 cm high and I knew the newts did fine in that depth of water.
The builder quoted me 1000 dollars for the tank and I would pick it up.
The first thing I needed to do after ordering the tank was build a stand so I would have somewhere to put the darn thing
At this point I don't remember what got me started on extruded aluminum, but I got a bug for making the stand out of the stuff. For those who are not aware, extruded aluminum is aluminum tubing with 't'-slots cut into it. It looks like this:

The advantage of this stuff is that you can use the t-slots to attach things, it's strong, it looks slick, and its waterproof. Even after building it, I still prefer a proper stand made of hardwood. BUT, an extruded aluminum stand is pretty easy to make better looking then a 2x4 stand. And significantly faster to build then a hardwood stand. So there is that.
Anyway, like all my bits of furniture, I make, the first step was making a 3d drawing in sketchup so I would know how to put the thing together. That looked like this:

The wood panels are meant to be doors in this picture.
I definitely did not invent this design as there are companies that offer to sell you precut and drilled extruded aluminum stands. The only reason I didn't go with them is expense. I wanted to try and save myself some money by buying the extruded aluminum and then cutting, tapping, and drilling it myself. I did this, and did save some money, just not as much as I was hoping. I thought I could do it all for around 300 dollars, but sadly the actual price of the stand all-in is closer to 700. That's still a lot cheaper then the 1500 to 2500 that various companies wanted, but not quite as good as I thought I was going to get for all the effort I put into tapping this darn critter.
Anyway, here are some pictures of the stand being built:


Not pictured here are the magnetic clasps the side panels are held onto. They are not pictured because I forgot to add them until after it was built. One of the downsides to extruded aluminum is that in order to access those t-slots where 'everything' is attached, is you need an exposed end. If you build the darn thing and forgot to add something in....like a magnetic clasp... then you get the joy of taking it apart before you can add it back on.
So that was fun. And because I forgot to add a few things I got the joy of taking it apart and putting it back together like 5 times...
Anyway, after a few weeks the builder contacted me letting me know the tank was ready!
There was much excitement.
There was also much driving. While this is my only 'local' builder, that didn't make him super close. It was 3.5 hours each way to get from my house in Maryland to the builder. That made for a long day of driving, but it was totally worth it.
One of the nice things about acrylic is that its significantly lighter then glass. This 5 foot long tank probably only weighs around 90 lbs. With a hand truck I was easily able to get the tank into my basement by myself. Here is how it looked when first arrived:

And here are what those magnetic clasps looked like on the stand:

And finally what the tank looked like unwrapped and in place:

The white board under the tank are two pieces of pvc trim-board. I wanted to use pvc because its completely waterproof. It's two pieces because I couldn't fit a 4x8 sheet in my car and home depot no longer cuts the stuff with their panel saw. I am still only mostly bitter on that discovery.
After that I started the process of taking down my multiple smaller tanks. In order to significantly shorten my cycle, I reused the substrate (all pool filter sand) and added it into the new tank. I also drilled 4 holes in the euro bracing so I could use 2 canister filters with lily pipes. Here is what that looked like:

Before I could slide the tank into place I needed to put on the background. I really like privacy window film for tank backgrounds. It's cheap, it looks good, it's easy to apply and to remove, and it's easy to get online. For this tank I decided on frosted white. This stuff goes on with just water and a squeegee. Here is how it looked:


After that I slid the tank into place, filled it and started working on the filters and plumbing. It's not very complicated but I wanted to make sure it would be in good shape for the foreseeable future. The canister filters are stainless steel filters with dc pumps. I love this type of filter because the steel filter itself is built like a tank, and the only part that can break is the pump which is entirely modular and easily replaced. DC pumps are ultra quiet, like you need to touch them to feel a vibration to even know they are on kind of quiet. I already owned both filters and they were in active use on the tanks I took down, so again, more reasons to believe the cycle would be quick.
I also took this time and began to play with aquascapes. Because I had so much room, I really wanted to use some big pieces of hardscape to show off the length of the tank. That ended up taking the form of two large pieces of wood that would stretch the length. Initial scape looked like this:

However, after a day I decided I didn't like the right hand side because it just didn't photograph well So I switched it up and settled on this:


I like the look of the 'broken' log in no small part because it reminded me of several scenes I have seen when out walking in parks. All the rock work will allow lots of places to add epiphytes as well.
All the plants in the tank are all from the existing tanks I took down so, so far I haven't spent anything on this except for the tank itself and the stand (and the light... to be talked about later).
The plant list for this tank is currently: Cryptocoryne spiralis, eriocaulon vietnam, amazon sword compacta, Cryptocoryne parva, tiger lily, anubias nana petite, and some species of fern like moss, and some species of plant I was told was 'like buce' but not, and that I totally forgot the name of. But its variegated which is cool for a completely submersed plant. Still to add is Marsilea Angustifolia for a carpet, Helvola Pygmy water lilies, and mayaca fluviatilis. Those are all in my 30 gallon tank with all my newts. I will be taking that tank down shortly and adding the newts once I'm sure the cycle is done (this will be soon, as the cycle is likely already completed as of the writing of this post).
Regarding the background, I didn't choose it entirely because I like the color white for this tank. I chose it because I planned to add some LED mood lighting to the tank
For a couple of years now I have admired the LED backgrounds you can buy for tanks, but I've not wanted to spend the money they cost (typically a few hundred dollars for even a small tank). So I decided to make my own. With an LED strip light adhered to the back top of the stand I got some nice effects! You can kind of notice the blue in the full tank shots near the bottom back of the tank. It's a little more noticeable in person. Here is a picture with the other lights off in the room which really makes it clear what it's doing:

Meanwhile I also started working on the lights for this tank. Well more specifically the light hanging system which is just 1/2" conduit attached to the wall:

That ended up definitely being the easiest light stand I've made so far. As for what will be going there? Well I went ahead and ordered a Twinstar V 1200S which I'm pretty excited about! I've been a twinstar fanboy for years, so when I figured out that there are very very very few 150cm lights... I decided my best bet was just buying a twinstar and hanging it up a bit higher then normal. Sadly it's not here yet. Happily it 'should' arrive on Wednesday.
AND.. that brings me to current. This is a LONG first post because I decided to combine several previous journal posts elsewhere to get me to where I'm at right now. Next time I will post more about the newts and my thoughts on acrylic tanks. Hopefully those that actually read to this point have enjoyed it so far
This is my first journal on the forum though I've been active on TPT and some other venues online for a few years now. Having just found this place, it's the perfect time to post a journal on a tank I am just starting up!
I recently decided to consolidate 5 smaller tanks into one large tank. This gives me significantly more real estate to aquascape while simultaneously lowering my maintenance routine. I frankly much rather do one water change on a big tank then 5 much smaller water changes on different tanks, even if they are all in the same room.
When it came time to decide on which tank to use exactly, I was of two minds. On the one hand, a regular 75 gallon tank would likely do the trick, but the 'perfect' tank would be a 150cm tank as it would fit the available space. But a 150 cm tank would cost a lot more..... in the end The Wife gave a green light and I contacted "Aquarium and Terrarium Builder" of Yorktown Virginia, my only 'local' custom tank builder. The builder only works with acrylic, but for reasons that will be explained, that's not a bad thing.
Since this was a custom tank, I was not limited to standard dimensions and asked for a tank that would be 150cm x 50cm x 45cm. Or roughly 60 inches x 20 inches x 18 inches. Or roughly 90 gallons. Why these dimensions? Well the 150 for the length fit the available room. 20 inches wide because any wider and my short arms have trouble reaching the back wall, and 18 inches high in part for the same access issues and in part because I already had a tank 45 cm high and I knew the newts did fine in that depth of water.
The builder quoted me 1000 dollars for the tank and I would pick it up.
The first thing I needed to do after ordering the tank was build a stand so I would have somewhere to put the darn thing
At this point I don't remember what got me started on extruded aluminum, but I got a bug for making the stand out of the stuff. For those who are not aware, extruded aluminum is aluminum tubing with 't'-slots cut into it. It looks like this:
The advantage of this stuff is that you can use the t-slots to attach things, it's strong, it looks slick, and its waterproof. Even after building it, I still prefer a proper stand made of hardwood. BUT, an extruded aluminum stand is pretty easy to make better looking then a 2x4 stand. And significantly faster to build then a hardwood stand. So there is that.
Anyway, like all my bits of furniture, I make, the first step was making a 3d drawing in sketchup so I would know how to put the thing together. That looked like this:
The wood panels are meant to be doors in this picture.
I definitely did not invent this design as there are companies that offer to sell you precut and drilled extruded aluminum stands. The only reason I didn't go with them is expense. I wanted to try and save myself some money by buying the extruded aluminum and then cutting, tapping, and drilling it myself. I did this, and did save some money, just not as much as I was hoping. I thought I could do it all for around 300 dollars, but sadly the actual price of the stand all-in is closer to 700. That's still a lot cheaper then the 1500 to 2500 that various companies wanted, but not quite as good as I thought I was going to get for all the effort I put into tapping this darn critter.
Anyway, here are some pictures of the stand being built:
Not pictured here are the magnetic clasps the side panels are held onto. They are not pictured because I forgot to add them until after it was built. One of the downsides to extruded aluminum is that in order to access those t-slots where 'everything' is attached, is you need an exposed end. If you build the darn thing and forgot to add something in....like a magnetic clasp... then you get the joy of taking it apart before you can add it back on.
So that was fun. And because I forgot to add a few things I got the joy of taking it apart and putting it back together like 5 times...
Anyway, after a few weeks the builder contacted me letting me know the tank was ready!
There was much excitement.
There was also much driving. While this is my only 'local' builder, that didn't make him super close. It was 3.5 hours each way to get from my house in Maryland to the builder. That made for a long day of driving, but it was totally worth it.
One of the nice things about acrylic is that its significantly lighter then glass. This 5 foot long tank probably only weighs around 90 lbs. With a hand truck I was easily able to get the tank into my basement by myself. Here is how it looked when first arrived:
And here are what those magnetic clasps looked like on the stand:
And finally what the tank looked like unwrapped and in place:
The white board under the tank are two pieces of pvc trim-board. I wanted to use pvc because its completely waterproof. It's two pieces because I couldn't fit a 4x8 sheet in my car and home depot no longer cuts the stuff with their panel saw. I am still only mostly bitter on that discovery.
After that I started the process of taking down my multiple smaller tanks. In order to significantly shorten my cycle, I reused the substrate (all pool filter sand) and added it into the new tank. I also drilled 4 holes in the euro bracing so I could use 2 canister filters with lily pipes. Here is what that looked like:
Before I could slide the tank into place I needed to put on the background. I really like privacy window film for tank backgrounds. It's cheap, it looks good, it's easy to apply and to remove, and it's easy to get online. For this tank I decided on frosted white. This stuff goes on with just water and a squeegee. Here is how it looked:
After that I slid the tank into place, filled it and started working on the filters and plumbing. It's not very complicated but I wanted to make sure it would be in good shape for the foreseeable future. The canister filters are stainless steel filters with dc pumps. I love this type of filter because the steel filter itself is built like a tank, and the only part that can break is the pump which is entirely modular and easily replaced. DC pumps are ultra quiet, like you need to touch them to feel a vibration to even know they are on kind of quiet. I already owned both filters and they were in active use on the tanks I took down, so again, more reasons to believe the cycle would be quick.
I also took this time and began to play with aquascapes. Because I had so much room, I really wanted to use some big pieces of hardscape to show off the length of the tank. That ended up taking the form of two large pieces of wood that would stretch the length. Initial scape looked like this:
However, after a day I decided I didn't like the right hand side because it just didn't photograph well
So I switched it up and settled on this:
I like the look of the 'broken' log in no small part because it reminded me of several scenes I have seen when out walking in parks. All the rock work will allow lots of places to add epiphytes as well.
All the plants in the tank are all from the existing tanks I took down so, so far I haven't spent anything on this except for the tank itself and the stand (and the light... to be talked about later).
The plant list for this tank is currently: Cryptocoryne spiralis, eriocaulon vietnam, amazon sword compacta, Cryptocoryne parva, tiger lily, anubias nana petite, and some species of fern like moss, and some species of plant I was told was 'like buce' but not, and that I totally forgot the name of. But its variegated which is cool for a completely submersed plant. Still to add is Marsilea Angustifolia for a carpet, Helvola Pygmy water lilies, and mayaca fluviatilis. Those are all in my 30 gallon tank with all my newts. I will be taking that tank down shortly and adding the newts once I'm sure the cycle is done (this will be soon, as the cycle is likely already completed as of the writing of this post).
Regarding the background, I didn't choose it entirely because I like the color white for this tank. I chose it because I planned to add some LED mood lighting to the tank
For a couple of years now I have admired the LED backgrounds you can buy for tanks, but I've not wanted to spend the money they cost (typically a few hundred dollars for even a small tank). So I decided to make my own. With an LED strip light adhered to the back top of the stand I got some nice effects! You can kind of notice the blue in the full tank shots near the bottom back of the tank. It's a little more noticeable in person. Here is a picture with the other lights off in the room which really makes it clear what it's doing:
Meanwhile I also started working on the lights for this tank. Well more specifically the light hanging system which is just 1/2" conduit attached to the wall:
That ended up definitely being the easiest light stand I've made so far. As for what will be going there? Well I went ahead and ordered a Twinstar V 1200S which I'm pretty excited about! I've been a twinstar fanboy for years, so when I figured out that there are very very very few 150cm lights... I decided my best bet was just buying a twinstar and hanging it up a bit higher then normal. Sadly it's not here yet. Happily it 'should' arrive on Wednesday.
AND.. that brings me to current. This is a LONG first post because I decided to combine several previous journal posts elsewhere to get me to where I'm at right now. Next time I will post more about the newts and my thoughts on acrylic tanks. Hopefully those that actually read to this point have enjoyed it so far
25 Replies
·
2066 views


Supporting
Expert in Residence
Rockstar
Article Contributor
This thread is for the general discussion of the Article Yugang CO2 Reactor - A Guide. Please add to the discussion here.
15 Replies
·
929 views


Rockstar
Journal Ben's Plant Pharm 2.0
I am working on my mistakes…. The next one will be huge.
Instead of continuing the old build thread, I wanted to make a new one. This build might go just as terrible, but I want to put the old one behind me. I really wish I had given myself a month or two break because I feel like I have algae PTSD. I’m pretty burned out, and I sort of dread trying again. Oh well, too late now.
I wanted to try 2Hr Aquarist stuff, but already had the Controlsoil. I bought it a year prior (see previous journal) and decided to go ahead and use it. Hopefully I’ll make a successful transition to nutrient depleted aquasoil, and then restart with the 2Hr stuff later.
I didn't plan on starting a new journal until about a month in, but since my aquasoil is already starting to give out of ammonia, I need to get it going to get help making the transition to full NPK dosing.
With that said…..
Ben’s Plant Pharm 2.0
(BTW, in case you were wondering, I’m a pharmacist. Hence the pharm)
Setup Date
8-11-25 (Day 0)
Goals
Enjoying some farming.
Successfully navigate the different stages of aqusoil nutrient release and subsequent depletion.
Tank
ADA 60p
Light
Chihiros WRGB Pro II
Starting out at 40% of the Fish setting
Red 53, Blue 34, Green 55, White 23
PAR 105 under the light (estimated)
Substrate
UNS Extra Fine Black 1 x 10L bag
Plants
From Previous Build
Xiris Red from S21 Aquatics
Eriocaulon quinguangulare from Cherries Nature Aquarium
TC plants from Buce Plant
Cryptocoryne parva, Pogostemon helferi, Rotala Sunset
Came in in questionable shape despite paying extra for insulated box. Were very jumbled.
TC from The Fish Room
Alternanthera reineckii ‘Mini’, Rotala macrandra, Gratiola viscidula, Rotala wallichi, Lobelia Cardinalis ‘Mini’
From S21 Aquatics
Synogonthas Vichada, Centrolepis drummondiana (Blood Vomit)
From Aquatic Plants Factory
Pogostemon stellatus Dassen and Rotala Florida? (TBD)
Fertilizer
Micros: Burr Aquatic Trace (BurrFertz)
Macros: DIY- dosages to be determined
PO, K, Mg at the beginning. Been adding about 2-3ppm PO4 daily
Transition to the addition of NO3 as aquasoil depletes
Filter
Oase HOB BioStyle
CO2
Injected via GLA regulator
Bar type diffuser placed inside the HOB filter
Livestock
None
Notes
Day 0


Day 1

Week 1

Week 2

Week 3


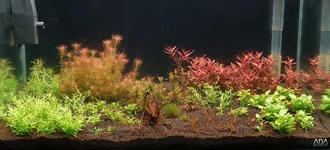
Here you can see the older Rotala Sunset on the left. On the right is supposed to be Rotala Florida, but it is looking a lot like the Sunset did at the same stage. Argh!

Pogostemon stellatas Dassen changing from emersed to submersed form

Syn Vichada is doing pretty good. It is growing slow. The new growth is all green and the old growth is dying off. I want to cut old leaves and clean it up a little, but right now, I don't really want to disturb it. I watch it every minute. I loving having it.

Instead of continuing the old build thread, I wanted to make a new one. This build might go just as terrible, but I want to put the old one behind me. I really wish I had given myself a month or two break because I feel like I have algae PTSD. I’m pretty burned out, and I sort of dread trying again. Oh well, too late now.
I wanted to try 2Hr Aquarist stuff, but already had the Controlsoil. I bought it a year prior (see previous journal) and decided to go ahead and use it. Hopefully I’ll make a successful transition to nutrient depleted aquasoil, and then restart with the 2Hr stuff later.
I didn't plan on starting a new journal until about a month in, but since my aquasoil is already starting to give out of ammonia, I need to get it going to get help making the transition to full NPK dosing.
With that said…..
Ben’s Plant Pharm 2.0
(BTW, in case you were wondering, I’m a pharmacist. Hence the pharm)
Setup Date
8-11-25 (Day 0)
Goals
Enjoying some farming.
Successfully navigate the different stages of aqusoil nutrient release and subsequent depletion.
Tank
ADA 60p
Light
Chihiros WRGB Pro II
Starting out at 40% of the Fish setting
Red 53, Blue 34, Green 55, White 23
PAR 105 under the light (estimated)
Substrate
UNS Extra Fine Black 1 x 10L bag
Plants
From Previous Build
Xiris Red from S21 Aquatics
Eriocaulon quinguangulare from Cherries Nature Aquarium
TC plants from Buce Plant
Cryptocoryne parva, Pogostemon helferi, Rotala Sunset
Came in in questionable shape despite paying extra for insulated box. Were very jumbled.
TC from The Fish Room
Alternanthera reineckii ‘Mini’, Rotala macrandra, Gratiola viscidula, Rotala wallichi, Lobelia Cardinalis ‘Mini’
From S21 Aquatics
Synogonthas Vichada, Centrolepis drummondiana (Blood Vomit)
From Aquatic Plants Factory
Pogostemon stellatus Dassen and Rotala Florida? (TBD)
Fertilizer
Micros: Burr Aquatic Trace (BurrFertz)
Macros: DIY- dosages to be determined
PO, K, Mg at the beginning. Been adding about 2-3ppm PO4 daily
Transition to the addition of NO3 as aquasoil depletes
Filter
Oase HOB BioStyle
CO2
Injected via GLA regulator
Bar type diffuser placed inside the HOB filter
Livestock
None
Notes
- The Alternanthera reineckii ‘Mini’ was in bad shape when I opened the container. Might have been bad when I got it and then it was a week before I used it.
- 8-15-25: Added Synogonthas Vichada and Blood Vomit. Checked NO3 for the first time. It was 40. Started making twice weekly water changes.
- 8-18-25: Increased light to 45% of the full “Fish” setting. PAR should be just about 114
- 8-23-25: Pogostemon stellatus Dassen and Rotala Florida added
- 8-29-25: Discovered my NO3 was 0. Aquasoil is giving out way earlier than I expected
- Had a short diatom period, but it seems to be resolving
- I had planned to increase my light to 50% of full "Fish" setting which would be a (tested) PAR of 126, but right now, things are going so good, I don't want to mess it up. We'll hold off for now.
- 8-31-25: Starting to dose my own mixture of NPK and Mg. I really need to determine my actual water volume. What I am trying to dose, and what it tests as after I dose it are a good bit off.
Day 0
Day 1
Week 1
Week 2
Week 3
Here you can see the older Rotala Sunset on the left. On the right is supposed to be Rotala Florida, but it is looking a lot like the Sunset did at the same stage. Argh!
Pogostemon stellatas Dassen changing from emersed to submersed form
Syn Vichada is doing pretty good. It is growing slow. The new growth is all green and the old growth is dying off. I want to cut old leaves and clean it up a little, but right now, I don't really want to disturb it. I watch it every minute. I loving having it.
162 Replies
·
12315 views

Supporting
I Donated 2026
Rockstar
I'll talk more about this in the coming weeks when I update my garden tank journal but wanted to get this out here.
Maybe I've been lucky up to this point, or maybe it's related to this being my first go at an inert substrate tank and new ferts, but as the title says, I'm dealing with my first algae bloom. I was already dealing with some spot algae on some of the plants and realized I might be driving the light a bit hard for a new tank with freshly rehomed plants getting used to the new conditions. I turned the par down a week ago to adjust. I also started out driving the CO2 rather hard until I just recently got it dialed down to around 30ppm which also occurred in the last week but the spot algae was already there before dialing it back.
I began noticing the water getting cloudier over the last few days which was a surprise since my other tanks were always crystal clear from the start. Even though this is a BDBS tank, I did run a short dark start while it cycled. It was short because I seeded the tank with other filter material and even had trays of cycled biomedia from other tanks. When I planted after a few weeks, parameters were good. Other than the lighting perhaps being too high, I also likely messed up by not being a little more aggressive on water changes early on. I just stuck to weekly 50-70 percent change like my other established tanks.
Some of the plants are still struggling to get established so I'm not too keen on doing a blackout. I'm considering investing in a UV sterilizer that I can set up as a temporary option on this and future tanks for just this issue. I'm kicking myself now for not taking advantage of some great marketplace deals on a couple used high-end sterilizers but that's life. So the question to the group, since I know some of you use them, what recommendations do you have for a reasonably priced sterilizer that's not too big but can get the job done on a tank of 50 to 75 gallons. I'm considering this unit: Aqua UV 15 watt advantage 2000 or perhaps the 8w version of it. I would likely set up a separate pump and pipes just for flow through the sterilizer ( although this unit hangs on the tank and therefore doesn't require out outlet pipe).
Maybe I've been lucky up to this point, or maybe it's related to this being my first go at an inert substrate tank and new ferts, but as the title says, I'm dealing with my first algae bloom. I was already dealing with some spot algae on some of the plants and realized I might be driving the light a bit hard for a new tank with freshly rehomed plants getting used to the new conditions. I turned the par down a week ago to adjust. I also started out driving the CO2 rather hard until I just recently got it dialed down to around 30ppm which also occurred in the last week but the spot algae was already there before dialing it back.
I began noticing the water getting cloudier over the last few days which was a surprise since my other tanks were always crystal clear from the start. Even though this is a BDBS tank, I did run a short dark start while it cycled. It was short because I seeded the tank with other filter material and even had trays of cycled biomedia from other tanks. When I planted after a few weeks, parameters were good. Other than the lighting perhaps being too high, I also likely messed up by not being a little more aggressive on water changes early on. I just stuck to weekly 50-70 percent change like my other established tanks.
Some of the plants are still struggling to get established so I'm not too keen on doing a blackout. I'm considering investing in a UV sterilizer that I can set up as a temporary option on this and future tanks for just this issue. I'm kicking myself now for not taking advantage of some great marketplace deals on a couple used high-end sterilizers but that's life. So the question to the group, since I know some of you use them, what recommendations do you have for a reasonably priced sterilizer that's not too big but can get the job done on a tank of 50 to 75 gallons. I'm considering this unit: Aqua UV 15 watt advantage 2000 or perhaps the 8w version of it. I would likely set up a separate pump and pipes just for flow through the sterilizer ( although this unit hangs on the tank and therefore doesn't require out outlet pipe).
3 Replies
·
33 views

Rockstar
Journal 22 gallon long bookshelf
Time to start a new thread.
I’ll fill in some details later, but I’m working on the hardscape now. Any and all criticism is appreciated. The vision is nothing more, and nothing less, than something appealing to the eye.
90cm x 30cm x 30cm Lifegard Aquatics ultra clear bookshelf tank. Buce and anubias on the hardscape, stems towards the back and center, mid to front carpet with some changes in shade and texture down to a flat grade on the right side of the tank.
Lily pipe inlet and skimmer will be in the back left corner with the outflow in the front left to hopefully achieve circular flow. I’ll be running an in-line diffuser. Light will be the P600 Pro that I regrettably did not upside to 900. Oh well. I’ll mount it high and hopefully it’ll have enough spread.
I have some dragon stone and red lava rock rubble I’ll use at the base to blend into the substrate, as well as some stratum I may or may not cap with.


I’ll fill in some details later, but I’m working on the hardscape now. Any and all criticism is appreciated. The vision is nothing more, and nothing less, than something appealing to the eye.
90cm x 30cm x 30cm Lifegard Aquatics ultra clear bookshelf tank. Buce and anubias on the hardscape, stems towards the back and center, mid to front carpet with some changes in shade and texture down to a flat grade on the right side of the tank.
Lily pipe inlet and skimmer will be in the back left corner with the outflow in the front left to hopefully achieve circular flow. I’ll be running an in-line diffuser. Light will be the P600 Pro that I regrettably did not upside to 900. Oh well. I’ll mount it high and hopefully it’ll have enough spread.
I have some dragon stone and red lava rock rubble I’ll use at the base to blend into the substrate, as well as some stratum I may or may not cap with.
264 Replies
·
27881 views

Sponsor
Expert in Residence
Rockstar
Journal Dutchy Deeds Done Dirt Cheap
Well... thats it! Im tired of watching you guys have all the fun so figured it was time to start my own journal to document this new scape Im working on, and also to talk about other plant happenings. So here goes
For this year's AGA Id been planning on using the 75P again. Love the dimensions, 30"x18"18" about 37 gal. Its in the living room along with the 75 gal ex-Dutch.
I try to keep these two a little more display-worthy than the back room back tanks but it doesnt always happen. Here's the 75p currently. Plants closed up its the middle of the night, I just flipped two bulbs on to take a quick pic
Ive been tossing some ideas around but it nothing has really inspired me lately

So I decided to try a couple things in the 75 gal and see if the almighty elusive muse will show up
I rarely have a plan going in, usually just an idea or two like maybe a street or focal points, and from there I just start sticking things around and see how it looks. Usually with just whatever plants I have enough of, even stuff that I know I wont end up using just to plot out general areas and color
So here we go starting about two months ago, with basically two streets and a focal point. Pics are 3-4 weeks apart. I'll spare you the details of every little plant move, basically just adding/moving stuff around between then and now
*ignore the weird color filter on these first few pics

Couple weeks later

Trying to find a place to use this dynamite Blyxa sp Red. Not to be confused with the "sp Red" currently being offered by a couple larger retailers. Those are likely to be other aubertii variants that may or may not actually turn red. A good rule of thumb for blyxa (since most cant grow emersed) is if it aint red when you buy it, dont count on it turning red. This one is like a tall Novoguineensis, tops out around 12"-14" with good vertical leaf formation, and stays red under most light

Added Ludwigia white to the front right corner

Dont like the Blyxa in the focal spot either. It'd need a bright green behind it, which would make all the other background groups need repositioning based on color. Plus the Blyxa is too tall for what Im trying to do here, I want this focal spot low in the tank, not high
**Continued next post, image limit reached
For this year's AGA Id been planning on using the 75P again. Love the dimensions, 30"x18"18" about 37 gal. Its in the living room along with the 75 gal ex-Dutch.
I try to keep these two a little more display-worthy than the back room back tanks but it doesnt always happen. Here's the 75p currently. Plants closed up its the middle of the night, I just flipped two bulbs on to take a quick pic
Ive been tossing some ideas around but it nothing has really inspired me lately
So I decided to try a couple things in the 75 gal and see if the almighty elusive muse will show up
I rarely have a plan going in, usually just an idea or two like maybe a street or focal points, and from there I just start sticking things around and see how it looks. Usually with just whatever plants I have enough of, even stuff that I know I wont end up using just to plot out general areas and color
So here we go starting about two months ago, with basically two streets and a focal point. Pics are 3-4 weeks apart. I'll spare you the details of every little plant move, basically just adding/moving stuff around between then and now
*ignore the weird color filter on these first few pics
Couple weeks later
Trying to find a place to use this dynamite Blyxa sp Red. Not to be confused with the "sp Red" currently being offered by a couple larger retailers. Those are likely to be other aubertii variants that may or may not actually turn red. A good rule of thumb for blyxa (since most cant grow emersed) is if it aint red when you buy it, dont count on it turning red. This one is like a tall Novoguineensis, tops out around 12"-14" with good vertical leaf formation, and stays red under most light
Added Ludwigia white to the front right corner
Dont like the Blyxa in the focal spot either. It'd need a bright green behind it, which would make all the other background groups need repositioning based on color. Plus the Blyxa is too tall for what Im trying to do here, I want this focal spot low in the tank, not high
**Continued next post, image limit reached
217 Replies
·
23618 views

Supporting
I Donated 2026
AquaGirls
Journal UNS 150U - Nature Aquarium
The adventure begins...again. After a substantial absence from the hobby, I dunked my toe back in last fall with a small 60F shrimp tank, a Chihiros WRGB slim, and a Chihiros CO2 (citric/baking soda) system. A lot has changed since I started this hobby in the 90s, and it's been about 20 years since I tore my last tank down. 'Aquascaping' per se wasn't as much a thing back then. I didn't know anyone running CO2, and LED lights didn't really exist. The 60F was fun, and the shrimp seem happy, but I have been itching to get to building something with more elbow room.
I did happen to find a pic of my old 75 gallon bowfront tank a few weeks ago that was taken just before I tore it down prior to a big move. It ran great for 7 years. Was a simple low tech setup, with one hunk of driftwood, no rocks, plain gravel (no soil) a lot of simple plants (the sword plants did great), and some peaceful fish. Algae wasn't an issue, filtration was pretty subpar by current standards, but the tank did well despite that, and algae wasn't really an issue. Aesthetically blah by today's standards, and certainly not my goal for this build, but I remember being proud of how well this tank ran back then, and wasn't too demanding. Important as my life was very hectic back then.

So, the tech plan so far for the new 150U:
I ordered the tank and stand from UNS, and to my amazement, despite the worst mid-January winter storm we had in some years here, it was delivered on time by the freight company. I do not recommend trying to move a 5ft wide 400+lb tank and stand across snow and ice, down a slope, into to basement. Very thankful to have a tractor with forks, but still was a bit stressful getting this into the house. Miraculously we got it in the house in one piece, and I seriously questioned ever getting a tank larger than this in the future!

It did require disassembly outside the basement door to actually get it into the house around a berm of snow, along with some extra muscle from a few friends. (This was originally meant to be a 120P, until I realized the hardscape plan I had wouldn't quite fit. What's a another foot in length? )
)

Just getting the tank through the snow and ice was enough, and the base cabinet and tank just sort of landed in the room, and stayed there for a few days while devising a strategy for the next step. After recruiting a tall and strong friend, and sourcing some of those giant suction cup handles you use for moving shower glass walls, a few days later the tank was finally hoisted up onto the base.
As there is a dropped ceiling in the basement my plan was to hang the lights directly above the tank from the ceiling, rather than using a light stand. A few tiles were removed to investigate the structure above, and with some 2x4 extra bracing for the anchors, as none of the joists were in quite the right spot, two Chihiros Vivid 3 lights were installed directly above the tank. At this point I discovered that none of the electrical circuits in the basement were GFCI protected, so obviously that was immediately remedied. Too much gear and too much water to mess around with unprotected circuits.

With the ceiling open, I decided to run the lighting cables over the top of the wall to the left of the tank, and down into the mechanicals room there. The advantage being that the power cords are hidden from view after going through the ceiling tiles, and it's two less large power sources cluttering up the cabinet under the tank. Had to add an outlet in that closet, but I like how it turned out.
With the tank in position and leveled, and the lights finally installed, the next big issue is water. The well water here is liquid limestone. That was the initial mistake I made with the shrimp tank. Sure, neocaridina like hard water, but not THAT hard, and I quickly had to shift to remineralized distilled. I knew before even getting serious about planning this tank that the only reasonable option, for any future tanks here, is RO. The well water might be fine for Malawi Cichlids, but that's not my plan for this tank, but it will be great to have flexibility going forward. It's a big glass box, at just over 140 gallons, and it won't be the only one here (I hope), so the water part I want to get right from the start, and to make it easy to do water changes. The basement is a walkout, so draining water during water changes will be easy, and I would like to make filling it just as easy. I sourced two 70 gallon storage tanks for the RO water from Northern Tool, and ordered a Vectra S2 pump which will help with transfering water between tanks, as well as pumping it out through a hose to the aquarium(s) during water changes. Forgot to take a pic when I was done, but the pvc is all glued up now. I will finish installing the RO unit this weekend.

So, aquarium set up, lights in, and RO system with storage in progress. Next up? The exciting part. Hardscape! I have been hoarding Manzanita, Hakkai stone, and substrate for several months, so I'm excited to move on to the next step! Tank so far pictured below (although I have already removed the privacy film on the back in favor of adding the ARC RGB light screen in part due to the stair rail being visible and distracting. First screen was damaged in transit, so waiting on a replacement).

I did happen to find a pic of my old 75 gallon bowfront tank a few weeks ago that was taken just before I tore it down prior to a big move. It ran great for 7 years. Was a simple low tech setup, with one hunk of driftwood, no rocks, plain gravel (no soil) a lot of simple plants (the sword plants did great), and some peaceful fish. Algae wasn't an issue, filtration was pretty subpar by current standards, but the tank did well despite that, and algae wasn't really an issue. Aesthetically blah by today's standards, and certainly not my goal for this build, but I remember being proud of how well this tank ran back then, and wasn't too demanding. Important as my life was very hectic back then.
So, the tech plan so far for the new 150U:
| UNS 150U Tank & Stand |
| Chihiros Vivid 3 x2 |
| Chihirios Vivid 3 Shades x2 |
| GLA PRO-DS-1 Dual Stage CO2 System (Modular) |
| Chihiros Auto Dosing System (4 doser) |
| Chihiros Dosing Flow Adapter |
| Oase Biomaster 2 Thermo 600 |
| Oase Biomaster 2 Thermo 850 |
| ARC RBG Backlight Screen |
| ARC Stainless Yugang CO2 Reactor (Large) |
I ordered the tank and stand from UNS, and to my amazement, despite the worst mid-January winter storm we had in some years here, it was delivered on time by the freight company. I do not recommend trying to move a 5ft wide 400+lb tank and stand across snow and ice, down a slope, into to basement. Very thankful to have a tractor with forks, but still was a bit stressful getting this into the house. Miraculously we got it in the house in one piece, and I seriously questioned ever getting a tank larger than this in the future!
It did require disassembly outside the basement door to actually get it into the house around a berm of snow, along with some extra muscle from a few friends. (This was originally meant to be a 120P, until I realized the hardscape plan I had wouldn't quite fit. What's a another foot in length?
)Just getting the tank through the snow and ice was enough, and the base cabinet and tank just sort of landed in the room, and stayed there for a few days while devising a strategy for the next step. After recruiting a tall and strong friend, and sourcing some of those giant suction cup handles you use for moving shower glass walls, a few days later the tank was finally hoisted up onto the base.
As there is a dropped ceiling in the basement my plan was to hang the lights directly above the tank from the ceiling, rather than using a light stand. A few tiles were removed to investigate the structure above, and with some 2x4 extra bracing for the anchors, as none of the joists were in quite the right spot, two Chihiros Vivid 3 lights were installed directly above the tank. At this point I discovered that none of the electrical circuits in the basement were GFCI protected, so obviously that was immediately remedied. Too much gear and too much water to mess around with unprotected circuits.
With the ceiling open, I decided to run the lighting cables over the top of the wall to the left of the tank, and down into the mechanicals room there. The advantage being that the power cords are hidden from view after going through the ceiling tiles, and it's two less large power sources cluttering up the cabinet under the tank. Had to add an outlet in that closet, but I like how it turned out.
With the tank in position and leveled, and the lights finally installed, the next big issue is water. The well water here is liquid limestone. That was the initial mistake I made with the shrimp tank. Sure, neocaridina like hard water, but not THAT hard, and I quickly had to shift to remineralized distilled. I knew before even getting serious about planning this tank that the only reasonable option, for any future tanks here, is RO. The well water might be fine for Malawi Cichlids, but that's not my plan for this tank, but it will be great to have flexibility going forward. It's a big glass box, at just over 140 gallons, and it won't be the only one here (I hope), so the water part I want to get right from the start, and to make it easy to do water changes. The basement is a walkout, so draining water during water changes will be easy, and I would like to make filling it just as easy. I sourced two 70 gallon storage tanks for the RO water from Northern Tool, and ordered a Vectra S2 pump which will help with transfering water between tanks, as well as pumping it out through a hose to the aquarium(s) during water changes. Forgot to take a pic when I was done, but the pvc is all glued up now. I will finish installing the RO unit this weekend.
So, aquarium set up, lights in, and RO system with storage in progress. Next up? The exciting part. Hardscape! I have been hoarding Manzanita, Hakkai stone, and substrate for several months, so I'm excited to move on to the next step! Tank so far pictured below (although I have already removed the privacy film on the back in favor of adding the ARC RGB light screen in part due to the stair rail being visible and distracting. First screen was damaged in transit, so waiting on a replacement).

109 Replies
·
8123 views

Hello everybody im opening this topic since i cant get rid of the algae and im getting a little tired of it
I have a Juwel Rio 350 liter
3x onex daytime 2x colour 1x plant
At 100% 186 par at the bottom (tank is 66cm high)
I have a 1.5 hour build up and 1.5 hour build off 5 hours full light (90% atm because of the algae)
I moved the timing a little earlier yesterday since i tought it may be on to late (22:00) and not getting enough fully darkness for the plants to recover so it goes out now at 20:00
My co2 goes on 2.5 hour before lights go on and half an hour before lights go out
Ph drop of 1.4-1.5 (dropchecker 30mg/l limegreen/yellow)
Filtration: tetra ex 1500, oase biomaster 750 thermo (both with a spraybar creating a roll over), eheim skim 350 and a marine 6000 wavemaker that goes on every hour for 5 minutes (from 12:00-20:00) to distribute loose dirt so the filters will suck it up and keep the plants more clean
Waterchange 50% a week on monday with only RO. Apt sky to a gh of 8
For fertz i use Apt E dosing 6ml a day (keeping the no3 stable trough the whole week from the strategy of Dennis)
I have tried higher dosing aiming at 20mg/l no3 to now leaner dosing.
My plants are not super healthy. The fast growing stems have healthy tops but bad old growth. Even when replanting the healthy parts they turn out the same way.
They are also not as deep red as they should be with 186 par and look like they lack light in the bottom of the tank. My theory is that the 66cm depth is filtering a lot of the spectrum especially red.
The soil is now 3 months in the tank and is 4 months matured if you include priming the soil in a big bucket for bacteries (darkstart)
I had algae before the soil change and still have it now. I tought the soil would be the cause.
I dont know what else i should try or what could be the problem
Thanks in advance for your help and reading this big text
I have a Juwel Rio 350 liter
3x onex daytime 2x colour 1x plant
At 100% 186 par at the bottom (tank is 66cm high)
I have a 1.5 hour build up and 1.5 hour build off 5 hours full light (90% atm because of the algae)
I moved the timing a little earlier yesterday since i tought it may be on to late (22:00) and not getting enough fully darkness for the plants to recover so it goes out now at 20:00
My co2 goes on 2.5 hour before lights go on and half an hour before lights go out
Ph drop of 1.4-1.5 (dropchecker 30mg/l limegreen/yellow)
Filtration: tetra ex 1500, oase biomaster 750 thermo (both with a spraybar creating a roll over), eheim skim 350 and a marine 6000 wavemaker that goes on every hour for 5 minutes (from 12:00-20:00) to distribute loose dirt so the filters will suck it up and keep the plants more clean
Waterchange 50% a week on monday with only RO. Apt sky to a gh of 8
For fertz i use Apt E dosing 6ml a day (keeping the no3 stable trough the whole week from the strategy of Dennis)
I have tried higher dosing aiming at 20mg/l no3 to now leaner dosing.
My plants are not super healthy. The fast growing stems have healthy tops but bad old growth. Even when replanting the healthy parts they turn out the same way.
They are also not as deep red as they should be with 186 par and look like they lack light in the bottom of the tank. My theory is that the 66cm depth is filtering a lot of the spectrum especially red.
The soil is now 3 months in the tank and is 4 months matured if you include priming the soil in a big bucket for bacteries (darkstart)
I had algae before the soil change and still have it now. I tought the soil would be the cause.
I dont know what else i should try or what could be the problem
Thanks in advance for your help and reading this big text


40 Replies
·
1014 views
Rockstar
I’m often out and about working in the field and stumble upon breathtaking examples of often overlooked and under appreciated slices of nature that Florida has to offer.
My neck of the woods is filled with marsh/wetlands ripe with both native and invasive wildlife of all flavors; I want to start a thread where I can document and share.
I’ll update this thread whenever I capture something noteworthy. Much of what catches my eye is aquatic flora, but I try and document anything captivating. I hope you find this as beautiful and fascinating as I do.


My neck of the woods is filled with marsh/wetlands ripe with both native and invasive wildlife of all flavors; I want to start a thread where I can document and share.
I’ll update this thread whenever I capture something noteworthy. Much of what catches my eye is aquatic flora, but I try and document anything captivating. I hope you find this as beautiful and fascinating as I do.
129 Replies
·
8612 views
Rockstar
Since the tanks have been in such a state of disarray, I’ve been focusing on moving everything to emersed until life sorts itself out.
How I transition from submersed to emersed depends on the growth form of the plant.
Plants that are primarily basal form (not stems) go in square nursery pots with one of two substrates. First choice is long fiber sphagnum (dried and then rehydrated) topped with aquasoil, straight aquasoil, or a mix of peat moss/perlite/coco coir/aquasoil. The sphagnum wicks better than aquasoil. Alternatively, I use straight aquasoil, I line the bottom of the pots with a coffee filter to keep the substrate from falling through. Both work equally well. The bin needs to be filled with a little more water than if dried sphagnum is used which is why the first method is preferable.
The nursery pots are kept in a clear plastic container. Sterilite are the typical go-to, but I actually prefer the tall clear shoe boxes from Walmart. They have built in ventilation holes which is handy because I need to drill holes in the sides of any other container near the lid rim. Ventilation is key.
The shoe boxes are cheap too. I fill the bins as much as possible but a little leftover space is okay.
After filling the bins with pots, I fill all the voids with live sphagnum and fill with enough distilled water to saturate the sphagnum. The sphagnum has antimicrobial properties (so I’ve read, and it seems to check out in practice). This keeps the water from developing algae almost entirely. I dress the tops with live sphagnum too if something needs a little help rooting. Depending on the space, I throw rhizome plants right into the sphagnum as well. They develop excellent root systems and are very easily removed and cleaned when needed compared to conventional soil.
I fertilize everything with a foliar spray of Maxsea 16-16-16 diluted to 1 teaspoon per gallon. It’s a kelp based fertilizer with micronutrients. I highly recommend it.
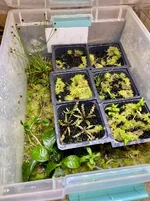
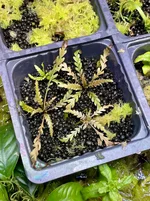
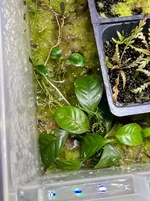
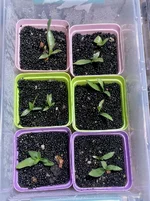
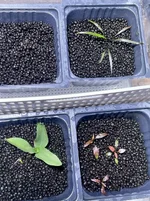
I’ll follow up with emersed stem plant propogation and other methods for the full greenhouse.
How I transition from submersed to emersed depends on the growth form of the plant.
Plants that are primarily basal form (not stems) go in square nursery pots with one of two substrates. First choice is long fiber sphagnum (dried and then rehydrated) topped with aquasoil, straight aquasoil, or a mix of peat moss/perlite/coco coir/aquasoil. The sphagnum wicks better than aquasoil. Alternatively, I use straight aquasoil, I line the bottom of the pots with a coffee filter to keep the substrate from falling through. Both work equally well. The bin needs to be filled with a little more water than if dried sphagnum is used which is why the first method is preferable.
The nursery pots are kept in a clear plastic container. Sterilite are the typical go-to, but I actually prefer the tall clear shoe boxes from Walmart. They have built in ventilation holes which is handy because I need to drill holes in the sides of any other container near the lid rim. Ventilation is key.
The shoe boxes are cheap too. I fill the bins as much as possible but a little leftover space is okay.
After filling the bins with pots, I fill all the voids with live sphagnum and fill with enough distilled water to saturate the sphagnum. The sphagnum has antimicrobial properties (so I’ve read, and it seems to check out in practice). This keeps the water from developing algae almost entirely. I dress the tops with live sphagnum too if something needs a little help rooting. Depending on the space, I throw rhizome plants right into the sphagnum as well. They develop excellent root systems and are very easily removed and cleaned when needed compared to conventional soil.
I fertilize everything with a foliar spray of Maxsea 16-16-16 diluted to 1 teaspoon per gallon. It’s a kelp based fertilizer with micronutrients. I highly recommend it.
I’ll follow up with emersed stem plant propogation and other methods for the full greenhouse.
10 Replies
·
562 views


Supporting
I Donated 2026
I’ve recently become aware of some opportunities to (supposedly) buy beautiful clumps of Buce from suppliers in Indonesia. Do any of the scapecrunchers have any knowledge/lessons learned to share on this topic?
38 Replies
·
397 views