
Welcome to ScapeCrunch
We are ScapeCrunch, the place where planted aquarium hobbyists come to build relationships and support each other. When you're tired of doom scrolling, you've found your home here.
Social Feed

Supporting
I Donated 2026
AquaGirls
Journal UNS 150U - Nature Aquarium
The adventure begins...again. After a substantial absence from the hobby, I dunked my toe back in last fall with a small 60F shrimp tank, a Chihiros WRGB slim, and a Chihiros CO2 (citric/baking soda) system. A lot has changed since I started this hobby in the 90s, and it's been about 20 years since I tore my last tank down. 'Aquascaping' per se wasn't as much a thing back then. I didn't know anyone running CO2, and LED lights didn't really exist. The 60F was fun, and the shrimp seem happy, but I have been itching to get to building something with more elbow room.
I did happen to find a pic of my old 75 gallon bowfront tank a few weeks ago that was taken just before I tore it down prior to a big move. It ran great for 7 years. Was a simple low tech setup, with one hunk of driftwood, no rocks, plain gravel (no soil) a lot of simple plants (the sword plants did great), and some peaceful fish. Algae wasn't an issue, filtration was pretty subpar by current standards, but the tank did well despite that, and algae wasn't really an issue. Aesthetically blah by today's standards, and certainly not my goal for this build, but I remember being proud of how well this tank ran back then, and wasn't too demanding. Important as my life was very hectic back then.

So, the tech plan so far for the new 150U:
I ordered the tank and stand from UNS, and to my amazement, despite the worst mid-January winter storm we had in some years here, it was delivered on time by the freight company. I do not recommend trying to move a 5ft wide 400+lb tank and stand across snow and ice, down a slope, into to basement. Very thankful to have a tractor with forks, but still was a bit stressful getting this into the house. Miraculously we got it in the house in one piece, and I seriously questioned ever getting a tank larger than this in the future!

It did require disassembly outside the basement door to actually get it into the house around a berm of snow, along with some extra muscle from a few friends. (This was originally meant to be a 120P, until I realized the hardscape plan I had wouldn't quite fit. What's a another foot in length? )
)

Just getting the tank through the snow and ice was enough, and the base cabinet and tank just sort of landed in the room, and stayed there for a few days while devising a strategy for the next step. After recruiting a tall and strong friend, and sourcing some of those giant suction cup handles you use for moving shower glass walls, a few days later the tank was finally hoisted up onto the base.
As there is a dropped ceiling in the basement my plan was to hang the lights directly above the tank from the ceiling, rather than using a light stand. A few tiles were removed to investigate the structure above, and with some 2x4 extra bracing for the anchors, as none of the joists were in quite the right spot, two Chihiros Vivid 3 lights were installed directly above the tank. At this point I discovered that none of the electrical circuits in the basement were GFCI protected, so obviously that was immediately remedied. Too much gear and too much water to mess around with unprotected circuits.

With the ceiling open, I decided to run the lighting cables over the top of the wall to the left of the tank, and down into the mechanicals room there. The advantage being that the power cords are hidden from view after going through the ceiling tiles, and it's two less large power sources cluttering up the cabinet under the tank. Had to add an outlet in that closet, but I like how it turned out.
With the tank in position and leveled, and the lights finally installed, the next big issue is water. The well water here is liquid limestone. That was the initial mistake I made with the shrimp tank. Sure, neocaridina like hard water, but not THAT hard, and I quickly had to shift to remineralized distilled. I knew before even getting serious about planning this tank that the only reasonable option, for any future tanks here, is RO. The well water might be fine for Malawi Cichlids, but that's not my plan for this tank, but it will be great to have flexibility going forward. It's a big glass box, at just over 140 gallons, and it won't be the only one here (I hope), so the water part I want to get right from the start, and to make it easy to do water changes. The basement is a walkout, so draining water during water changes will be easy, and I would like to make filling it just as easy. I sourced two 70 gallon storage tanks for the RO water from Northern Tool, and ordered a Vectra S2 pump which will help with transfering water between tanks, as well as pumping it out through a hose to the aquarium(s) during water changes. Forgot to take a pic when I was done, but the pvc is all glued up now. I will finish installing the RO unit this weekend.

So, aquarium set up, lights in, and RO system with storage in progress. Next up? The exciting part. Hardscape! I have been hoarding Manzanita, Hakkai stone, and substrate for several months, so I'm excited to move on to the next step! Tank so far pictured below (although I have already removed the privacy film on the back in favor of adding the ARC RGB light screen in part due to the stair rail being visible and distracting. First screen was damaged in transit, so waiting on a replacement).

I did happen to find a pic of my old 75 gallon bowfront tank a few weeks ago that was taken just before I tore it down prior to a big move. It ran great for 7 years. Was a simple low tech setup, with one hunk of driftwood, no rocks, plain gravel (no soil) a lot of simple plants (the sword plants did great), and some peaceful fish. Algae wasn't an issue, filtration was pretty subpar by current standards, but the tank did well despite that, and algae wasn't really an issue. Aesthetically blah by today's standards, and certainly not my goal for this build, but I remember being proud of how well this tank ran back then, and wasn't too demanding. Important as my life was very hectic back then.
So, the tech plan so far for the new 150U:
| UNS 150U Tank & Stand |
| Chihiros Vivid 3 x2 |
| Chihirios Vivid 3 Shades x2 |
| GLA PRO-DS-1 Dual Stage CO2 System (Modular) |
| Chihiros Auto Dosing System (4 doser) |
| Chihiros Dosing Flow Adapter |
| Oase Biomaster 2 Thermo 600 |
| Oase Biomaster 2 Thermo 850 |
| ARC RBG Backlight Screen |
| ARC Stainless Yugang CO2 Reactor (Large) |
I ordered the tank and stand from UNS, and to my amazement, despite the worst mid-January winter storm we had in some years here, it was delivered on time by the freight company. I do not recommend trying to move a 5ft wide 400+lb tank and stand across snow and ice, down a slope, into to basement. Very thankful to have a tractor with forks, but still was a bit stressful getting this into the house. Miraculously we got it in the house in one piece, and I seriously questioned ever getting a tank larger than this in the future!
It did require disassembly outside the basement door to actually get it into the house around a berm of snow, along with some extra muscle from a few friends. (This was originally meant to be a 120P, until I realized the hardscape plan I had wouldn't quite fit. What's a another foot in length?
)Just getting the tank through the snow and ice was enough, and the base cabinet and tank just sort of landed in the room, and stayed there for a few days while devising a strategy for the next step. After recruiting a tall and strong friend, and sourcing some of those giant suction cup handles you use for moving shower glass walls, a few days later the tank was finally hoisted up onto the base.
As there is a dropped ceiling in the basement my plan was to hang the lights directly above the tank from the ceiling, rather than using a light stand. A few tiles were removed to investigate the structure above, and with some 2x4 extra bracing for the anchors, as none of the joists were in quite the right spot, two Chihiros Vivid 3 lights were installed directly above the tank. At this point I discovered that none of the electrical circuits in the basement were GFCI protected, so obviously that was immediately remedied. Too much gear and too much water to mess around with unprotected circuits.
With the ceiling open, I decided to run the lighting cables over the top of the wall to the left of the tank, and down into the mechanicals room there. The advantage being that the power cords are hidden from view after going through the ceiling tiles, and it's two less large power sources cluttering up the cabinet under the tank. Had to add an outlet in that closet, but I like how it turned out.
With the tank in position and leveled, and the lights finally installed, the next big issue is water. The well water here is liquid limestone. That was the initial mistake I made with the shrimp tank. Sure, neocaridina like hard water, but not THAT hard, and I quickly had to shift to remineralized distilled. I knew before even getting serious about planning this tank that the only reasonable option, for any future tanks here, is RO. The well water might be fine for Malawi Cichlids, but that's not my plan for this tank, but it will be great to have flexibility going forward. It's a big glass box, at just over 140 gallons, and it won't be the only one here (I hope), so the water part I want to get right from the start, and to make it easy to do water changes. The basement is a walkout, so draining water during water changes will be easy, and I would like to make filling it just as easy. I sourced two 70 gallon storage tanks for the RO water from Northern Tool, and ordered a Vectra S2 pump which will help with transfering water between tanks, as well as pumping it out through a hose to the aquarium(s) during water changes. Forgot to take a pic when I was done, but the pvc is all glued up now. I will finish installing the RO unit this weekend.
So, aquarium set up, lights in, and RO system with storage in progress. Next up? The exciting part. Hardscape! I have been hoarding Manzanita, Hakkai stone, and substrate for several months, so I'm excited to move on to the next step! Tank so far pictured below (although I have already removed the privacy film on the back in favor of adding the ARC RGB light screen in part due to the stair rail being visible and distracting. First screen was damaged in transit, so waiting on a replacement).

115 Replies
·
10203 views


Staff member
I Donated 2026
Founding Member
Hello Welcome, liamcsail
Welcome to ScapeCrunch, @liamcsail!
We would love to get to know you. Please tell us about yourself. What tank do you have?
We would love to get to know you. Please tell us about yourself. What tank do you have?
0 Replies
·
5 views

Rockstar
Journal 22 gallon long bookshelf
Time to start a new thread.
I’ll fill in some details later, but I’m working on the hardscape now. Any and all criticism is appreciated. The vision is nothing more, and nothing less, than something appealing to the eye.
90cm x 30cm x 30cm Lifegard Aquatics ultra clear bookshelf tank. Buce and anubias on the hardscape, stems towards the back and center, mid to front carpet with some changes in shade and texture down to a flat grade on the right side of the tank.
Lily pipe inlet and skimmer will be in the back left corner with the outflow in the front left to hopefully achieve circular flow. I’ll be running an in-line diffuser. Light will be the P600 Pro that I regrettably did not upside to 900. Oh well. I’ll mount it high and hopefully it’ll have enough spread.
I have some dragon stone and red lava rock rubble I’ll use at the base to blend into the substrate, as well as some stratum I may or may not cap with.


I’ll fill in some details later, but I’m working on the hardscape now. Any and all criticism is appreciated. The vision is nothing more, and nothing less, than something appealing to the eye.
90cm x 30cm x 30cm Lifegard Aquatics ultra clear bookshelf tank. Buce and anubias on the hardscape, stems towards the back and center, mid to front carpet with some changes in shade and texture down to a flat grade on the right side of the tank.
Lily pipe inlet and skimmer will be in the back left corner with the outflow in the front left to hopefully achieve circular flow. I’ll be running an in-line diffuser. Light will be the P600 Pro that I regrettably did not upside to 900. Oh well. I’ll mount it high and hopefully it’ll have enough spread.
I have some dragon stone and red lava rock rubble I’ll use at the base to blend into the substrate, as well as some stratum I may or may not cap with.
301 Replies
·
34029 views

I Donated 2026
I wanted to share my experience so far with a cheap flow meter from Aliexpress.
I am generally a “you get what you pay for” aquarist, but I have taken a gamble due to circumstances. It is still early days, but it feels like it may have paid off.
Looking to add a flow meter to help tune my CO2 in a newly set up 130L tank, I searched far and wide for the different options. They were few and far between, most were for far larger flows than I needed and those that were appropriate were ridiculously expensive to get to Australia. So I went searching on the various Chinese discount sites and came across the LZB-3WB flow meters. They are cheap… real cheap. Less than $30 Australian landed, which made me nervous, but felt it was worth a shot at that price.
Not knowing what flow ranges I would need I ordered a 6-60ml/minute model.
After installing it, it was clearly too high of a range for my tank, but it did allow for some visibility while adjusting CO2. It was certainly better than a bubble counter.
Here is a picture of it action:

As you can see, the reading is below the scale of the meter, but with a marker I could at least set a starting point as I adjusted my CO2 higher. Also the adjustment valve was useless, a tiny turn would shut the flow off or open it to max out the meter.
I ordered the below as a replacement:

2.5-25ml/minute seems like a good range for my tank.
As a bonus the valve is better than most standard regulator needle valves. I can adjust the flow in increments of about 1ml/minute.
Below is the valve in action:

They have been in service for 2 months total now, 1 month each, so still an early review. It has been a solid upgrade though and was an easy install. They come with big 8mm barbed fittings but they can be unscrewed to reveal 1/8 female threads that standard needle valves for aquariums fit. I have also got some 1/8 to push fit fittings that I am yet to install as I am heading away on holiday for 2 weeks soon and don’t want to make any changes for the house-sitters to potentially have to fix!
Pros: adjusting my CO2 was made so much easier by being able to see exactly how much of an increase I was making with each adjustment. Monitoring that the valve isn’t drifting has been easy also, a quick check of the meter tells me it is steady.
Cons: I doubt that the reading is accurate. This means little to me, as I am not using it for a calculation or comparison between tanks. As long as the reading is consistent, even if it is wrong, I am fine with that. Also, the max pressure is listed as 40psi. I am unsure if that is a failure or accuracy maximum. Again, it doesn’t affect me as I run a low regulator pressure due to using a reactor. If I were using a diffuser that needed a high pressure, it may make me nervous.
As always, with any cheap gear, your mileage may vary. But, I thought it was worth sharing as it may help those with limited access to flow meters of appropriate sizes. So far it is proving to be the second best $25 I have spent on this tank, second only to the super red bristlenose I have in the tank.
I am generally a “you get what you pay for” aquarist, but I have taken a gamble due to circumstances. It is still early days, but it feels like it may have paid off.
Looking to add a flow meter to help tune my CO2 in a newly set up 130L tank, I searched far and wide for the different options. They were few and far between, most were for far larger flows than I needed and those that were appropriate were ridiculously expensive to get to Australia. So I went searching on the various Chinese discount sites and came across the LZB-3WB flow meters. They are cheap… real cheap. Less than $30 Australian landed, which made me nervous, but felt it was worth a shot at that price.
Not knowing what flow ranges I would need I ordered a 6-60ml/minute model.
After installing it, it was clearly too high of a range for my tank, but it did allow for some visibility while adjusting CO2. It was certainly better than a bubble counter.
Here is a picture of it action:
As you can see, the reading is below the scale of the meter, but with a marker I could at least set a starting point as I adjusted my CO2 higher. Also the adjustment valve was useless, a tiny turn would shut the flow off or open it to max out the meter.
I ordered the below as a replacement:
2.5-25ml/minute seems like a good range for my tank.
As a bonus the valve is better than most standard regulator needle valves. I can adjust the flow in increments of about 1ml/minute.
Below is the valve in action:
They have been in service for 2 months total now, 1 month each, so still an early review. It has been a solid upgrade though and was an easy install. They come with big 8mm barbed fittings but they can be unscrewed to reveal 1/8 female threads that standard needle valves for aquariums fit. I have also got some 1/8 to push fit fittings that I am yet to install as I am heading away on holiday for 2 weeks soon and don’t want to make any changes for the house-sitters to potentially have to fix!
Pros: adjusting my CO2 was made so much easier by being able to see exactly how much of an increase I was making with each adjustment. Monitoring that the valve isn’t drifting has been easy also, a quick check of the meter tells me it is steady.
Cons: I doubt that the reading is accurate. This means little to me, as I am not using it for a calculation or comparison between tanks. As long as the reading is consistent, even if it is wrong, I am fine with that. Also, the max pressure is listed as 40psi. I am unsure if that is a failure or accuracy maximum. Again, it doesn’t affect me as I run a low regulator pressure due to using a reactor. If I were using a diffuser that needed a high pressure, it may make me nervous.
As always, with any cheap gear, your mileage may vary. But, I thought it was worth sharing as it may help those with limited access to flow meters of appropriate sizes. So far it is proving to be the second best $25 I have spent on this tank, second only to the super red bristlenose I have in the tank.
32 Replies
·
2315 views


Got on the tree build kick in past 2 weeks to make somthing I like for 36g freebie build to replace the huge tree turd #2 in there. I got 6 stumps ready today to get built for smaller tanks, 3 done today 3 waiting. Built the larger 17 tall 16 wide tree pics added other day to journal but gonna a build 2-3 more larger trees and the 6 smaller. Sell the ones off on eBay and etsy I don't want.
The larger stump 2nd post pic s 16" tall 15 wide plan to use in future scapes smaller. I've been using Amazon branch packs 15.00 for 25-35 pieces and amazon spiderwood 6-8" 5 for 12.00 for small trees. The large tree I made was a 10.99 piece I tore apart and used the 3 larger branches and built onto them to get the large tree in added pics cost me in end around 22.00 .... I have 10 pieces coming in mail Friday 5 large and 5 medium all spiderwood to make larger trees with this weekend.
Bought a ton of Amazon wood on Amazon lol 2 for 17.00 10-14" so I glued some of them together for larger usable pieces. some came out cool and well worth the 17.00 for the pieces glued together.The 1 has natural plant pots on top. The v shape last 2 pics 12" deep and 16" wide
After literally glueing a finger to a rock today Imao I quit! I ended up used all the accelerator I had anyway so Friday or sat before I can finish my smaller trees. will update as it goes, It will be a forest of trees when its done.
The larger stump 2nd post pic s 16" tall 15 wide plan to use in future scapes smaller. I've been using Amazon branch packs 15.00 for 25-35 pieces and amazon spiderwood 6-8" 5 for 12.00 for small trees. The large tree I made was a 10.99 piece I tore apart and used the 3 larger branches and built onto them to get the large tree in added pics cost me in end around 22.00 .... I have 10 pieces coming in mail Friday 5 large and 5 medium all spiderwood to make larger trees with this weekend.
Bought a ton of Amazon wood on Amazon lol 2 for 17.00 10-14" so I glued some of them together for larger usable pieces. some came out cool and well worth the 17.00 for the pieces glued together.The 1 has natural plant pots on top. The v shape last 2 pics 12" deep and 16" wide
After literally glueing a finger to a rock today Imao I quit! I ended up used all the accelerator I had anyway so Friday or sat before I can finish my smaller trees. will update as it goes, It will be a forest of trees when its done.


8 Replies
·
157 views

Rockstar
I mention this plant on occasion, but no one ever comments. So I thought I'd make a post for others and me for future reference.
It is my favorite Erio. It is a darker green, doesn't get too big, and for me it has never sent up any seed stalks.
I find it easy to grow. I have high light but nothing crazy at 124PAR and high CO2, 50+ppm. It gets about max 3-4" and makes side daughter plants when large. I'm not sure my dosing scheme is. Sort of an EI daily dosing kind of thing.
What gets me is every autumn, it starts to melt. I'm not sure how it knows it's autumn with consistent light and a heater, but it must get a little cooler in the tank or something. The plant starts to turn brown and sends up (I'm not sure of the correct term) vegetative stalks with little plantlets on the ends. I've found you can plant these stalks into the substrate with the plantlet on top, and it will grow into a new plant. They've been easy to grow. This is the third year this has happened to me.
Pic of plantlets below. I'll try to get a better one sometime. All I had time for tonight was a crappy phone pic.
This year I divided one of the mother plants in hopes that it wouldn't fully melt and would regrow. That is still in progress.
Anyone else's experiences are welcome.
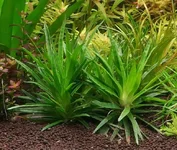
This plant is the same plant as the one on the right above.

It is my favorite Erio. It is a darker green, doesn't get too big, and for me it has never sent up any seed stalks.
I find it easy to grow. I have high light but nothing crazy at 124PAR and high CO2, 50+ppm. It gets about max 3-4" and makes side daughter plants when large. I'm not sure my dosing scheme is. Sort of an EI daily dosing kind of thing.
What gets me is every autumn, it starts to melt. I'm not sure how it knows it's autumn with consistent light and a heater, but it must get a little cooler in the tank or something. The plant starts to turn brown and sends up (I'm not sure of the correct term) vegetative stalks with little plantlets on the ends. I've found you can plant these stalks into the substrate with the plantlet on top, and it will grow into a new plant. They've been easy to grow. This is the third year this has happened to me.
Pic of plantlets below. I'll try to get a better one sometime. All I had time for tonight was a crappy phone pic.
This year I divided one of the mother plants in hopes that it wouldn't fully melt and would regrow. That is still in progress.
Anyone else's experiences are welcome.
This plant is the same plant as the one on the right above.
7 Replies
·
203 views
Journal High-Tech 90P Build
Hi guys!
I'm new here, but not entirely new to planted tanks though I've been out of the hobby for the better part of the last decade between kids and moving a couple of times - but finally in a spot where I can do something again. I'm mostly going to be making things up as I go along, but plan on a lot of automation (I want to integrate everything into home assistant) and a lot of DIY as I love the challenge of building things out myself.
The starting point:
I picked up a 90P rimless, low-iron tank on a great deal.
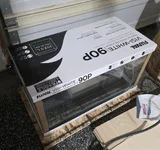
I have a rough idea in my head for a stand to be built from plywood - just have a couple other house projects to finish off before starting that built.
Wife says I can only have one aquarium, so for this tank, I want to go all out with a sump to allow for auto top off, and auto water changes, auto fertilizer dosing etc. etc. I have half a plan in my mind.
I've also started on the light fixture which I've modeled up in CAD, and plan on making out of an 8020 extrusion, and some 3D printed bits.
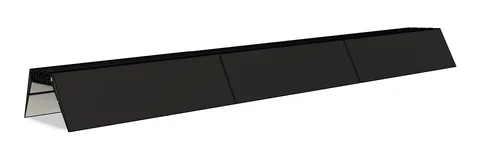
I'm using bridgelux gen 3 thrive CW (3000k) and WW (5000k) LED strips which have super high CRI at 98+ along with some specific XPE2 wavelengths that I'll solder onto some starboards. Far Red (730nm), Red (654nm), Cyan (495nm), Blue (455nm), Visible UV (415nm). Each segment of the white channels will be on its own driver so I can adjust left to right brightness in thirds, and each colour channel on its own driver so I can vary each channel on a time-based approach.
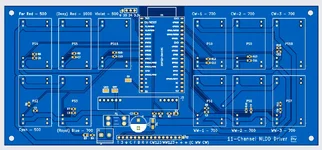
These will be run from a custom PCB board with Meanwell N-LDD drivers, and will run ESPHome on an ESP32 so it can link up with my Home Assistant installation.
That's it for now, this will probably be a very slow build so be warned if you follow along!
I'm new here, but not entirely new to planted tanks though I've been out of the hobby for the better part of the last decade between kids and moving a couple of times - but finally in a spot where I can do something again. I'm mostly going to be making things up as I go along, but plan on a lot of automation (I want to integrate everything into home assistant) and a lot of DIY as I love the challenge of building things out myself.
The starting point:
I picked up a 90P rimless, low-iron tank on a great deal.
I have a rough idea in my head for a stand to be built from plywood - just have a couple other house projects to finish off before starting that built.
Wife says I can only have one aquarium, so for this tank, I want to go all out with a sump to allow for auto top off, and auto water changes, auto fertilizer dosing etc. etc. I have half a plan in my mind.
I've also started on the light fixture which I've modeled up in CAD, and plan on making out of an 8020 extrusion, and some 3D printed bits.
I'm using bridgelux gen 3 thrive CW (3000k) and WW (5000k) LED strips which have super high CRI at 98+ along with some specific XPE2 wavelengths that I'll solder onto some starboards. Far Red (730nm), Red (654nm), Cyan (495nm), Blue (455nm), Visible UV (415nm). Each segment of the white channels will be on its own driver so I can adjust left to right brightness in thirds, and each colour channel on its own driver so I can vary each channel on a time-based approach.
These will be run from a custom PCB board with Meanwell N-LDD drivers, and will run ESPHome on an ESP32 so it can link up with my Home Assistant installation.
That's it for now, this will probably be a very slow build so be warned if you follow along!
74 Replies
·
5406 views

Staff member
I Donated 2026
Founding Member
This month's theme is: plant, hardscape and fish
This one is going to be tough but I hope some of you take up the challenge. Take a picture that captures a plant, some hardscape and at least one fish in the same picture.
Be as artistic and creative as you like.
The rules:
A $25 store credit from BurrAqua thanks to @Burr740!

This one is going to be tough but I hope some of you take up the challenge. Take a picture that captures a plant, some hardscape and at least one fish in the same picture.
Be as artistic and creative as you like.
The rules:
- Submissions are allowed between October 7 and October 23.
- Voting will start on October 23 at 12:01 am Eastern time.
- Voting will end on October 31 at 11:30 pm Eastern time.
A $25 store credit from BurrAqua thanks to @Burr740!
5 Replies
·
229 views
Staff member
I Donated 2026
Founding Member
Hello Welcome, guernsey
Welcome to ScapeCrunch, @guernsey!
We would love to get to know you. Please tell us about yourself. What tank do you have?
We would love to get to know you. Please tell us about yourself. What tank do you have?
0 Replies
·
15 views

Supporting
I Donated 2026
Rockstar
When I was walking around Aquashella Chicago, I crossed paths multiple times with Logan Rando while he was filming. I was wondering if he had posted a video of the show yet so I checked out his channel. No video of Chicago yet, so I instead watched his video of New Jersey. About half way through the video, Father Fish rolls by on his scooter and announces he'll be making an announcement that will destroy the tropical fish industry. LOL! I didn't know Father Fish was actually a speaker at Aquashella. Seems funny that a guy who preaches about not giving money to the aquarium industry was invited to speak. I figured WTH, I'll bite and go to his channel to see what the big news was. I couldn't bring myself to watch the whole thing, but I did scan through it and still don't know what the big Earth shattering news was. Just the same ole preachy stuff and I regret destroying the brain cells. I have to be more careful of that, as I'm older and can't afford to lose many more. I'm sure glad my path into this hobby was seeing the work of Takashi Amano, other knowledgeable aquascapers, and all the great folks in this community.
15 Replies
·
402 views


Supporting
I Donated 2026
Rockstar
Journal Kwyet’s 60G Hillstream Tank
Sometime in Nov 2024, I bought a 60G Aqueon tank at the 50% off sale. I already had a 75 gallon stand and tank, but I wanted a shorter tank so I could look in over the top. The 75 gallon was relegated to the garage in case I want it again, and I painted the stand black. I also put black vinyl on the back.
My goal was to make a hillstream environment, based on the long-running tank of Rachel O’Leary. I had looked at other options like the river manifolds, but I liked Rachel’s better. I set it up with an fx6 filter, a horizontal spray bar on the left side, and 2nd modified spray bar situated vertically behind a corner Matten filter on the back right side. Glass strips were attached with silicone to hold it. I cut the Matten filter horizontally a few inches from the tank floor so the top part could be easily removed for cleaning. I also cut a small vertical groove from the inside so it wouldn’t constrict the holes so much on the curve.
This was how it looked on Dec 20, 2024:

My goal was to make a hillstream environment, based on the long-running tank of Rachel O’Leary. I had looked at other options like the river manifolds, but I liked Rachel’s better. I set it up with an fx6 filter, a horizontal spray bar on the left side, and 2nd modified spray bar situated vertically behind a corner Matten filter on the back right side. Glass strips were attached with silicone to hold it. I cut the Matten filter horizontally a few inches from the tank floor so the top part could be easily removed for cleaning. I also cut a small vertical groove from the inside so it wouldn’t constrict the holes so much on the curve.
This was how it looked on Dec 20, 2024:
47 Replies
·
5630 views