
Welcome to ScapeCrunch
We are ScapeCrunch, the place where planted aquarium hobbyists come to build relationships and support each other. When you're tired of doom scrolling, you've found your home here.
Social Feed

Rockstar
I have a 60p and have always been frustrated with the feeling that any amount of equipment in it seems to take up so much room and look ugly.
I was watching a George Farmer video today HERE and he is stuffing the CO2 and heater into a HOB filter. The only thing in the tank is filter intake.
In the US, you can get an Oase HOB with heater built in. All I'd need to add is CO2.
My main concern, based on his video, is that I don't want the filter pushing out tons of CO2 bubbles. I want it dissolved first. I like pearling, but I don't like the fizzy look from CO2 mist. There is a difference. I supposed I could put the diffuser behind the filter media. The CO2 would hopefully dissolve as it goes through the mesh.
Anyone done this? Alternate recommendations? I don't have any experience with Oase HOB filters. Thoughts? Is there room for something like Purigen?
Thanks,
Ben
I was watching a George Farmer video today HERE and he is stuffing the CO2 and heater into a HOB filter. The only thing in the tank is filter intake.
In the US, you can get an Oase HOB with heater built in. All I'd need to add is CO2.
My main concern, based on his video, is that I don't want the filter pushing out tons of CO2 bubbles. I want it dissolved first. I like pearling, but I don't like the fizzy look from CO2 mist. There is a difference. I supposed I could put the diffuser behind the filter media. The CO2 would hopefully dissolve as it goes through the mesh.
Anyone done this? Alternate recommendations? I don't have any experience with Oase HOB filters. Thoughts? Is there room for something like Purigen?
Thanks,
Ben
6 Replies
·
1377 views

Got on the tree build kick in past 2 weeks to make somthing I like for 36g freebie build to replace the huge tree turd #2 in there. I got 6 stumps ready today to get built for smaller tanks, 3 done today 3 waiting. Built the larger 17 tall 16 wide tree pics added other day to journal but gonna a build 2-3 more larger trees and the 6 smaller. Sell the ones off on eBay and etsy I don't want.
The larger stump 2nd post pic s 16" tall 15 wide plan to use in future scapes smaller. I've been using Amazon branch packs 15.00 for 25-35 pieces and amazon spiderwood 6-8" 5 for 12.00 for small trees. The large tree I made was a 10.99 piece I tore apart and used the 3 larger branches and built onto them to get the large tree in added pics cost me in end around 22.00 .... I have 10 pieces coming in mail Friday 5 large and 5 medium all spiderwood to make larger trees with this weekend.
Bought a ton of Amazon wood on Amazon lol 2 for 17.00 10-14" so I glued some of them together for larger usable pieces. some came out cool and well worth the 17.00 for the pieces glued together.The 1 has natural plant pots on top. The v shape last 2 pics 12" deep and 16" wide
After literally glueing a finger to a rock today Imao I quit! I ended up used all the accelerator I had anyway so Friday or sat before I can finish my smaller trees. will update as it goes, It will be a forest of trees when its done.
The larger stump 2nd post pic s 16" tall 15 wide plan to use in future scapes smaller. I've been using Amazon branch packs 15.00 for 25-35 pieces and amazon spiderwood 6-8" 5 for 12.00 for small trees. The large tree I made was a 10.99 piece I tore apart and used the 3 larger branches and built onto them to get the large tree in added pics cost me in end around 22.00 .... I have 10 pieces coming in mail Friday 5 large and 5 medium all spiderwood to make larger trees with this weekend.
Bought a ton of Amazon wood on Amazon lol 2 for 17.00 10-14" so I glued some of them together for larger usable pieces. some came out cool and well worth the 17.00 for the pieces glued together.The 1 has natural plant pots on top. The v shape last 2 pics 12" deep and 16" wide
After literally glueing a finger to a rock today Imao I quit! I ended up used all the accelerator I had anyway so Friday or sat before I can finish my smaller trees. will update as it goes, It will be a forest of trees when its done.


11 Replies
·
273 views


Staff member
Supporting
Founding Member
Expert in Residence
MOTM Winner
Rockstar
As some people may know I had a long running journal on another forum. Glad to see Art get this new site started. A fresh beginning and loads of possibilities ahead. I'll be updating with thoughts here but for today just wanted to share my latest tank pics.


354 Replies
·
64703 views


I Donated 2026
Been meaning to write this up for a while, so here it is. Over the last few months I've built a full custom controller setup for my 130L planted, CO2 injected tank, running on three ESP32 boards working together. It replaced an ageing Up Aqua CO2/pH controller and turned into a genuinely complete automation system for water changes, dosing, CO2, top-off, and reservoir monitoring. Sharing the overview here in case it's useful or interesting to anyone else down a similar rabbit hole.
Three boards, each with its own job:
They talk to each other over WiFi and three deliberate hardwired links for the communications that genuinely shouldn't depend on the network as they are safety critical.
Weekly, fully automated. Connect a line from the WaterDrop filter, a drain line that goes outside to the garden or lawn (both with quick connects and manual valves for safety), choose your water change volume in litres, press start and it then:
- runs through safety prompts to ensure everything is connected and safety valves are set correctly.
-prompts to clean prefilters
-prompts to measure remineralisers (calculated on screen, based on your water change volume selection).
-it then drains and refills with RO water. It also turns off/ on smart plugs so skimmers, co2, heaters ect are off for draining then start to turn them on as water fill reaches certain thresholds.
- It doses potassium bicarbonate for KH, calcium and magnesium sulfate for GH, and boosts macros (nitrate, phosphate, potassium, micros), again, all scaled to my actual water change volume.
Everything's logged, every step confirmed before moving to the next, with a wizard-style setup so I can adjust the fill amount, KH target, and anything else on the fly.
I also get phone updates, the fill solenoid is connected with a flow rate sensor, temperature probe and TDS sensor. So every 10L I get an update on the flow rate, tds and temperature of that 10L fill and average so far, so I can spot any issues. It will also abort the water change, stop filter.
I have also put a weight sensor under my CO2 bottle so it tells me how full/empty my co2 bottle is and predicts refill date based on useage (this is untested as it's still so new, I don't have the data for it to be accurate.)
Four channel dosing pump, fully scripted daily doses plus automatic post-water-change boosts, calculated from my actual verified nutrient targets rather than rough guesses. Doses are triggered automatically the moment a water change finishes.
For now, the auto top-off unit itself does the actual work, but the controller now watches the reservoir independently, a proper pressure-based level sensor for the real litre count, plus a simple mechanical float as a dumb, sensor-agnostic backup. If the float ever trips, ATO shuts down immediately and I get a notification, worded differently depending on whether the pressure sensor agrees with the float or not, since a disagreement between the two usually points at the pressure sensor itself needing a look rather than a genuinely empty reservoir. I have some optical sensors on the way, and hopefully by next week the controller is running the ATO independently.
A small but genuinely nice touch. Feeding pauses CO2 injection, filter and skimmer automatically, it's voice activated or you can use a unit mounted button, and the front panel readouts switch to a simple "feeding" display while the filter's off, since the normal sensor numbers would be meaningless with no flow through the lines anyway.
Everything logs to a Grafana dashboard, I have pH, temperature, TDS, reservoir level se sors, it also logs CO2 state, with history of all controller actions that I can actually look back through rather than just a live snapshot. Genuinely useful for spotting slow trends, not just catching sudden problems.
If there's one thing I'd want someone building something similar to take away, it's this. Every automated system that can act on its own needs to fail toward safe, not just work correctly when everything's fine.
A few of the principles that ended up running through the whole build:
The short version
Three boards, each with its own job:
- Water change controller — drains, refills, remineralises, and doses the tank automatically, sitting mostly idle between weekly changes.
- Tank controller — the brains of day-to-day operation, running CO2/pH control, top-off monitoring, the reservoir, and a small front panel with live readouts.
- Alexa bridge — ties the whole thing into Alexa for voice control and equipment scenes, and handles the feeding routine.
They talk to each other over WiFi and three deliberate hardwired links for the communications that genuinely shouldn't depend on the network as they are safety critical.
Water changes
Weekly, fully automated. Connect a line from the WaterDrop filter, a drain line that goes outside to the garden or lawn (both with quick connects and manual valves for safety), choose your water change volume in litres, press start and it then:
- runs through safety prompts to ensure everything is connected and safety valves are set correctly.
-prompts to clean prefilters
-prompts to measure remineralisers (calculated on screen, based on your water change volume selection).
-it then drains and refills with RO water. It also turns off/ on smart plugs so skimmers, co2, heaters ect are off for draining then start to turn them on as water fill reaches certain thresholds.
- during refil it remineralises to target GH and KH from a container with a magnetic stirrer with a perialstatic dosing pump that fires at set percentages of fill.
- it then connects to my Chihiros dosing pumps and fires the dosing boosts to preload nutrients (again these doses are scaled with selected water change volume)
- It doses potassium bicarbonate for KH, calcium and magnesium sulfate for GH, and boosts macros (nitrate, phosphate, potassium, micros), again, all scaled to my actual water change volume.
Everything's logged, every step confirmed before moving to the next, with a wizard-style setup so I can adjust the fill amount, KH target, and anything else on the fly.
I also get phone updates, the fill solenoid is connected with a flow rate sensor, temperature probe and TDS sensor. So every 10L I get an update on the flow rate, tds and temperature of that 10L fill and average so far, so I can spot any issues. It will also abort the water change, stop filter.
CO2 and pH
This was the original reason the whole project started. My old analogue controller had a pretty coarse hysteresis, and in low KH water even small CO2 swings move pH more than I'd like. The new controller runs a proper pH probe on a scheduled window, targets a specific pH with a tight, tunable hysteresis, and logs everything continuously. It also catches things a dumb timer never could, a sudden pH crash with the solenoid already closed pointed straight at a CO2 regulator dumping its tank, something I'd never have caught otherwise until it was a much bigger problem. The Atlas Ezo ph sensor setup is elite and far more accurate than my previous setup. I can also see live updates, get phone alerts for certain events and have set safety alets and shutoffs for events like rapid changes in ph.I have also put a weight sensor under my CO2 bottle so it tells me how full/empty my co2 bottle is and predicts refill date based on useage (this is untested as it's still so new, I don't have the data for it to be accurate.)
Dosing
Being sick of the Chihiros app occasionally being unavailable this year, I have given over control of the scheduling and setup to my controller. I have my own dashboard and phone app that does this now and can send schedules and settings to the Chihiros pumps. It has taken some trial error and bluetooth sniffing apps to work this out but it is rock solid now.Four channel dosing pump, fully scripted daily doses plus automatic post-water-change boosts, calculated from my actual verified nutrient targets rather than rough guesses. Doses are triggered automatically the moment a water change finishes.
Top-off and reservoir
For now, the auto top-off unit itself does the actual work, but the controller now watches the reservoir independently, a proper pressure-based level sensor for the real litre count, plus a simple mechanical float as a dumb, sensor-agnostic backup. If the float ever trips, ATO shuts down immediately and I get a notification, worded differently depending on whether the pressure sensor agrees with the float or not, since a disagreement between the two usually points at the pressure sensor itself needing a look rather than a genuinely empty reservoir. I have some optical sensors on the way, and hopefully by next week the controller is running the ATO independently.
Feeding
A small but genuinely nice touch. Feeding pauses CO2 injection, filter and skimmer automatically, it's voice activated or you can use a unit mounted button, and the front panel readouts switch to a simple "feeding" display while the filter's off, since the normal sensor numbers would be meaningless with no flow through the lines anyway.
Remote monitoring
Everything logs to a Grafana dashboard, I have pH, temperature, TDS, reservoir level se sors, it also logs CO2 state, with history of all controller actions that I can actually look back through rather than just a live snapshot. Genuinely useful for spotting slow trends, not just catching sudden problems.
Alexa integration
Voice control for scenes around water changes, changing settings and feeding, equipment turning off and on automatically at the right points in each process, and a physical feed button that fires the exact same routine as the voice command.Safety, and why it mattered more than any single feature
If there's one thing I'd want someone building something similar to take away, it's this. Every automated system that can act on its own needs to fail toward safe, not just work correctly when everything's fine.
A few of the principles that ended up running through the whole build:
- Solenoids fail closed. Power loss means CO2 and water stay off, never on, by hardware design, not firmware logic that could have a bug in it.
- A tripped safety condition can't be quietly dismissed. If something raises an alert, like the backup float, you can acknowledge it, but the system won't let you clear it while the actual problem is still physically present. No accidentally waving away a real fault.
- The one link that has to work regardless of WiFi, does. CO2 and ATO pausing during a water change runs over a direct hardwired connection between boards, not the network. Everything else can be a bit more relaxed about connectivity; that one thing can't be.
- A backup sensor's only job is to disagree usefully. The float switch isn't there to be a second source of truth, it's there to catch the primary sensor being wrong. When they disagree, the alert tells me which one to actually go check.
- Never power anything from two sources at once. Learned that one the hard way, destroyed a board's regulator early on doing exactly that. So it now has wifi firmware updates for each board, to save the USB input power when updating by PC
None of this was designed perfectly the first time either, more caught through actually running it and paying attention than getting it right on paper up front. A few genuine bugs this build taught me: features that were fully coded but sitting behind a switch I'd forgotten to flip on, so they looked complete but never actually ran; a menu screen that could lose progress if you walked away at the wrong moment during a slow calibration step. Both fixed once they showed up in real use, which is really the whole point of building it in stages rather than all at once and hoping. I have spent weeks finding and squashing bugs before I have given over control of the tank to it.
Next on the list:
Heater/fan control, full ATO control, uninteruptable power unit uninterruptible that alerts me to power outages and turns on air pumps.
It is also in a pretty basic case and the cutouts are purposely oversized. I have ordered smoked acrylic to 'wrap' it in so it appears to be black rectangular box, with only the LED parameter readouts (temp, pH, TDS and ATO reservoir litres) visible through the smoke tinted acrylic and the two black control knobs that wake sleeping OLED screens, all other controls will be behind hinged flaps. I want to make sure all the sensors etc are wired correctly though before I wrap and anchor wiring.
The great thing is, every time I think of something I want to add, it is a coding session with the help of AI and finding the sensors or equipement required. I can wake up with an idea and genuinely have it implemented with an hour or two of soldering and coding. It fits my tank like a glove and is infinitely adaptable. menu setup and setting options all added as I think of them!
I will add some pictures below of the in progress build! I wanted to share in case anyone is thinking of doing the same, with the prices of ESP32s and the sensors (except for the Atlas Ezo chips! which are expensive but well worth it!) it is definitely a project in reach of anyone with a basic idea of code and soldering.
30 Replies
·
1646 views


Supporting
I Donated 2026
Rockstar
When I was walking around Aquashella Chicago, I crossed paths multiple times with Logan Rando while he was filming. I was wondering if he had posted a video of the show yet so I checked out his channel. No video of Chicago yet, so I instead watched his video of New Jersey. About half way through the video, Father Fish rolls by on his scooter and announces he'll be making an announcement that will destroy the tropical fish industry. LOL! I didn't know Father Fish was actually a speaker at Aquashella. Seems funny that a guy who preaches about not giving money to the aquarium industry was invited to speak. I figured WTH, I'll bite and go to his channel to see what the big news was. I couldn't bring myself to watch the whole thing, but I did scan through it and still don't know what the big Earth shattering news was. Just the same ole preachy stuff and I regret destroying the brain cells. I have to be more careful of that, as I'm older and can't afford to lose many more. I'm sure glad my path into this hobby was seeing the work of Takashi Amano, other knowledgeable aquascapers, and all the great folks in this community.
23 Replies
·
693 views


Staff member
I Donated 2026
Founding Member
Question of the Day Hobby Hacks - your best tips, tricks and time-savers!
If you've been in the aquarium hobby for a while, I'm sure you've created or picked up so valuable hacks that fall into the tips, tricks and time-savers categories. So, in an effort to compile and share them, let's post them here.
This site is about sharing knowledge and experiences so don't be shy, no hack is too small or silly.
Please post yours.

This site is about sharing knowledge and experiences so don't be shy, no hack is too small or silly.
Please post yours.
79 Replies
·
9685 views

Rockstar
Journal 22 gallon long bookshelf
Time to start a new thread.
I’ll fill in some details later, but I’m working on the hardscape now. Any and all criticism is appreciated. The vision is nothing more, and nothing less, than something appealing to the eye.
90cm x 30cm x 30cm Lifegard Aquatics ultra clear bookshelf tank. Buce and anubias on the hardscape, stems towards the back and center, mid to front carpet with some changes in shade and texture down to a flat grade on the right side of the tank.
Lily pipe inlet and skimmer will be in the back left corner with the outflow in the front left to hopefully achieve circular flow. I’ll be running an in-line diffuser. Light will be the P600 Pro that I regrettably did not upside to 900. Oh well. I’ll mount it high and hopefully it’ll have enough spread.
I have some dragon stone and red lava rock rubble I’ll use at the base to blend into the substrate, as well as some stratum I may or may not cap with.


I’ll fill in some details later, but I’m working on the hardscape now. Any and all criticism is appreciated. The vision is nothing more, and nothing less, than something appealing to the eye.
90cm x 30cm x 30cm Lifegard Aquatics ultra clear bookshelf tank. Buce and anubias on the hardscape, stems towards the back and center, mid to front carpet with some changes in shade and texture down to a flat grade on the right side of the tank.
Lily pipe inlet and skimmer will be in the back left corner with the outflow in the front left to hopefully achieve circular flow. I’ll be running an in-line diffuser. Light will be the P600 Pro that I regrettably did not upside to 900. Oh well. I’ll mount it high and hopefully it’ll have enough spread.
I have some dragon stone and red lava rock rubble I’ll use at the base to blend into the substrate, as well as some stratum I may or may not cap with.
302 Replies
·
34178 views
Supporting
I Donated 2026
Rockstar
Anybody else stay up late to watch the IAPLC rankings. As usual, my choices would have been different. Some scapes ranked in the 40s got picked by some judges as the best, so at least I'm not alone in that. Highest ranking by a U.S. contestant was Ryan Noel at, I believe, 31. Congrats to Ryan.
15 Replies
·
419 views
I Donated 2026
I wanted to share my experience so far with a cheap flow meter from Aliexpress.
I am generally a “you get what you pay for” aquarist, but I have taken a gamble due to circumstances. It is still early days, but it feels like it may have paid off.
Looking to add a flow meter to help tune my CO2 in a newly set up 130L tank, I searched far and wide for the different options. They were few and far between, most were for far larger flows than I needed and those that were appropriate were ridiculously expensive to get to Australia. So I went searching on the various Chinese discount sites and came across the LZB-3WB flow meters. They are cheap… real cheap. Less than $30 Australian landed, which made me nervous, but felt it was worth a shot at that price.
Not knowing what flow ranges I would need I ordered a 6-60ml/minute model.
After installing it, it was clearly too high of a range for my tank, but it did allow for some visibility while adjusting CO2. It was certainly better than a bubble counter.
Here is a picture of it action:

As you can see, the reading is below the scale of the meter, but with a marker I could at least set a starting point as I adjusted my CO2 higher. Also the adjustment valve was useless, a tiny turn would shut the flow off or open it to max out the meter.
I ordered the below as a replacement:

2.5-25ml/minute seems like a good range for my tank.
As a bonus the valve is better than most standard regulator needle valves. I can adjust the flow in increments of about 1ml/minute.
Below is the valve in action:

They have been in service for 2 months total now, 1 month each, so still an early review. It has been a solid upgrade though and was an easy install. They come with big 8mm barbed fittings but they can be unscrewed to reveal 1/8 female threads that standard needle valves for aquariums fit. I have also got some 1/8 to push fit fittings that I am yet to install as I am heading away on holiday for 2 weeks soon and don’t want to make any changes for the house-sitters to potentially have to fix!
Pros: adjusting my CO2 was made so much easier by being able to see exactly how much of an increase I was making with each adjustment. Monitoring that the valve isn’t drifting has been easy also, a quick check of the meter tells me it is steady.
Cons: I doubt that the reading is accurate. This means little to me, as I am not using it for a calculation or comparison between tanks. As long as the reading is consistent, even if it is wrong, I am fine with that. Also, the max pressure is listed as 40psi. I am unsure if that is a failure or accuracy maximum. Again, it doesn’t affect me as I run a low regulator pressure due to using a reactor. If I were using a diffuser that needed a high pressure, it may make me nervous.
As always, with any cheap gear, your mileage may vary. But, I thought it was worth sharing as it may help those with limited access to flow meters of appropriate sizes. So far it is proving to be the second best $25 I have spent on this tank, second only to the super red bristlenose I have in the tank.
I am generally a “you get what you pay for” aquarist, but I have taken a gamble due to circumstances. It is still early days, but it feels like it may have paid off.
Looking to add a flow meter to help tune my CO2 in a newly set up 130L tank, I searched far and wide for the different options. They were few and far between, most were for far larger flows than I needed and those that were appropriate were ridiculously expensive to get to Australia. So I went searching on the various Chinese discount sites and came across the LZB-3WB flow meters. They are cheap… real cheap. Less than $30 Australian landed, which made me nervous, but felt it was worth a shot at that price.
Not knowing what flow ranges I would need I ordered a 6-60ml/minute model.
After installing it, it was clearly too high of a range for my tank, but it did allow for some visibility while adjusting CO2. It was certainly better than a bubble counter.
Here is a picture of it action:
As you can see, the reading is below the scale of the meter, but with a marker I could at least set a starting point as I adjusted my CO2 higher. Also the adjustment valve was useless, a tiny turn would shut the flow off or open it to max out the meter.
I ordered the below as a replacement:
2.5-25ml/minute seems like a good range for my tank.
As a bonus the valve is better than most standard regulator needle valves. I can adjust the flow in increments of about 1ml/minute.
Below is the valve in action:
They have been in service for 2 months total now, 1 month each, so still an early review. It has been a solid upgrade though and was an easy install. They come with big 8mm barbed fittings but they can be unscrewed to reveal 1/8 female threads that standard needle valves for aquariums fit. I have also got some 1/8 to push fit fittings that I am yet to install as I am heading away on holiday for 2 weeks soon and don’t want to make any changes for the house-sitters to potentially have to fix!
Pros: adjusting my CO2 was made so much easier by being able to see exactly how much of an increase I was making with each adjustment. Monitoring that the valve isn’t drifting has been easy also, a quick check of the meter tells me it is steady.
Cons: I doubt that the reading is accurate. This means little to me, as I am not using it for a calculation or comparison between tanks. As long as the reading is consistent, even if it is wrong, I am fine with that. Also, the max pressure is listed as 40psi. I am unsure if that is a failure or accuracy maximum. Again, it doesn’t affect me as I run a low regulator pressure due to using a reactor. If I were using a diffuser that needed a high pressure, it may make me nervous.
As always, with any cheap gear, your mileage may vary. But, I thought it was worth sharing as it may help those with limited access to flow meters of appropriate sizes. So far it is proving to be the second best $25 I have spent on this tank, second only to the super red bristlenose I have in the tank.
34 Replies
·
2398 views

Supporting
Expert in Residence
Rockstar
Article Contributor
I want to thank @Unexpected for introducing me to this new forum, but most importantly for him being the first ever to build the Horizontal CO2 Reactor. I feel honored that "Yugang Reactor" as he calls it (Yugang 鱼缸 means fish tank) is introduced in @Unexpected journal, but it would be a pity if that journal gets cluttered with too much reactor talk. So let me open a dedicated thread for discussions, questions and help on this Horizontal Reactor.
I have been experimenting for years with CO2, and at some time I took videos of my (modified) Aquamedic reactor to watch the bubbles in slow motion. To my surprise I found that the combined surface area of the bubbles was not very high for achieving a 1.5 pH drop in my 250 liter tank, and that CO2 absorbs so fast in water that the lifetime of bubbles is quite short. So .... we don't need to juggle bubbles at all, we can just create a very simple absorption interface between flowing water and a pocket of CO2 above it. The Horizontal reactor is surprisingly simple, and has some benefits that we won't find in diffusers or conventional Cerges / Griggs bubble reactors:

Or a multi stage version ...

A detailed thread can be found on UKAPS, linked with the kind permission from Scapecrunch forum moderators #1
I am happy to help new users to verify the calculations on reactor dimensions for their tank, please send me a PM.
I have been experimenting for years with CO2, and at some time I took videos of my (modified) Aquamedic reactor to watch the bubbles in slow motion. To my surprise I found that the combined surface area of the bubbles was not very high for achieving a 1.5 pH drop in my 250 liter tank, and that CO2 absorbs so fast in water that the lifetime of bubbles is quite short. So .... we don't need to juggle bubbles at all, we can just create a very simple absorption interface between flowing water and a pocket of CO2 above it. The Horizontal reactor is surprisingly simple, and has some benefits that we won't find in diffusers or conventional Cerges / Griggs bubble reactors:
- Simple rules to find the correct dimensions for any tank, a small nano tank or a huge tank the size of a swimming pool.
- Very easy and cheap to build with plumbing materials. No fragile parts, low risk of leakage or malfunction.
- 100% CO2 absorption efficiency
- No need to experiment with vortices, venturis, diffusers, needles wheels, impellers / rotors, multi stage reactors - it is just a pipe with a gentle flow of water.
- No noise
- No mist in the tank
- No maintenance, and stable performance over time
- Virtually no reduction of flow from pump
- A purging valve is optional, as the reactor will purge itself from excessive trapped air.
- The reactor can be configured so that in the event of a failure, CO2 injection will not exceed a limit and fish cannot be gassed. Inherently safe.
- The reactor can be configured so that we do not need a precision regulator, because the reactor controls the CO2 injection rate
Or a multi stage version ...
A detailed thread can be found on UKAPS, linked with the kind permission from Scapecrunch forum moderators #1
I am happy to help new users to verify the calculations on reactor dimensions for their tank, please send me a PM.
536 Replies
·
99459 views
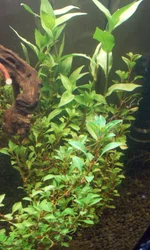
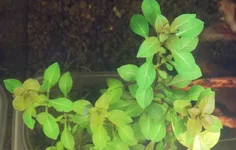
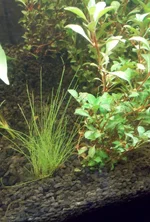
Ludwigia repens, hairgrass "eleocharis palustris" and ludwigia glandulosa all found locally growing emersed beside water and all growing submerged in water. Nice freebys if they survive the transition theres 20,000 stems in this tiny little pond. all clean no bugs put in tank with no fish to be safe will peroxide dip it before moving into other tank. 1 bunch l repens last pic I picked 8 days ago grown 2" and top turning more red with no melt at all. Well see how it goes. All found beside my local Lincoln dealer parking lot lol.
I've got local emersed plants before I know where theres a storm of lemon bacopa and anacharis is. Seems it always melted badly to mush. These plants are growing emersed for a week then submersed for days when water levels go up. Maybe they are more hardy being grown above and below water over and over? They may all melt to turds in weeks lol.
I've got local emersed plants before I know where theres a storm of lemon bacopa and anacharis is. Seems it always melted badly to mush. These plants are growing emersed for a week then submersed for days when water levels go up. Maybe they are more hardy being grown above and below water over and over? They may all melt to turds in weeks lol.
4 Replies
·
344 views
