
Welcome to ScapeCrunch
We are ScapeCrunch, the place where planted aquarium hobbyists come to build relationships and support each other. When you're tired of doom scrolling, you've found your home here.
Social Feed

Supporting
I Donated 2026
Rockstar
What do you think? Would you want to maintain something like this. I don't know that I would have room for it.
Tall Paludarium Reel
Tall Paludarium Reel
6 Replies
·
126 views


Supporting
I Donated 2026
AquaGirls
Journal UNS 150U - Nature Aquarium
The adventure begins...again. After a substantial absence from the hobby, I dunked my toe back in last fall with a small 60F shrimp tank, a Chihiros WRGB slim, and a Chihiros CO2 (citric/baking soda) system. A lot has changed since I started this hobby in the 90s, and it's been about 20 years since I tore my last tank down. 'Aquascaping' per se wasn't as much a thing back then. I didn't know anyone running CO2, and LED lights didn't really exist. The 60F was fun, and the shrimp seem happy, but I have been itching to get to building something with more elbow room.
I did happen to find a pic of my old 75 gallon bowfront tank a few weeks ago that was taken just before I tore it down prior to a big move. It ran great for 7 years. Was a simple low tech setup, with one hunk of driftwood, no rocks, plain gravel (no soil) a lot of simple plants (the sword plants did great), and some peaceful fish. Algae wasn't an issue, filtration was pretty subpar by current standards, but the tank did well despite that, and algae wasn't really an issue. Aesthetically blah by today's standards, and certainly not my goal for this build, but I remember being proud of how well this tank ran back then, and wasn't too demanding. Important as my life was very hectic back then.

So, the tech plan so far for the new 150U:
I ordered the tank and stand from UNS, and to my amazement, despite the worst mid-January winter storm we had in some years here, it was delivered on time by the freight company. I do not recommend trying to move a 5ft wide 400+lb tank and stand across snow and ice, down a slope, into to basement. Very thankful to have a tractor with forks, but still was a bit stressful getting this into the house. Miraculously we got it in the house in one piece, and I seriously questioned ever getting a tank larger than this in the future!

It did require disassembly outside the basement door to actually get it into the house around a berm of snow, along with some extra muscle from a few friends. (This was originally meant to be a 120P, until I realized the hardscape plan I had wouldn't quite fit. What's a another foot in length? )

Just getting the tank through the snow and ice was enough, and the base cabinet and tank just sort of landed in the room, and stayed there for a few days while devising a strategy for the next step. After recruiting a tall and strong friend, and sourcing some of those giant suction cup handles you use for moving shower glass walls, a few days later the tank was finally hoisted up onto the base.
As there is a dropped ceiling in the basement my plan was to hang the lights directly above the tank from the ceiling, rather than using a light stand. A few tiles were removed to investigate the structure above, and with some 2x4 extra bracing for the anchors, as none of the joists were in quite the right spot, two Chihiros Vivid 3 lights were installed directly above the tank. At this point I discovered that none of the electrical circuits in the basement were GFCI protected, so obviously that was immediately remedied. Too much gear and too much water to mess around with unprotected circuits.

With the ceiling open, I decided to run the lighting cables over the top of the wall to the left of the tank, and down into the mechanicals room there. The advantage being that the power cords are hidden from view after going through the ceiling tiles, and it's two less large power sources cluttering up the cabinet under the tank. Had to add an outlet in that closet, but I like how it turned out.
With the tank in position and leveled, and the lights finally installed, the next big issue is water. The well water here is liquid limestone. That was the initial mistake I made with the shrimp tank. Sure, neocaridina like hard water, but not THAT hard, and I quickly had to shift to remineralized distilled. I knew before even getting serious about planning this tank that the only reasonable option, for any future tanks here, is RO. The well water might be fine for Malawi Cichlids, but that's not my plan for this tank, but it will be great to have flexibility going forward. It's a big glass box, at just over 140 gallons, and it won't be the only one here (I hope), so the water part I want to get right from the start, and to make it easy to do water changes. The basement is a walkout, so draining water during water changes will be easy, and I would like to make filling it just as easy. I sourced two 70 gallon storage tanks for the RO water from Northern Tool, and ordered a Vectra S2 pump which will help with transfering water between tanks, as well as pumping it out through a hose to the aquarium(s) during water changes. Forgot to take a pic when I was done, but the pvc is all glued up now. I will finish installing the RO unit this weekend.

So, aquarium set up, lights in, and RO system with storage in progress. Next up? The exciting part. Hardscape! I have been hoarding Manzanita, Hakkai stone, and substrate for several months, so I'm excited to move on to the next step! Tank so far pictured below (although I have already removed the privacy film on the back in favor of adding the ARC RGB light screen in part due to the stair rail being visible and distracting. First screen was damaged in transit, so waiting on a replacement).

I did happen to find a pic of my old 75 gallon bowfront tank a few weeks ago that was taken just before I tore it down prior to a big move. It ran great for 7 years. Was a simple low tech setup, with one hunk of driftwood, no rocks, plain gravel (no soil) a lot of simple plants (the sword plants did great), and some peaceful fish. Algae wasn't an issue, filtration was pretty subpar by current standards, but the tank did well despite that, and algae wasn't really an issue. Aesthetically blah by today's standards, and certainly not my goal for this build, but I remember being proud of how well this tank ran back then, and wasn't too demanding. Important as my life was very hectic back then.
So, the tech plan so far for the new 150U:
| UNS 150U Tank & Stand |
| Chihiros Vivid 3 x2 |
| Chihirios Vivid 3 Shades x2 |
| GLA PRO-DS-1 Dual Stage CO2 System (Modular) |
| Chihiros Auto Dosing System (4 doser) |
| Chihiros Dosing Flow Adapter |
| Oase Biomaster 2 Thermo 600 |
| Oase Biomaster 2 Thermo 850 |
| ARC RBG Backlight Screen |
| ARC Stainless Yugang CO2 Reactor (Large) |
I ordered the tank and stand from UNS, and to my amazement, despite the worst mid-January winter storm we had in some years here, it was delivered on time by the freight company. I do not recommend trying to move a 5ft wide 400+lb tank and stand across snow and ice, down a slope, into to basement. Very thankful to have a tractor with forks, but still was a bit stressful getting this into the house. Miraculously we got it in the house in one piece, and I seriously questioned ever getting a tank larger than this in the future!
It did require disassembly outside the basement door to actually get it into the house around a berm of snow, along with some extra muscle from a few friends. (This was originally meant to be a 120P, until I realized the hardscape plan I had wouldn't quite fit. What's a another foot in length?
)Just getting the tank through the snow and ice was enough, and the base cabinet and tank just sort of landed in the room, and stayed there for a few days while devising a strategy for the next step. After recruiting a tall and strong friend, and sourcing some of those giant suction cup handles you use for moving shower glass walls, a few days later the tank was finally hoisted up onto the base.
As there is a dropped ceiling in the basement my plan was to hang the lights directly above the tank from the ceiling, rather than using a light stand. A few tiles were removed to investigate the structure above, and with some 2x4 extra bracing for the anchors, as none of the joists were in quite the right spot, two Chihiros Vivid 3 lights were installed directly above the tank. At this point I discovered that none of the electrical circuits in the basement were GFCI protected, so obviously that was immediately remedied. Too much gear and too much water to mess around with unprotected circuits.
With the ceiling open, I decided to run the lighting cables over the top of the wall to the left of the tank, and down into the mechanicals room there. The advantage being that the power cords are hidden from view after going through the ceiling tiles, and it's two less large power sources cluttering up the cabinet under the tank. Had to add an outlet in that closet, but I like how it turned out.
With the tank in position and leveled, and the lights finally installed, the next big issue is water. The well water here is liquid limestone. That was the initial mistake I made with the shrimp tank. Sure, neocaridina like hard water, but not THAT hard, and I quickly had to shift to remineralized distilled. I knew before even getting serious about planning this tank that the only reasonable option, for any future tanks here, is RO. The well water might be fine for Malawi Cichlids, but that's not my plan for this tank, but it will be great to have flexibility going forward. It's a big glass box, at just over 140 gallons, and it won't be the only one here (I hope), so the water part I want to get right from the start, and to make it easy to do water changes. The basement is a walkout, so draining water during water changes will be easy, and I would like to make filling it just as easy. I sourced two 70 gallon storage tanks for the RO water from Northern Tool, and ordered a Vectra S2 pump which will help with transfering water between tanks, as well as pumping it out through a hose to the aquarium(s) during water changes. Forgot to take a pic when I was done, but the pvc is all glued up now. I will finish installing the RO unit this weekend.
So, aquarium set up, lights in, and RO system with storage in progress. Next up? The exciting part. Hardscape! I have been hoarding Manzanita, Hakkai stone, and substrate for several months, so I'm excited to move on to the next step! Tank so far pictured below (although I have already removed the privacy film on the back in favor of adding the ARC RGB light screen in part due to the stair rail being visible and distracting. First screen was damaged in transit, so waiting on a replacement).

116 Replies
·
11104 views


Journal Farmer D. Singh's journal
Ive reorganized the order of my tanks so I can better keep track of them ie. Tank 2 moss tank is now tank 3. This helps in any confusion I had when tracking tanks they are in a sort of order now. Rather than taking time editing my old journal id rather create a new thread. Pics will be current (for the most part) as they are posted. I am not aquascaping. I am just farming.
92 Replies
·
6168 views

I Donated 2026
Expert in Residence
MOTM Winner
Rockstar
His study answers many questions and is filled with data for folks to pour over.
10 Replies
·
413 views

Since I am a fan of automation and cool gadgetry...has anyone seen or used this product before?
EvolvAqua Spectra 1 | Smart Aquarium Photometer & 24/7 Monitoring
AND SOLD HERE:
Spectra 1 Smart Photometer
Seems to be EU-based only at the moment...but man, I can't help but wish I could get my hands on one of these
EvolvAqua Spectra 1 | Smart Aquarium Photometer & 24/7 Monitoring
AND SOLD HERE:
Spectra 1 Smart Photometer
Seems to be EU-based only at the moment...but man, I can't help but wish I could get my hands on one of these
10 Replies
·
685 views

I picked up a UNS 45T secondhand and decided to set up a high tech, NA-inspired triangular layout. Aiming to keep this relatively low maintenance.
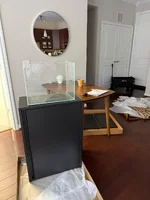

For the cabinet, I ordered a SUNDSO cabinet from IKEA. It's a stylish black indoor-outdoor cabinet made of galvanized steel but extremely flimsy, with all of the panels warping at the slightest touch. I built a simple lumber frame from 2x2s and 1/4" plywood to go inside. Although it's not tied into the cabinet, the frame measurements have so little tolerance that it is solid and reinforces the cabinet perfectly with no torquing or lateral movements. This cabinet is ideal because the shelving and bottom panels can be omitted from the installation without compromising the assembly of the walls, so I was able to insert the lumber frame inside and transfer all of the load directly onto the floor. The other major benefit of this cabinet was the adjustable feet, which made it easy to achieve perfect contact between the top of the lumber frame and the inside of the cabinet. Essentially, the cabinet acts as an aesthetic shell that fits over a much more structurally sound stand. The only other modification made was to drill holes in the side and back panels for plumbing and electrical wiring. The sharp holes were fitted with 3D printed grommets.
Equipment:

Cabinet and equipment close-up
Layout
The goal is a triangular peninsula layout with lots of negative space. In the past I have done much more hardscape-heavy layouts with way too many plant species, so I'm trying a slightly more minimalist feel with mostly epiphytes and mosses.
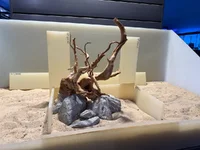
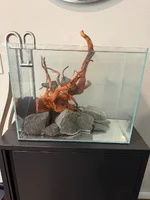
Final layout. Spiderwood and some stone whose name I can't remember. The majority were very geometric and cuboid, so what you see are the most organic looking pieces I could find in the bin. Substrate is Fluval Stratum and UNS Controsoil which will be added after planting.
Plant list, if sourcing works out
Inspiration
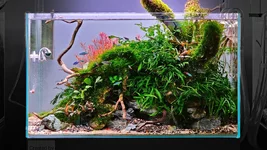
Heavily inspired by this aquascape by Rachel Ellis for Horizon Aquatics.
Other inspiration comes from JJ Aquarium


The tank is currently filled and in a dark start with some seeded media while we wait for the light to arrive. Chihiros halts business during the entire month of Chinese New Year so it hasn't shipped yet.
For the cabinet, I ordered a SUNDSO cabinet from IKEA. It's a stylish black indoor-outdoor cabinet made of galvanized steel but extremely flimsy, with all of the panels warping at the slightest touch. I built a simple lumber frame from 2x2s and 1/4" plywood to go inside. Although it's not tied into the cabinet, the frame measurements have so little tolerance that it is solid and reinforces the cabinet perfectly with no torquing or lateral movements. This cabinet is ideal because the shelving and bottom panels can be omitted from the installation without compromising the assembly of the walls, so I was able to insert the lumber frame inside and transfer all of the load directly onto the floor. The other major benefit of this cabinet was the adjustable feet, which made it easy to achieve perfect contact between the top of the lumber frame and the inside of the cabinet. Essentially, the cabinet acts as an aesthetic shell that fits over a much more structurally sound stand. The only other modification made was to drill holes in the side and back panels for plumbing and electrical wiring. The sharp holes were fitted with 3D printed grommets.
Equipment:
- Tank: UNS 45T
- Filtration: Oase Filtosmart Thermo 100, FZone stainless steel inlet/outlet pipes with surface skimmer
- Lighting: Chihiros WRGB II 10th Edition 45cm
- CO2: 5 lb cylinder, FZone budget regulator, FZone inline CO2 diffuser
Cabinet and equipment close-up
Layout
The goal is a triangular peninsula layout with lots of negative space. In the past I have done much more hardscape-heavy layouts with way too many plant species, so I'm trying a slightly more minimalist feel with mostly epiphytes and mosses.
Final layout. Spiderwood and some stone whose name I can't remember. The majority were very geometric and cuboid, so what you see are the most organic looking pieces I could find in the bin. Substrate is Fluval Stratum and UNS Controsoil which will be added after planting.
Plant list, if sourcing works out
- Java fern trident
- Ludwigia arcuata
- S. repens
- Hydrocotyle japan
- Buce lamandau mini purple + other mixed buce
- Anubias nana petite
- Riccardia chamedryfolia
- Christmas or weeping moss
Inspiration
Heavily inspired by this aquascape by Rachel Ellis for Horizon Aquatics.
Other inspiration comes from JJ Aquarium
The tank is currently filled and in a dark start with some seeded media while we wait for the light to arrive. Chihiros halts business during the entire month of Chinese New Year so it hasn't shipped yet.

80 Replies
·
7459 views
Supporting
I Donated 2026
Rockstar
I've done some reading on the subject of reusing aquasoil. There are videos showing fully removing the soil, cleaning it to remove all old detritus, and then even baking it. @Dennis Wong (2hr Aquarist) discusses regular replenishing of depleted aquasoil but I didn't see an article on a complete new scape using old soil. It seems to me that once you have removed all hardscape and livestock from a tank, you could remove a partial amount of soil, stir up what is remaining quite well while also doing a deep vacuum to remove as much detritus as possible, and then add in fresh soil to desired substrate level. In theory this would leave a substantial amount of beneficial bacteria in the tank, and if you're also reusing biomedia, the tank would cycle in very short time.
I was about to start the next couple new tanks with new soil but have paused to consider these options. I currently have 3 scapes that I'll be breaking down, but I can break down one tank at a time now, clean the soil in the tank as I described and, move the soil to the new tank (along with the additional new soil). The catch is that I would still have to do the scaping either underwater, or holding off filling with water for the extended time while I place hardscape, so I don't know how well live bacteria in the old soil would handle that.
Curious to hear other's thoughts, especially if you've actually done this.
15 Replies
·
673 views

Staff member
I Donated 2026
Founding Member
This is the future home for the announcements when someone obtains an achievement badge. Let the games begin!
2060 Replies
·
79707 views
Staff member
I Donated 2026
Founding Member
Hello Welcome, EvolvAqua
Welcome to ScapeCrunch, @EvolvAqua!
We would love to get to know you. Please tell us about yourself. What tank do you have?
We would love to get to know you. Please tell us about yourself. What tank do you have?
0 Replies
·
25 views

Santa came early this year with a new 75g tank. I've never owned a 4' tank ever been stuck on the normal 30" wide 29g and 20g's forever. I wanted the uns 90u 36x22x22 but 750.00 is nuts to me I don't have that much in all tanks and equip I own so went cheap route.
Saw the 75g at PetSmart the imagitarium brand for 150 on sale. Those cheapos have bad reviews on leaking and I believe it as I actually picked up a free leaky 75g imagitarium at petco last week and sold it for snake terrarium for 40.00. Went to petco they also have the 50% off sale on marineland and aqueon. The tank was 159.00 out the door. Got lucky the manager said take this set of new glass tops for free, were a return they cant sell it.I assume the made in USA marineland is a better tank than the other cheapos and I actually don't mind the black silicone.
Went to Lowes today for some wood 4- 2x4x8 and 2- 2x4x10 and sheet if 1/2 osb for top and bottom shelf and for extra strength. When I get done I'm sure it would hold a 300g tank. Will wrap the tank in either bead board wood paneling or 1/4" plywood with some nice moulding on corners. Def gotta make a lip to hide the bottom plastic rim as well so its not so ugly. probably build a hood to why not hide some rims! Just gotta build or find a pair of doors on something else I can steal and use for this stand. I don't plan on getting it setup for few weeks but want stand base 1/2 done now so I can try some diff dry scapes with wood and rocks in it. This will be replacing my 20long I was scaping in other journal its now a plant farm full of ludwigia and plants for sale.
Still not sure on the name on this tank, Whipple landing is where I took some pics I want to copy for the tank. Its feed by the great pee dee river here so name may change later.


24 Replies
·
971 views
Staff member
I Donated 2026
Founding Member
Hello Welcome, KrisBerd
Welcome to ScapeCrunch, @KrisBerd!
We would love to get to know you. Please tell us about yourself. What tank do you have?
We would love to get to know you. Please tell us about yourself. What tank do you have?
0 Replies
·
22 views