
Welcome to ScapeCrunch
We are ScapeCrunch, the place where planted aquarium hobbyists come to build relationships and support each other. When you're tired of doom scrolling, you've found your home here.
Social Feed

Journal 100x40x40 Nivliw's Planted Tank
Hello everyone,
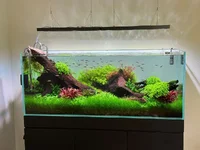
Today I finally moved from my old aquarium, a Juwel Rio 180, to a new optiwhite tank built by Genesi Acquari.
I decided to make this change for two main reasons. First, I never really liked the aesthetics of the Rio 180, and its plastic frame made it somewhat limiting when it came to using lily pipes and other cleaner-looking hardware. Second, I had been dealing with persistent staghorn algae issues, so I thought it would be a good opportunity to start fresh.
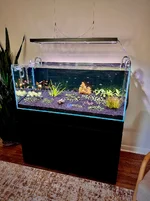
For reference, this was the Rio 180 before I dismantled it today:
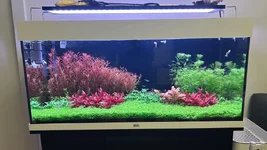
Most of the plants in this new setup were taken from the Rio 180 before dismantling it today. I trimmed healthy tops from the old plants and replanted them in this aquarium, hoping they will establish themselves properly and grow much better under the new conditions.
And here is the new tank on day one:
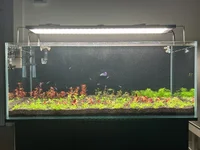
June 3rd, 2026
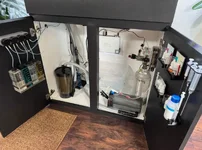
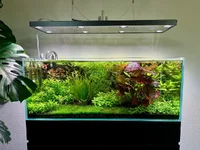
Some additional shots of the new setup:
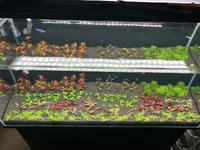
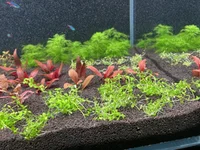
What do you think of the setup so far?
At the moment, the Monte Carlo looks a bit "lifted" rather than hugging the substrate. Is this something I should be concerned about, or will it naturally settle and develop into a proper carpet as it adapts and produces new growth?
As mentioned above, most of the plants were transferred from the Rio 180 that I dismantled today, so they may need some time to adjust.
Thank you all for stopping by, and I look forward to hearing your thoughts and suggestions!
Today I finally moved from my old aquarium, a Juwel Rio 180, to a new optiwhite tank built by Genesi Acquari.
I decided to make this change for two main reasons. First, I never really liked the aesthetics of the Rio 180, and its plastic frame made it somewhat limiting when it came to using lily pipes and other cleaner-looking hardware. Second, I had been dealing with persistent staghorn algae issues, so I thought it would be a good opportunity to start fresh.
For reference, this was the Rio 180 before I dismantled it today:
Most of the plants in this new setup were taken from the Rio 180 before dismantling it today. I trimmed healthy tops from the old plants and replanted them in this aquarium, hoping they will establish themselves properly and grow much better under the new conditions.
And here is the new tank on day one:
Tank Specifications
- Tank: Optiwhite aquarium by Genesi Acquari
- Dimensions: 100 × 40 × 40 cm
- Volume: 160 L
- Lighting: Chihiros WRGB II Pro 90
- CO₂: Inline diffuser with refillable cylinder
- Filter: Oase BioMaster 2 Thermo 600
- Substrate: Dennerle Black Gravel 1–2 mm
- Additional equipment:
- OaseSkim (which I will likely remove soon and replace with glass lily pipes featuring an integrated surface skimmer),
- Neo Flow Reliever
- Hanna's digital testers For no3 po4 and fe
Water Parameters
- pH: 7.1 → 5.8 with CO₂ running
- KH: 0
- GH: 5–7
- TDS: 120 ppm
- NO₃: 6–7 ppm
- PO₄: 1.25 ppm
Setup Date
June 3rd, 2026
Some additional shots of the new setup:
Questions
What do you think of the setup so far?
At the moment, the Monte Carlo looks a bit "lifted" rather than hugging the substrate. Is this something I should be concerned about, or will it naturally settle and develop into a proper carpet as it adapts and produces new growth?
As mentioned above, most of the plants were transferred from the Rio 180 that I dismantled today, so they may need some time to adjust.
Thank you all for stopping by, and I look forward to hearing your thoughts and suggestions!
14 Replies
·
936 views


I’m often out and about working in the field and stumble upon breathtaking examples of often overlooked and under appreciated slices of nature that Florida has to offer.
My neck of the woods is filled with marsh/wetlands ripe with both native and invasive wildlife of all flavors; I want to start a thread where I can document and share.
I’ll update this thread whenever I capture something noteworthy. Much of what catches my eye is aquatic flora, but I try and document anything captivating. I hope you find this as beautiful and fascinating as I do.


My neck of the woods is filled with marsh/wetlands ripe with both native and invasive wildlife of all flavors; I want to start a thread where I can document and share.
I’ll update this thread whenever I capture something noteworthy. Much of what catches my eye is aquatic flora, but I try and document anything captivating. I hope you find this as beautiful and fascinating as I do.
117 Replies
·
7510 views

Sponsor
Expert in Residence
Rockstar
0 Replies
·
19 views

Hey all,
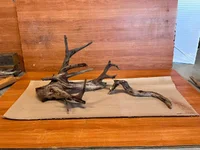
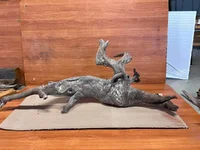
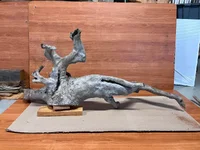
I’m a week away from cabinet making, waiting on supplies but managed to find some great driftwood this weekend. This is in my workshop so I’ve just cut a bit of cardboard to start playing with ideas for my new 1200x450x450 rimless tank. You’ll have to look past the background and lighting for now please.
Which design do you think I should progress?
This will be a more nature style scape with limited stem plants and mostly crypts. I’m not keen on trimming all the time and prefer the form of leaves.
I will likely use some aqua soil in mesh bags in the deeper areas which will be capped with an inert blond sand as this is my best available option here.
I will start a journal for my stand build with one of these ideas.
Style 1
Style 2
Style 3
Noting that there will be a little trimming required to sort final placements.
Cheers
C
I’m a week away from cabinet making, waiting on supplies but managed to find some great driftwood this weekend. This is in my workshop so I’ve just cut a bit of cardboard to start playing with ideas for my new 1200x450x450 rimless tank. You’ll have to look past the background and lighting for now please.
Which design do you think I should progress?
This will be a more nature style scape with limited stem plants and mostly crypts. I’m not keen on trimming all the time and prefer the form of leaves.
I will likely use some aqua soil in mesh bags in the deeper areas which will be capped with an inert blond sand as this is my best available option here.
I will start a journal for my stand build with one of these ideas.
Style 1
Style 2
Style 3
Noting that there will be a little trimming required to sort final placements.
Cheers
C
Which scape idea should I progress for my new tank?
9 votes total
3 Replies
·
63 views

Supporting
I Donated 2026
Rockstar
Article Contributor
See this post regarding AR Mini trimming/planting, and this post regarding Cyperus helferi trimming and planting!
I have hardly seen this subject talked about enough, but I think that it's one of the biggest reasons contributing to beginner's algae-filled downfalls! If you're buying plants from big stores like Aquarium Plants Factory (really good btw), Buceplant, etc. 90% of the plants you are receiving are terrestrially-grown.
Here's an important fact about terrestrially-grown aquarium plants
100% of all terrestrial leaves, when submerged under water, for any plant, will eventually get algae and die.
Some can take a while (anubias, java fern, cyperus helferi), while others will either melt (Crypts) or quickly get algae (AR Mini, Staurogyne repens, stem plants, etc)
But what about buying submerged-growth plants? From hobbyists, or BurrAqua, for example?
There is still a chance that your tank's conditions are different enough that many, if not most leaves you plant, will melt/die/attract algae.
How do we fix this? By leaving only enough leaves for the plant to continue to absorb light and put out new growth. Usually the top 4-6 leaves for stem plants.

It's a lot of work up front, but you will MAJORLY reduce the amount of waste, DOC 's, and algae-inducing scenarios if you trim your plants before planting.
I've done this in ALL of my tanks in the last 4 years with great success.
The easiest way to do this is with stainless squeeze scissors over your sink:
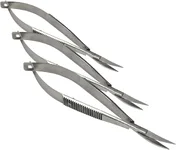
Here's the ones I recommend.
Yes, it takes a ton of patience. But if it could make a big difference in preventing the 2-3 month algae bloom in your tank, would you do it?
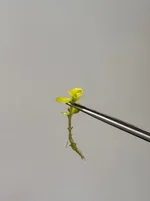
Lysimachia nummularia 'Aurea', only a few top leaves left, 3" of stem.
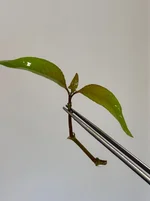
Hygrophila corymbosa. Note how I left the leaf nodes on the stem? That's where roots will grow from. Almost all stem plants need nodes to grow roots, even if you've removed the leaves from them.
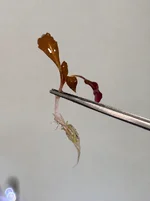
Terrestrially-grown AR 'Mini' from APF. See how I did the same in this thread for my previous tanks.
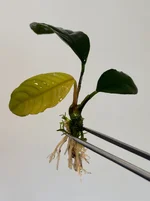
This Anubias barteri var. coffeefolia was grown terrestrially (often called 'emersed' or emergent) in a greenhouse. I removed all but the newest 3 leaves, and trimmed the roots too. Terrestrial roots are quite different from submerged with certain plants.
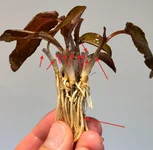
Almost ALL Cryptocoryne species are grown terrestrially. These plants grow as a Rosette, where the inner-most leaves on the "stem" are the freshest, and the outer-most are the oldest. I removed a TON of old terrestrial leaves, leaving just enough for the plant to be able to grow new submerged leaves in my tank as quickly as possible, while leaving as few algae-attracting terrestrial leaves as possible. I also trimmed the roots, which were 5" long upon receiving the plant.

Lobelia cardinalis 'mini'
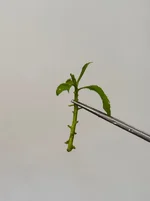
Penthorum sedoides. Would also look very similar for Staurogyne repens, too.
Did you know that Blyxa japonica is actually a stem plant? It looks like a rosette, but it's actually a squat, wide stem plant. The lowest/outermost leaves are the oldest, and even though this is a true aquatic plant with no terrestrial form in nature, I know that it likes to throw a fit and melt a good portion of it's oldest leaves when transitioning to my tank's conditions. Here's what it looked like when I received it from @Burr740:

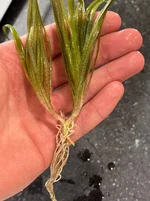
Nice and trimmed up. Less problematic at the 1-2 month mark in the tank's development, I know it!
What about delicate/feather plants?
They're super annoying to prep. I still only keep the top 3-4" max.
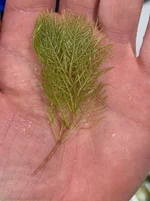
With Myriophyllum mattogrossense 'Golden', I only keep a few inches and still try to remove some of the lower leaves that would otherwise just rot by being buried in my inert sand.

What about Myriophyllum sp. "Roraima"? F*ck that. Nightmare to trim lower leaves, just trim it to 3" (not pictured) and discard the bottom when planting.
Curious what you guys think! I know I could receive plenty of "I've never done this, my tank has been fine" but I'd recommend trying it first before having a strong opinion of it
By the way, all plants pictured were actually used in my upcoming 120cm Showcase tank:
I have hardly seen this subject talked about enough, but I think that it's one of the biggest reasons contributing to beginner's algae-filled downfalls! If you're buying plants from big stores like Aquarium Plants Factory (really good btw), Buceplant, etc. 90% of the plants you are receiving are terrestrially-grown.
Here's an important fact about terrestrially-grown aquarium plants
100% of all terrestrial leaves, when submerged under water, for any plant, will eventually get algae and die.
Some can take a while (anubias, java fern, cyperus helferi), while others will either melt (Crypts) or quickly get algae (AR Mini, Staurogyne repens, stem plants, etc)
But what about buying submerged-growth plants? From hobbyists, or BurrAqua, for example?
There is still a chance that your tank's conditions are different enough that many, if not most leaves you plant, will melt/die/attract algae.
How do we fix this? By leaving only enough leaves for the plant to continue to absorb light and put out new growth. Usually the top 4-6 leaves for stem plants.
It's a lot of work up front, but you will MAJORLY reduce the amount of waste, DOC 's, and algae-inducing scenarios if you trim your plants before planting.
I've done this in ALL of my tanks in the last 4 years with great success.
The easiest way to do this is with stainless squeeze scissors over your sink:
Here's the ones I recommend.
Yes, it takes a ton of patience. But if it could make a big difference in preventing the 2-3 month algae bloom in your tank, would you do it?
Here are some specific plant examples:
For most true stem plants, I like to leave 3-4" of stem, trimming roots if necessary, and leaving only 4-6 of the freshest leaves. More than that, they will eventually be algae magnets. Less than that (like 2 leaves only) they might not survive the shock.Lysimachia nummularia 'Aurea', only a few top leaves left, 3" of stem.
Hygrophila corymbosa. Note how I left the leaf nodes on the stem? That's where roots will grow from. Almost all stem plants need nodes to grow roots, even if you've removed the leaves from them.
Terrestrially-grown AR 'Mini' from APF. See how I did the same in this thread for my previous tanks.
This Anubias barteri var. coffeefolia was grown terrestrially (often called 'emersed' or emergent) in a greenhouse. I removed all but the newest 3 leaves, and trimmed the roots too. Terrestrial roots are quite different from submerged with certain plants.
Almost ALL Cryptocoryne species are grown terrestrially. These plants grow as a Rosette, where the inner-most leaves on the "stem" are the freshest, and the outer-most are the oldest. I removed a TON of old terrestrial leaves, leaving just enough for the plant to be able to grow new submerged leaves in my tank as quickly as possible, while leaving as few algae-attracting terrestrial leaves as possible. I also trimmed the roots, which were 5" long upon receiving the plant.
Lobelia cardinalis 'mini'
Penthorum sedoides. Would also look very similar for Staurogyne repens, too.
Did you know that Blyxa japonica is actually a stem plant? It looks like a rosette, but it's actually a squat, wide stem plant. The lowest/outermost leaves are the oldest, and even though this is a true aquatic plant with no terrestrial form in nature, I know that it likes to throw a fit and melt a good portion of it's oldest leaves when transitioning to my tank's conditions. Here's what it looked like when I received it from @Burr740:
Nice and trimmed up. Less problematic at the 1-2 month mark in the tank's development, I know it!
What about delicate/feather plants?
They're super annoying to prep. I still only keep the top 3-4" max.
With Myriophyllum mattogrossense 'Golden', I only keep a few inches and still try to remove some of the lower leaves that would otherwise just rot by being buried in my inert sand.
What about Myriophyllum sp. "Roraima"? F*ck that. Nightmare to trim lower leaves, just trim it to 3" (not pictured) and discard the bottom when planting.
Curious what you guys think! I know I could receive plenty of "I've never done this, my tank has been fine" but I'd recommend trying it first before having a strong opinion of it
By the way, all plants pictured were actually used in my upcoming 120cm Showcase tank:
12 Replies
·
165 views


Staff member
I Donated 2026
Founding Member
The theme for this month's contest is: Shades of Green
Please take a picture of shades of green in your aquarium. Be as artistic and creative as you like.
The rules:
A $25 store credit from BurrAqua thanks to @Burr740!

Good Luck!
Please take a picture of shades of green in your aquarium. Be as artistic and creative as you like.
The rules:
- Submissions are allowed between August 16 and August 23.
- Voting will start on August 23 at 12:01 am Eastern time.
- Voting will end on August 30 at 11:30 pm Eastern time.
A $25 store credit from BurrAqua thanks to @Burr740!
Good Luck!
2 Replies
·
68 views
Supporting
I Donated 2026
Rockstar
Article Contributor
This is not a step by step tutorial, more for inspiration and general information!
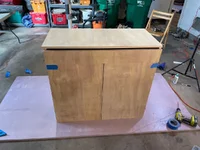
My very first DIY stand was a 100cm two-door home-depot plywood stand. It looks fine in pictures, but was NOT up to the insanely high, unhealthy standards of excellence that I hold myself to with everything:


No journal for this old tank.
The lesson here was: don’t use home depot plywood! It sucks. Find a real plywood dealer and spend the extra $.
My next stand was way more ambitious: a 150cm x 60cm stand, designed to hold up 2400+ lbs, made from quality baltic birch plywood. 3 doors, two interior weight-bearing vertical panels, adjustable leveling feet. It worked great, and can be seen in my two journals Many Lessons and Inert Sand Trials:
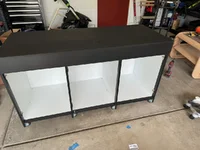
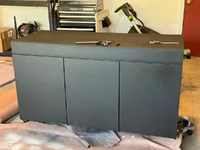
I did a WAY better job on this stand, and it now resides with @Kwyet ! Also, a spray finish really makes a big difference.
After that, the 90cm Experiment Tank stand. Two doors, and instead of a cumbersome middle panel, I used one hefty plywood column:


Scottish accent Fookin' crispay
This tank also had a waterproof, sealed bottom “rim” so up to 2cm of water would have to fill the stand bottom before it overflows. Useful for emergencies or leaks, when combined with loud water leak alarms! This stand and tank is in my garage, soon to be sold to anyone in Colorado who wants it!
This stand is for my new 120cm tank! This stand is the culmination of seven years of stand-making. All of my mistakes, lessons, preferences, and skills were combined to make the stand of my dreams!
And of course, I had to move homes and got seriously injured, requiring surgery, while I was trying to finish it. Sorry for the lack of pictures!
I would not say this design is beginner friendly. It’s not expert, but likely intermediate difficulty. I have a Wen track saw and a Sawstop PCS Cabinet saw, which changes the entire process compared to someone working with more difficult tools. I also have a Graco Magnum X7 paint sprayer for a professional paint finish.
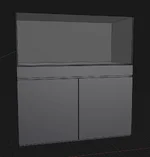
First, I started with mocking up the stand in Shapr3D, my modeling program:

My local lumber company had really good deals on 5x5’ sheets of ¾” baltic birch plywood.
IT IS CRITICAL for precision woodworking like this (no trim to cover up mistakes) to get exact measurements, particularly for the thickness of the plywood. For example, using a pair of digital calipers, this 3/4" plywood was 17.8mm thick (0.7 in a lot smaller than .75"), which is what I used in my modeling program to create the exact length of cuts to properly span 120cm long and 60cm deep.
I collected the exact measurements of each part needed, and threw it into Opticutter to determine how to best cut my 5x5’ plywood sheets:
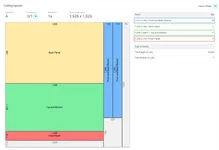
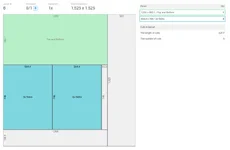

You don't need to study these sheets; the photos are just to show you how Opticutter works to save you from creating too much waste, and using the fewest cuts!
4-plywood-thick center column, with "notch" for the front brace to fit flush:

Top down first on a flat, even surface, then add sides and back:
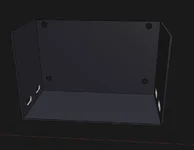
Flip right-side-up, and add the bottom panel:

Add the rear brace, the front brace, and the center column. Make sure the front brace and column are flush with the front of the top/back panel edges.
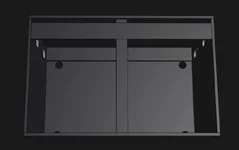
Add the front panel and bottom lip pieces:
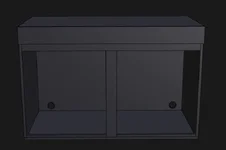
For the doors, create a notched finger pull (side view):

Door hinge stuff:
And it's done! Here's some of the few pictures I DID take of this process, sorry! I had a lot going on:
Gluing the 4-ply-thick center column:

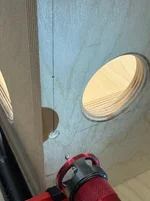
To make the access holes in the back and side panels, I 3D printed some plastic guides for my router bit to follow, then roughly cut the inside out so the router had less material to work through:

Perfect routered holes:
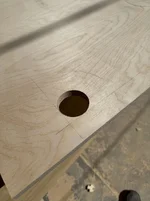
I learned to score the plywood with my box cutter first, so when it chipped from the rough jigsaw cut, it chipped ONLY to the scored lines:

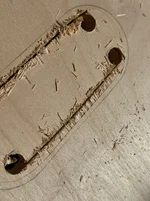
I removed the excess interior material with the jigsaw, then routered. I also used a roundover bit (in process on the left hole, right hole not rounded):
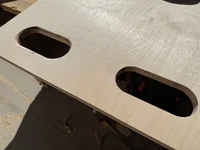
Any chips or imperfections could be fixed later with bondo wood filler and sanding.
Once I had my access holes cut out, I could assemble! I used clamps to hold the panels together and flush, used an Incra T-Rule (amazing device) to mark a line that was the middle of my plywood panel's core:

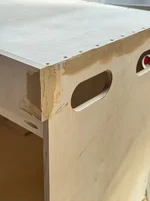
Then, I drilled countersink holes with this bit for the screw heads to sit below the level of the wood:
Screws:
Since the screws on the top, bottom, and rear of the stand would never be visible, I decided to skip the annoying "pocket screw and glue" scenario and just go with crazy robust torx-head 1.5” construction screws. I LOVED it. Definitely my preferred method, though they really do require pre-drilling AND drilling countersink heads. Still, way stronger than pocket screws my god.
Wood filling and Priming:
Bondo wood filler is amazing stuff. I used TONS of it, this was just the first pass:
Apply, sand, apply more, sand more.
Then I primed with Sherwin Williams Gallery Series primer, and sprayed with a TrueAirless 515 tip in my Magnum X7:

Once the primer was dry, I sanded it, and sprayed again. Once dry, sanded again. Lots of sanding:

I wiped the tank down with tack cloth, then went for the finishing coat using a Graco FFLP 310 Tip and Sherwin-Williams Gallery Series Waterborne Topcoat in true black. Probably a matte or satin sheen, I can’t recall. Not cheap, good paint! Make sure to filter your paint through a find mesh before spraying.
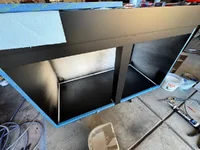
By far the best, most perfect finish I've ever had on a stand. BTW, the doors are fully adjustable up, down, left and right to get them nicely aligned. Blum hinges rock!
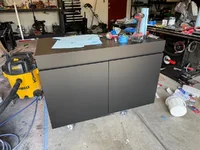
Once it was all put together, I got some help to move it into the new house. And installed the oversized Aquarium Mat.
I paid Tommy, the owner of Aqua Rocks Colorado, a delivery fee to have my custom 120x60x50cm tank delivered and installed on the stand. Once positioned evenly around all sides, I trimmed the aquarium mat with an Xacto knife, and was finished!
I'm tired today, but I'll upload more pics of this stand soon to this thread and to the 120cm Journal, too!
My very first DIY stand was a 100cm two-door home-depot plywood stand. It looks fine in pictures, but was NOT up to the insanely high, unhealthy standards of excellence that I hold myself to with everything:
No journal for this old tank.
The lesson here was: don’t use home depot plywood! It sucks. Find a real plywood dealer and spend the extra $.
My next stand was way more ambitious: a 150cm x 60cm stand, designed to hold up 2400+ lbs, made from quality baltic birch plywood. 3 doors, two interior weight-bearing vertical panels, adjustable leveling feet. It worked great, and can be seen in my two journals Many Lessons and Inert Sand Trials:
I did a WAY better job on this stand, and it now resides with @Kwyet ! Also, a spray finish really makes a big difference.
After that, the 90cm Experiment Tank stand. Two doors, and instead of a cumbersome middle panel, I used one hefty plywood column:
Scottish accent Fookin' crispay
This tank also had a waterproof, sealed bottom “rim” so up to 2cm of water would have to fill the stand bottom before it overflows. Useful for emergencies or leaks, when combined with loud water leak alarms! This stand and tank is in my garage, soon to be sold to anyone in Colorado who wants it!
The new 120cm stand:
This stand is for my new 120cm tank! This stand is the culmination of seven years of stand-making. All of my mistakes, lessons, preferences, and skills were combined to make the stand of my dreams!
And of course, I had to move homes and got seriously injured, requiring surgery, while I was trying to finish it. Sorry for the lack of pictures!
I would not say this design is beginner friendly. It’s not expert, but likely intermediate difficulty. I have a Wen track saw and a Sawstop PCS Cabinet saw, which changes the entire process compared to someone working with more difficult tools. I also have a Graco Magnum X7 paint sprayer for a professional paint finish.
First, I started with mocking up the stand in Shapr3D, my modeling program:
My local lumber company had really good deals on 5x5’ sheets of ¾” baltic birch plywood.
IT IS CRITICAL for precision woodworking like this (no trim to cover up mistakes) to get exact measurements, particularly for the thickness of the plywood. For example, using a pair of digital calipers, this 3/4" plywood was 17.8mm thick (0.7 in a lot smaller than .75"), which is what I used in my modeling program to create the exact length of cuts to properly span 120cm long and 60cm deep.
I collected the exact measurements of each part needed, and threw it into Opticutter to determine how to best cut my 5x5’ plywood sheets:
You don't need to study these sheets; the photos are just to show you how Opticutter works to save you from creating too much waste, and using the fewest cuts!
Steps I followed for this stand:
- Cut all panels using table/track saw.
- Make 4-ply support column. Make notch cut ~145mm from top of column to fit behind front brace. Glue and trim/clean.
- Cut out "access holes" in panels, including pocket holes for front and back brace, predrilled holes for front brace (in middle, and upper portion for future front panel) and predrilled holes for back panel. Use a router with roundover bit to create round, smooth holes for cord and tubing access, as well as handles for moving the stand around!
- Run the "standing height "of the side and back panels (and 4-ply center column) through table saw to make uniform height for all 4 parts. All of these 4 parts should be cut to the exactly same height.
- Trim door “finger-pull” with a router. Just a 45-degree "slice" off the door's corner to make a finger pull.
- To assemble: Flip top upside down, test fit sides and back, secure with screws. Make front edge flush, back can be trimmed down with router flush bit if necessary.
- Attach the bottom panel, Make front edge flush, as the back can be trimmed down.
- Add 4-ply column, ensure front edge flush.
- Add front and back "braces".
- Add front panel, and bottom "lips" that hold any spilled water in.
- Spray and sand stand, fill gaps with Bondo wood filler. Sand and repeat until corners, cracks and divots are smooth.
- Caulk the inner corners where water would be.
- Paint stand and doors.
- Attach doors.
- Add feet.
- Run electrical and LED strips.
- Cut foam mat to size.
4-plywood-thick center column, with "notch" for the front brace to fit flush:
Top down first on a flat, even surface, then add sides and back:
Flip right-side-up, and add the bottom panel:
Add the rear brace, the front brace, and the center column. Make sure the front brace and column are flush with the front of the top/back panel edges.
Add the front panel and bottom lip pieces:
For the doors, create a notched finger pull (side view):
Door hinge stuff:
And it's done! Here's some of the few pictures I DID take of this process, sorry! I had a lot going on:
Gluing the 4-ply-thick center column:
To make the access holes in the back and side panels, I 3D printed some plastic guides for my router bit to follow, then roughly cut the inside out so the router had less material to work through:
Perfect routered holes:
I learned to score the plywood with my box cutter first, so when it chipped from the rough jigsaw cut, it chipped ONLY to the scored lines:
I removed the excess interior material with the jigsaw, then routered. I also used a roundover bit (in process on the left hole, right hole not rounded):
Any chips or imperfections could be fixed later with bondo wood filler and sanding.
Once I had my access holes cut out, I could assemble! I used clamps to hold the panels together and flush, used an Incra T-Rule (amazing device) to mark a line that was the middle of my plywood panel's core:
Then, I drilled countersink holes with this bit for the screw heads to sit below the level of the wood:
Screws:
Since the screws on the top, bottom, and rear of the stand would never be visible, I decided to skip the annoying "pocket screw and glue" scenario and just go with crazy robust torx-head 1.5” construction screws. I LOVED it. Definitely my preferred method, though they really do require pre-drilling AND drilling countersink heads. Still, way stronger than pocket screws my god.
- SPAX #8, 1-1/2" Interior Flat Head Torx Wood Screws
- INCRA T-Ruler 6 inch for marking my ~8.9mm line (middle of the plywood core I was screwing into).
Wood filling and Priming:
Bondo wood filler is amazing stuff. I used TONS of it, this was just the first pass:
Apply, sand, apply more, sand more.
Then I primed with Sherwin Williams Gallery Series primer, and sprayed with a TrueAirless 515 tip in my Magnum X7:
Once the primer was dry, I sanded it, and sprayed again. Once dry, sanded again. Lots of sanding:
I wiped the tank down with tack cloth, then went for the finishing coat using a Graco FFLP 310 Tip and Sherwin-Williams Gallery Series Waterborne Topcoat in true black. Probably a matte or satin sheen, I can’t recall. Not cheap, good paint! Make sure to filter your paint through a find mesh before spraying.
By far the best, most perfect finish I've ever had on a stand. BTW, the doors are fully adjustable up, down, left and right to get them nicely aligned. Blum hinges rock!
Once it was all put together, I got some help to move it into the new house. And installed the oversized Aquarium Mat.
I paid Tommy, the owner of Aqua Rocks Colorado, a delivery fee to have my custom 120x60x50cm tank delivered and installed on the stand. Once positioned evenly around all sides, I trimmed the aquarium mat with an Xacto knife, and was finished!
I'm tired today, but I'll upload more pics of this stand soon to this thread and to the 120cm Journal, too!
Questions? Ask below! I love to help out.
3 Replies
·
90 views
Supporting
I Donated 2026
Rockstar
Article Contributor


Main idea/inspiration:
Since my main 150p aquarium is in our front room and is the first thing we and our guests see, I can't afford to experiment much with it. I also spent like $600 on aquasoil to fill it, so I thought I'd like to try something different.This tank will be 100% BDBS substrate, no fertilized substrate. No root tabs (yet), no aquasoil. Only water column fertilization, to challenge myself to see whether I can grow plants well without aquasoil or not! Inspired by the @Burr740 BDBS journals and many other amazing inert-substrate aquariums out there. This isn't a dutch style, only a general "garden" style tank.
218 Replies
·
19412 views

Supporting
I Donated 2026
Rockstar
Sale Alert Oase Filtosmart Thermo 100
This thread is for the general discussion of the classified ad Oase Filtosmart Thermo 100. Please add to the discussion here.
0 Replies
·
21 views
Staff member
I Donated 2026
Founding Member
This is the future home for the announcements when someone obtains an achievement badge. Let the games begin!
2031 Replies
·
50470 views
Journal 22 gallon long bookshelf
Time to start a new thread.
I’ll fill in some details later, but I’m working on the hardscape now. Any and all criticism is appreciated. The vision is nothing more, and nothing less, than something appealing to the eye.
90cm x 30cm x 30cm Lifegard Aquatics ultra clear bookshelf tank. Buce and anubias on the hardscape, stems towards the back and center, mid to front carpet with some changes in shade and texture down to a flat grade on the right side of the tank.
Lily pipe inlet and skimmer will be in the back left corner with the outflow in the front left to hopefully achieve circular flow. I’ll be running an in-line diffuser. Light will be the P600 Pro that I regrettably did not upside to 900. Oh well. I’ll mount it high and hopefully it’ll have enough spread.
I have some dragon stone and red lava rock rubble I’ll use at the base to blend into the substrate, as well as some stratum I may or may not cap with.


I’ll fill in some details later, but I’m working on the hardscape now. Any and all criticism is appreciated. The vision is nothing more, and nothing less, than something appealing to the eye.
90cm x 30cm x 30cm Lifegard Aquatics ultra clear bookshelf tank. Buce and anubias on the hardscape, stems towards the back and center, mid to front carpet with some changes in shade and texture down to a flat grade on the right side of the tank.
Lily pipe inlet and skimmer will be in the back left corner with the outflow in the front left to hopefully achieve circular flow. I’ll be running an in-line diffuser. Light will be the P600 Pro that I regrettably did not upside to 900. Oh well. I’ll mount it high and hopefully it’ll have enough spread.
I have some dragon stone and red lava rock rubble I’ll use at the base to blend into the substrate, as well as some stratum I may or may not cap with.
241 Replies
·
25893 views