
Welcome to ScapeCrunch
We are ScapeCrunch, the place where planted aquarium hobbyists come to build relationships and support each other. When you're tired of doom scrolling, you've found your home here.
Social Feed

Hypothesis Ramosior & the Droop
*This was an experiment I ran back in 2020 that I still believe has some helpful qualities to it. Especially as more and more people get their hands on plants such as Florida and Sunset. I state many times that I might not be right, this was just something that worked FOR ME. I show the pictures of the progress each plant made. It would be fun to get feed back on how you guys are taking care of this species in your own ways. I do plan on owning both of these plants eventually and have every intention to run this again. I hope you guys enjoy this!
I’d Like to first start off by simply saying that this was just an experiment that I decided to test out. At the time of this experiment I was in the hobby for about 1 year and 7 months: Take this info as you wish. I am not claiming this to be a solution of any sort, there are people that have been around a lot longer than I have that might have a better hypothesis or understanding. When I first began to put thought into this I thought to myself “No way, you’re wrong … but what if you’re right?” (Yes it was one of those kind of things) This is just my theory on what might cause the infamous droop syndrome so many have experienced.
The motivation for this small experiment was because there’s no worse feeling than looking into your tank and seeing your beloved, favorite, and typically expensive (at the time) Ramosior species with drooping leaves. I remember seeing this happen to my first round of Florida I owned, one stem had drooping leaves and I slowly watched it dwindle away. I thought “No big deal it was just an unhealthy stem” not ever expecting to lose every single stem with in the next 3 days. Yes… a total of 20+ stems GONE just like that. Not to mention I paid about $110 for 8 stem back then. haha. They stuck around for about 3 months before catching the ‘droop’.
So what am I talking about for those that aren’t familiar: With Ramosior species there seems to be a time where the plant will droop its leaves, in my case it started with one stem, then 2 more… then 3 more… then, they all melted away without a trace. literally. I woke up, checked the tank and $110 was gone before my eyes. From discussing with others that have had this issue no body can seem to put a finger on what exactly it could be. (Maybe someone today has figured it out) Is there a TIMELINE on when to expect it? No. Could certain SUBSTRATES cause it? Possibly. Co2 issues? Dosing issues? Some strange disease that develops with in the plants? Who knows. All I can say is here’s what I came up with.
7 months ago I decided to give Florida a try again. I started with 5 Stems and focused on trying to keep them as healthy as possible as long as possible, I was giving myself 3 months to see if they get the Droop:

Original 5 Stems: November 14th 2019

Here is what those 5 stems grew to in 2 months January 16th 2020

That same bunch 3 months after planting: February 21st 2020
Right around that time I started to work with Rotala Ramosior Sunset which i was told was a much more pickier plant than Florida. (As you can see in the last picture) At this point I was going on 4 months with Florida and hadn’t lost a single stem to melting or to drooping leaves. Sunset was around for about 3 weeks and as you can tell by the picture was in rough shape.
(Here is where it got interesting for me)
Not really knowing what made Florida stick around so long I started back tracking on how I was caring for the plant. Everything in my tank at this time was being Topped, I would trim the plant and toss the bottoms. This is where I stumbled on something… As I started to focus more on growing Sunset I noticed something about Sunset that was different from my Florida. Florida was being topped once a week. Sunset was never topped or trimmed, I just wanted it to grow. I decided to up root the Sunset and noticed that the bottom of the stems were black, Compared to the Florida which was whitish yellow. Unfortunately I don’t have pictures of them from this time (I know, this is why I’d be discredited in a legit lab lol) but this is where I noticed a difference. Keep this in mind. Here are pictures of the progress Sunset had when I decided to treat it just like Florida and top it once a week, sometimes even twice a week. Pay attention to the Sunset which is in the Center of the tank just to the left of Florida, then will end up to the far left.

February 22nd 2020

March 1st 2020

March 10th 2020

March 23rd 2020

March 30th 2020

April 9th 2020
At this time I decided to run a short experiment. Hoping it would show some results… Now I did only use Florida for this test, however keep in mind that I still continue to top my Sunset once a week.
So let’s dive back into the black rotting at the bottom of the Sunset before topping it. I noticed that Florida never dealt with this issue because I was always topping all of my plants at least once a week, that was just my maintenance routine. When I planted sunset I didn’t touch it for almost 3 weeks thinking it would grow but it was struggling more than anything. Pale color, Not many side shoots, and overall didn’t look healthy. As you can see from the picture above when I started topping it, it grew faster with 3–4 side shoots on each stem, had beautiful color, and looked healthy for the most part.
April 14th I set up a second tank with the exact same conditions I had in the tank pictured above. (I decided to use Millers Micro-complex instead of mixing my own micros: call it laziness) I took 3 sets of Florida, the first stems (Group 1) I didn’t top at all, second (Group 2) I would top only 3 times over the span of the experiment. Which was conducted over about a 6–7 week time frame. The last set (Group 3) I topped once a week. Here is why I think this is important for Ramosior Species.
Pay attention to how rotted the bottom of the stems are compared to the ones that were topped 3 times and the ones that were topped every week.
Below is Group 1 which was never topped through out the experiment:


Now here is the Second group. Again pay attention to the Bottoms, as well as size difference:


With group two I noticed some rotting towards the bottoms but overall they had decent growth and were much healthy than Group 1 by a long shot. Here’s a side by side comparison:

Now, Here is the growth of Group 3 which was topped every week during the length of the experiment:

Group 3 had thicker stems larger roots, and grew beautiful round leaves, better color and had no rotting at the bottom.
Here is a comparison between Group 2 and Group 3:

And finally, a picture of all groups: Left: Group 1 — Middle: Group 2 — Right: Group 3

*To also note, these were set up in a fairly new tank a the time. It was up and running for about 2 weeks before i threw the plants into the tank. There was a lot for them to adapt to for sure.
So what's the theory? Well, at the time i had Florida growing consistently for 7 months and not a single stem catching the dreaded Droop. (Nov. 14th — June 1st) Sunset had exploded for me at the time with more stems than I thought I’d be able to grow (More pic’s later) Now again, this is just a theory, so please keep that in mind. Working with Ramosior for these months I believe they enjoy rotting from the bottom up… why does that matter? Well, because they rot underneath the substrate, where you would never be able to notice it.
Ramosiors have an inner stem like core, it’s harder than the out side of the plant. If you take your finger nail and run it down the stem barely scratching the outer surface you will see this inner stem that I’m talking about… I’m honestly not sure what to call it. I believe this inner stem acts as a “membrane” for the plant… keeping it healthy. When rotting begins to occur at the bottom of the stem, these membrane like stems begin to rot as well not being able to keep the plant as healthy as possible. Avoid the Rot, Avoid the droop. So where does the droop come into play? I think where we are going wrong with these plants is trimming them and trying to propagate the tops as well as keeping the bottoms. Growing these plants out to be too tall, giving them the time to rot from the bottom.
When rotting occurs for too long, I believe the inner core becomes unhealthy and begins to rot behind the outer stem that we see. As we continue to propagate side shoots and tops from the already unhealthy bottoms, the inner core like stem continues to be unhealthy and rot… Eventually Leading to the drooping leaves which will then lead to stems melting. Now the only part I’m stuck on is why they would all decide to melt at the same time. Thinking back on when my Florida Drooped the first time, I never cut the stems, I was too afraid to. I would only cut side shoots and replant them. Which would make sense as to why they all melted at the same time. I was taking shoots off of an unhealthy plant (Think inner stem here) and planting it. All of my stems where unhealthy at that point… think of it as a disease almost. Once the main stem has it… so do the side shoots. Nothing, and I mean absolutely nothing you can do about it. This would explain why even those that took the stems out of the tank and put them into another tank were still experiencing drooping right after one stem got it. If you experience a stem that droops, it’s only a matter of time before all of the others droop.
The conclusion? I truly believe that if you are able to keep the bottoms from rotting by continuously topping the Ramosior species (Florida, Sunset, Cramer) it could give you a very good chance of preventing the Droop Syndrome. Again, I’m no expert, I’m only speaking from experience here…and 7 months with out any drooping is twice as long as I was able to keep it the first time.
By no means am I saying this is the answer to this strange event… or that I’ve even come close to figuring it out. One thing is for sure, it grows really nice stems! for 6 weeks I’ve topped sunset every week. Here’s what it produced, mind you this is just out of my “farm” tank.


Now I had mentioned something way earlier in this post about how substrate may possibly matter when it comes to The Droop. I also mentioned how this was still an on going experiment. All of these stems were grown in Black Diamond Blasting sand and theres a theory out there that Ramosior Sunset doesn't do well in Aquasoil, so to be fair, I recently switched my main tank to Landens Aquasoil to test this with Sunset as well. With about a month into it being in Aquasoil it's not doing so bad. I plan on certainly updating this post after time goes on.

Now to conclude this, I stopped running this experiment as I got busier with work during summer months and was not doing much husbandry to the tank. With fresh soil, few water changes, and little care, algae crept in and I ended up moving the sunset to the "farm tank" getting it healthy and selling it all to focus on more of a "Dutch style" tank at the time. Both of my entire groups of Florida and sunset were eventually sold off and never seen again in this tank. haha.
This was a very fun thing to perform with two amazing plants in this hobby. they are both stunning when grown healthy. This was my second time caring for Florida and my first time growing sunset. I was lucky enough to keep Florida around for almost 2 years and sunset for a solid 14 months. I had no issues trimming either plant using the "topping" method, and even moved them around frequently. Over gown farm tanks with them in it and had them survive that tank with almost 2 weeks of no water changes... I never had an issue with either.
Now, this could have certainly been luck, or maybe at the time I was too green to know that I was actually doing something simple or "standard" for these species. I never wanted to be right - I just wanted to help others keep these plants around a whole lot longer than I was able to the first time. There's nothing like getting to show off a beautiful group of Ramosior's in your aquarium!
Thank you for Reading!
I’d Like to first start off by simply saying that this was just an experiment that I decided to test out. At the time of this experiment I was in the hobby for about 1 year and 7 months: Take this info as you wish. I am not claiming this to be a solution of any sort, there are people that have been around a lot longer than I have that might have a better hypothesis or understanding. When I first began to put thought into this I thought to myself “No way, you’re wrong … but what if you’re right?” (Yes it was one of those kind of things) This is just my theory on what might cause the infamous droop syndrome so many have experienced.
The motivation for this small experiment was because there’s no worse feeling than looking into your tank and seeing your beloved, favorite, and typically expensive (at the time) Ramosior species with drooping leaves. I remember seeing this happen to my first round of Florida I owned, one stem had drooping leaves and I slowly watched it dwindle away. I thought “No big deal it was just an unhealthy stem” not ever expecting to lose every single stem with in the next 3 days. Yes… a total of 20+ stems GONE just like that. Not to mention I paid about $110 for 8 stem back then. haha. They stuck around for about 3 months before catching the ‘droop’.
So what am I talking about for those that aren’t familiar: With Ramosior species there seems to be a time where the plant will droop its leaves, in my case it started with one stem, then 2 more… then 3 more… then, they all melted away without a trace. literally. I woke up, checked the tank and $110 was gone before my eyes. From discussing with others that have had this issue no body can seem to put a finger on what exactly it could be. (Maybe someone today has figured it out) Is there a TIMELINE on when to expect it? No. Could certain SUBSTRATES cause it? Possibly. Co2 issues? Dosing issues? Some strange disease that develops with in the plants? Who knows. All I can say is here’s what I came up with.
7 months ago I decided to give Florida a try again. I started with 5 Stems and focused on trying to keep them as healthy as possible as long as possible, I was giving myself 3 months to see if they get the Droop:
Original 5 Stems: November 14th 2019
Here is what those 5 stems grew to in 2 months January 16th 2020
That same bunch 3 months after planting: February 21st 2020
Right around that time I started to work with Rotala Ramosior Sunset which i was told was a much more pickier plant than Florida. (As you can see in the last picture) At this point I was going on 4 months with Florida and hadn’t lost a single stem to melting or to drooping leaves. Sunset was around for about 3 weeks and as you can tell by the picture was in rough shape.
(Here is where it got interesting for me)
Not really knowing what made Florida stick around so long I started back tracking on how I was caring for the plant. Everything in my tank at this time was being Topped, I would trim the plant and toss the bottoms. This is where I stumbled on something… As I started to focus more on growing Sunset I noticed something about Sunset that was different from my Florida. Florida was being topped once a week. Sunset was never topped or trimmed, I just wanted it to grow. I decided to up root the Sunset and noticed that the bottom of the stems were black, Compared to the Florida which was whitish yellow. Unfortunately I don’t have pictures of them from this time (I know, this is why I’d be discredited in a legit lab lol) but this is where I noticed a difference. Keep this in mind. Here are pictures of the progress Sunset had when I decided to treat it just like Florida and top it once a week, sometimes even twice a week. Pay attention to the Sunset which is in the Center of the tank just to the left of Florida, then will end up to the far left.
February 22nd 2020
March 1st 2020
March 10th 2020
March 23rd 2020
March 30th 2020
April 9th 2020
At this time I decided to run a short experiment. Hoping it would show some results… Now I did only use Florida for this test, however keep in mind that I still continue to top my Sunset once a week.
So let’s dive back into the black rotting at the bottom of the Sunset before topping it. I noticed that Florida never dealt with this issue because I was always topping all of my plants at least once a week, that was just my maintenance routine. When I planted sunset I didn’t touch it for almost 3 weeks thinking it would grow but it was struggling more than anything. Pale color, Not many side shoots, and overall didn’t look healthy. As you can see from the picture above when I started topping it, it grew faster with 3–4 side shoots on each stem, had beautiful color, and looked healthy for the most part.
April 14th I set up a second tank with the exact same conditions I had in the tank pictured above. (I decided to use Millers Micro-complex instead of mixing my own micros: call it laziness) I took 3 sets of Florida, the first stems (Group 1) I didn’t top at all, second (Group 2) I would top only 3 times over the span of the experiment. Which was conducted over about a 6–7 week time frame. The last set (Group 3) I topped once a week. Here is why I think this is important for Ramosior Species.
Pay attention to how rotted the bottom of the stems are compared to the ones that were topped 3 times and the ones that were topped every week.
Below is Group 1 which was never topped through out the experiment:
Now here is the Second group. Again pay attention to the Bottoms, as well as size difference:
With group two I noticed some rotting towards the bottoms but overall they had decent growth and were much healthy than Group 1 by a long shot. Here’s a side by side comparison:
Now, Here is the growth of Group 3 which was topped every week during the length of the experiment:
Group 3 had thicker stems larger roots, and grew beautiful round leaves, better color and had no rotting at the bottom.
Here is a comparison between Group 2 and Group 3:
And finally, a picture of all groups: Left: Group 1 — Middle: Group 2 — Right: Group 3
*To also note, these were set up in a fairly new tank a the time. It was up and running for about 2 weeks before i threw the plants into the tank. There was a lot for them to adapt to for sure.
So what's the theory? Well, at the time i had Florida growing consistently for 7 months and not a single stem catching the dreaded Droop. (Nov. 14th — June 1st) Sunset had exploded for me at the time with more stems than I thought I’d be able to grow (More pic’s later) Now again, this is just a theory, so please keep that in mind. Working with Ramosior for these months I believe they enjoy rotting from the bottom up… why does that matter? Well, because they rot underneath the substrate, where you would never be able to notice it.
Ramosiors have an inner stem like core, it’s harder than the out side of the plant. If you take your finger nail and run it down the stem barely scratching the outer surface you will see this inner stem that I’m talking about… I’m honestly not sure what to call it. I believe this inner stem acts as a “membrane” for the plant… keeping it healthy. When rotting begins to occur at the bottom of the stem, these membrane like stems begin to rot as well not being able to keep the plant as healthy as possible. Avoid the Rot, Avoid the droop. So where does the droop come into play? I think where we are going wrong with these plants is trimming them and trying to propagate the tops as well as keeping the bottoms. Growing these plants out to be too tall, giving them the time to rot from the bottom.
When rotting occurs for too long, I believe the inner core becomes unhealthy and begins to rot behind the outer stem that we see. As we continue to propagate side shoots and tops from the already unhealthy bottoms, the inner core like stem continues to be unhealthy and rot… Eventually Leading to the drooping leaves which will then lead to stems melting. Now the only part I’m stuck on is why they would all decide to melt at the same time. Thinking back on when my Florida Drooped the first time, I never cut the stems, I was too afraid to. I would only cut side shoots and replant them. Which would make sense as to why they all melted at the same time. I was taking shoots off of an unhealthy plant (Think inner stem here) and planting it. All of my stems where unhealthy at that point… think of it as a disease almost. Once the main stem has it… so do the side shoots. Nothing, and I mean absolutely nothing you can do about it. This would explain why even those that took the stems out of the tank and put them into another tank were still experiencing drooping right after one stem got it. If you experience a stem that droops, it’s only a matter of time before all of the others droop.
The conclusion? I truly believe that if you are able to keep the bottoms from rotting by continuously topping the Ramosior species (Florida, Sunset, Cramer) it could give you a very good chance of preventing the Droop Syndrome. Again, I’m no expert, I’m only speaking from experience here…and 7 months with out any drooping is twice as long as I was able to keep it the first time.
By no means am I saying this is the answer to this strange event… or that I’ve even come close to figuring it out. One thing is for sure, it grows really nice stems! for 6 weeks I’ve topped sunset every week. Here’s what it produced, mind you this is just out of my “farm” tank.
Now I had mentioned something way earlier in this post about how substrate may possibly matter when it comes to The Droop. I also mentioned how this was still an on going experiment. All of these stems were grown in Black Diamond Blasting sand and theres a theory out there that Ramosior Sunset doesn't do well in Aquasoil, so to be fair, I recently switched my main tank to Landens Aquasoil to test this with Sunset as well. With about a month into it being in Aquasoil it's not doing so bad. I plan on certainly updating this post after time goes on.
Now to conclude this, I stopped running this experiment as I got busier with work during summer months and was not doing much husbandry to the tank. With fresh soil, few water changes, and little care, algae crept in and I ended up moving the sunset to the "farm tank" getting it healthy and selling it all to focus on more of a "Dutch style" tank at the time. Both of my entire groups of Florida and sunset were eventually sold off and never seen again in this tank. haha.
This was a very fun thing to perform with two amazing plants in this hobby. they are both stunning when grown healthy. This was my second time caring for Florida and my first time growing sunset. I was lucky enough to keep Florida around for almost 2 years and sunset for a solid 14 months. I had no issues trimming either plant using the "topping" method, and even moved them around frequently. Over gown farm tanks with them in it and had them survive that tank with almost 2 weeks of no water changes... I never had an issue with either.
Now, this could have certainly been luck, or maybe at the time I was too green to know that I was actually doing something simple or "standard" for these species. I never wanted to be right - I just wanted to help others keep these plants around a whole lot longer than I was able to the first time. There's nothing like getting to show off a beautiful group of Ramosior's in your aquarium!
Thank you for Reading!

11 Replies
·
1224 views


Supporting
Trying a true journal format. Let me know if it's too much writing. My natural tendency is to bullet point everything.
The Mishap That Started It All
This whole project began at 6:30 a.m., courtesy of my Oase Biomaster Thermo 250 deciding to serenade me with impeller noise while I was trying to work from home. Biofilm on the impeller — nothing dramatic — but the sound was maddening, especially with an 8 a.m. call with our London office looming. So I did what any aquarist does under pressure: a lightning‑fast pre‑filter and impeller clean.That’s when the universe decided to intervene.
While disconnecting the hoses — the same routine I’ve done countless times — the lock failed. Suddenly a vacuum of water blasted across the floor of my upstairs alcove “office.” I yanked the intake and outflow from my 60U, stopping the torrent, but not before a solid gallon had soaked into the floorboards.
My wife woke up to the sound of chaos and the sight of me standing in a puddle. Understandably, she was not thrilled. The alcove has cathedral ceilings, so every noise echoes, and the massive 8‑foot cabinet we built with her dad years ago makes cleaning underneath nearly impossible. It’s not a space designed for aquariums, humidity, or early‑morning filter geysers.
As we cleaned, she admitted she hated having tanks and equipment out in the open upstairs. Fair enough. When we built the house, the plan was always for my “stuff” to live in the downstairs office while she had the rest of the house. But during COVID she needed privacy for patient calls, so I gave her the office and moved my stuff upstairs. Now her role has changed — two days in the hospital, one day from home — and the need for that arrangement is gone.
So I floated the idea: What if I moved everything back downstairs, consolidated the two smaller tanks into one larger, beautifully executed setup — something like the living room tank she actually likes? Less noise, less humidity upstairs, and I get a proper scaping space again.
To my mild shock, she was completely on board. From a mishap came opportunity.
Choosing the Tank
Once the idea settled, I had to pick the right aquarium. I landed on the AquaEl Ultrascaper 90 — the dimensions are perfect, and I’d been eyeing it ever since researching the Skylight Hyperspot and AquaEl’s filter lineup. The tank was designed with the scapers at AquaShow in Poland, and their sample layouts are right up there with ADA, ADG, and Green Aqua imo.Finding one in the U.S. was the next challenge. I reached out to the AquaEl rep, asked about the Hypermax for my living room tank, and inquired about Ultrascaper 90 availability. He pointed me to Fish Tanks Direct — and with a discount code in hand, I placed the order for the snow variant. My only quandy was to go for the cheaper one and get a Netlea AT5S to hang or try their newer attractive but inferior light option (RGB vs WBG). I chose to try their light as it looked interesting and the PAR on paper is more than enough.
Link for reference:https://fishtanksdirect.com/aquael-ultrascape-90-with-ultra-slim-snow-tank-light-cabinet/
Atlanta Weekend & Tank Comparisons
Right after ordering, we had a weekend trip to Atlanta for one of my wife’s appointments. On Friday we visited the botanical garden, grabbed food, and while she was at her appointment Saturday, I made the rounds to three local fish stores. The Aquarium was an option but a Saturday solo but spending roughly $100 to be around 10 million families sounded less enjoyable than exploring ATL suburbs and seeing the stores and their tanks.Premiere Aquatics had a beautiful setup UNS 90U and one for sale as well but at nearly $2,000 out the door it wasn't a great deal. Plus the tank is taller than I wanted, it wasn’t the right fit. I did pick up two gorgeous rose swords and a great piece of ghost wood.
I went to one store in Alpharetta but it was out of literally everything, not sure if they are doing poorly or just sell out fast and under order. I did buy a crinum there. Plus I liked driving from Premier to their.
Then I got lucky at Optimum Aquarium — they had an AquaEl Ultrascaper 90 in stock that had arrived that week, priced at a very respectable $1,000 (without the light). If the cabinet had been white, I would’ve bought it on the spot. They also had a wide range of tanks, which let me compare my choice to the Fluval Opti White 90 (a very reasonable $700) and several Aquatlantis rimless tanks I didn’t even know were available in the U.S. Their shallow 80 is especially cool — tank, stand, and light for $830, I would get a different color but I like the concept. They also had a bunch of healthy Dwarf Sag for $3 dollars so I bought a 4 bunches to use as I couldn't find dwarf chain swords easily online and heleiatium tenellum is a little too small.
My takeaways:
- Fluval Opti White 90: Nice tank but a bit small and too tall, the stand feels cheap and lightweight. Attractive for the price, but not my pick.
- Aquatlantis: Surprisingly impressive. I’d choose them over Fluval at similar price points.
- UNS 90U: The stands are unquestionably superior. The tank mitering is spectacular.
- AquaEl Ultrascaper 90:
- Stand: Best flat‑pack stand I’ve seen, though still a flat‑pack.
- Glass: Equal quality to UNS but no mitering.
- Dimensions: 90 × 60 × 45 — absolutely perfect.
- Incredible depth
- Lower height makes it ideal for seated viewing
- Easier to work in
- Better top‑down perspective


13 Replies
·
897 views

I recently set up my first big (to me) tank. I've been into this hobby for a couple of years but limited to a 20 gallon and a couple 10 gallon tanks in my office. I decided it was time to splurge and set up a nice 75 gallon system that can become a more appropriately-scaled Dutch tank. Here it is shortly after planting:
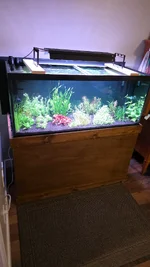
I like to save money where possible, so I ended up building my own tank stand as well as a Yugang reactor. I wanted to document these things to show everyone that it is quite attainable with a set of tools and a weekend of work.
So, here is the first post. Tank Stand Build:
When researching simple lumber stands, I found this great video:
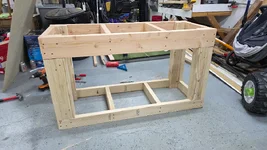
I used it as a guideline to build a simple dimensional lumber stand. My stand is 49" long, 19" wide, and 28" tall. This gives approximately 1/2" of clearance around the 75 gallon aquarium footprint and keeps the tank low enough that I can reach over the rim and touch the bottom substrate without straining. As shown in the photo, I used 2x6 lumber for the upper frame so that I could avoid using a centerspan support. This makes it so much easier to access the space under the tank. I used two 8ft 2x6 and six 8ft 2x4 studs. Total cost at home depot was under $50.
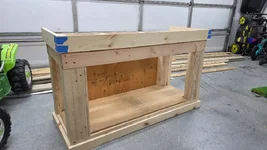
Once the structural frame was complete, I started thinking about how to dress it up as a piece of furniture that I didnt hate to have in my home. I ended up deciding to do a very simple trim with 1x3 boards on the bottom and 1x4 on the top. The top trim is offset upwards from the frame such that it covers the plastic trim on the tank when it is on the stand. I also used a piece of scrap plywood from my garage to act as a back panel and shear support to prevent racking of the frame. The 1x3 and 1x4 boards came out to $15
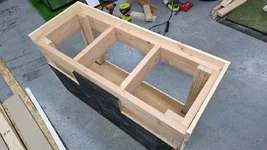
To finish it off, I bought a sheet of 1/8" "utility board" plywood for another $15. I cut it to wrap around the sides and front.
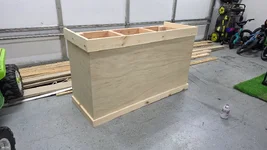
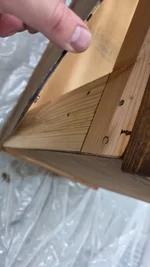
Now how to access the bottom? I thought about this a lot and ultimately decided on the cheapest/simplest/most lame approach. I bought some magnets from Harbor Freight for $5. I lucked out and these magnets were nearly the same size as the heads on the screws I used, so I simply put them on 4 corner screws and then added matching magnets on the front plywood panel at the 4 corners. It actually works really well and makes it simple to take the front panel off for filter access. It saved me hours of work and the cost of building actual cabinet doors, and I like how clean the final product ends up looking.
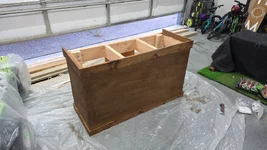
Lastly, I stained using dark walnut stain. Pine needs conditioner, so I did that first and then did one coat of stain. I then did about 4 coats of spray on oil-based polyurethane to seal it up.
The last thing I did was add a sheet of styrofoam insulation on top of the frame to help even out any bumps in the lumber. I made it as flat as possible, but dimensional lumber is not meant for this kind of thing and has imperfections. The styrofoam is peace of mind for me to make sure the tank rim gets fully supported all the way around.
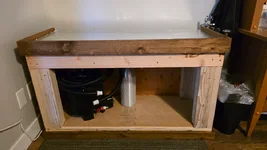
I'm really happy with how it turned out. Total cost for me was around $110, but I had some scrap plywood at home for the back panel and the bottom shelf where my filters sit. If you need to buy a sheet, figure another $40 bucks or so. Total time investment was maybe like 8 hours over the weekend and then the hours of waiting between coats of stain and poly. Tools used were a miter saw, circular saw, drill, driver, nailer, and sander.
I like to save money where possible, so I ended up building my own tank stand as well as a Yugang reactor. I wanted to document these things to show everyone that it is quite attainable with a set of tools and a weekend of work.
So, here is the first post. Tank Stand Build:
When researching simple lumber stands, I found this great video:
I used it as a guideline to build a simple dimensional lumber stand. My stand is 49" long, 19" wide, and 28" tall. This gives approximately 1/2" of clearance around the 75 gallon aquarium footprint and keeps the tank low enough that I can reach over the rim and touch the bottom substrate without straining. As shown in the photo, I used 2x6 lumber for the upper frame so that I could avoid using a centerspan support. This makes it so much easier to access the space under the tank. I used two 8ft 2x6 and six 8ft 2x4 studs. Total cost at home depot was under $50.
Once the structural frame was complete, I started thinking about how to dress it up as a piece of furniture that I didnt hate to have in my home. I ended up deciding to do a very simple trim with 1x3 boards on the bottom and 1x4 on the top. The top trim is offset upwards from the frame such that it covers the plastic trim on the tank when it is on the stand. I also used a piece of scrap plywood from my garage to act as a back panel and shear support to prevent racking of the frame. The 1x3 and 1x4 boards came out to $15
To finish it off, I bought a sheet of 1/8" "utility board" plywood for another $15. I cut it to wrap around the sides and front.
Now how to access the bottom? I thought about this a lot and ultimately decided on the cheapest/simplest/most lame approach. I bought some magnets from Harbor Freight for $5. I lucked out and these magnets were nearly the same size as the heads on the screws I used, so I simply put them on 4 corner screws and then added matching magnets on the front plywood panel at the 4 corners. It actually works really well and makes it simple to take the front panel off for filter access. It saved me hours of work and the cost of building actual cabinet doors, and I like how clean the final product ends up looking.
Lastly, I stained using dark walnut stain. Pine needs conditioner, so I did that first and then did one coat of stain. I then did about 4 coats of spray on oil-based polyurethane to seal it up.
The last thing I did was add a sheet of styrofoam insulation on top of the frame to help even out any bumps in the lumber. I made it as flat as possible, but dimensional lumber is not meant for this kind of thing and has imperfections. The styrofoam is peace of mind for me to make sure the tank rim gets fully supported all the way around.
I'm really happy with how it turned out. Total cost for me was around $110, but I had some scrap plywood at home for the back panel and the bottom shelf where my filters sit. If you need to buy a sheet, figure another $40 bucks or so. Total time investment was maybe like 8 hours over the weekend and then the hours of waiting between coats of stain and poly. Tools used were a miter saw, circular saw, drill, driver, nailer, and sander.
8 Replies
·
467 views

Staff member
I Donated 2026
Founding Member
The theme for this month's contest is: Shades of Green
Please take a picture of shades of green in your aquarium. Be as artistic and creative as you like.
The rules:
A $25 store credit from BurrAqua thanks to @Burr740!

Good Luck!
Please take a picture of shades of green in your aquarium. Be as artistic and creative as you like.
The rules:
- Submissions are allowed between August 16 and August 23.
- Voting will start on August 23 at 12:01 am Eastern time.
- Voting will end on August 30 at 11:30 pm Eastern time.
A $25 store credit from BurrAqua thanks to @Burr740!
Good Luck!
6 Replies
·
317 views

Journal 22 gallon long bookshelf
Time to start a new thread.
I’ll fill in some details later, but I’m working on the hardscape now. Any and all criticism is appreciated. The vision is nothing more, and nothing less, than something appealing to the eye.
90cm x 30cm x 30cm Lifegard Aquatics ultra clear bookshelf tank. Buce and anubias on the hardscape, stems towards the back and center, mid to front carpet with some changes in shade and texture down to a flat grade on the right side of the tank.
Lily pipe inlet and skimmer will be in the back left corner with the outflow in the front left to hopefully achieve circular flow. I’ll be running an in-line diffuser. Light will be the P600 Pro that I regrettably did not upside to 900. Oh well. I’ll mount it high and hopefully it’ll have enough spread.
I have some dragon stone and red lava rock rubble I’ll use at the base to blend into the substrate, as well as some stratum I may or may not cap with.


I’ll fill in some details later, but I’m working on the hardscape now. Any and all criticism is appreciated. The vision is nothing more, and nothing less, than something appealing to the eye.
90cm x 30cm x 30cm Lifegard Aquatics ultra clear bookshelf tank. Buce and anubias on the hardscape, stems towards the back and center, mid to front carpet with some changes in shade and texture down to a flat grade on the right side of the tank.
Lily pipe inlet and skimmer will be in the back left corner with the outflow in the front left to hopefully achieve circular flow. I’ll be running an in-line diffuser. Light will be the P600 Pro that I regrettably did not upside to 900. Oh well. I’ll mount it high and hopefully it’ll have enough spread.
I have some dragon stone and red lava rock rubble I’ll use at the base to blend into the substrate, as well as some stratum I may or may not cap with.
250 Replies
·
26982 views
Staff member
I Donated 2026
Founding Member
This is the future home for the announcements when someone obtains an achievement badge. Let the games begin!
2034 Replies
·
55819 views

Supporting
I Donated 2026
From
With the death of Christel Kasselmann, the global aquaristics community loses one of its most significant pioneers of aquarium botany. We, the aquarists of Berlin-Tegel 1912 e.V., mourn the outstanding expert and long-time companion and friend of our hobby.
On her numerous expeditions to the tropics, she explored the natural biotopes of Echinodorus, Cryptocoryne, and others. Her insights into water values, light, and substrate at the natural site revolutionized plant care in the aquarium.
Her book "Aquarienpflanzen" combines botanical precision with practical value and has been a staple of reading for countless aquarians for decades.
Through her first descriptions, lectures, and publications, Christel Kasselmann has shaped and enriched aquarium botany like few others.
As aquarists of Berlin-Tegel 1912 e.V., we bow to her life's work.
Her knowledge, passion, and work will live on in our aquariums and in the hearts of our association family, in every wave and bloom of the plants she dedicated her life to.
With the death of Christel Kasselmann, the global aquaristics community loses one of its most significant pioneers of aquarium botany. We, the aquarists of Berlin-Tegel 1912 e.V., mourn the outstanding expert and long-time companion and friend of our hobby.
On her numerous expeditions to the tropics, she explored the natural biotopes of Echinodorus, Cryptocoryne, and others. Her insights into water values, light, and substrate at the natural site revolutionized plant care in the aquarium.
Her book "Aquarienpflanzen" combines botanical precision with practical value and has been a staple of reading for countless aquarians for decades.
Through her first descriptions, lectures, and publications, Christel Kasselmann has shaped and enriched aquarium botany like few others.
As aquarists of Berlin-Tegel 1912 e.V., we bow to her life's work.
Her knowledge, passion, and work will live on in our aquariums and in the hearts of our association family, in every wave and bloom of the plants she dedicated her life to.
0 Replies
·
23 views


Supporting
I Donated 2026
Rockstar
Article Contributor
Skip to the actual journal here.
I'm known here for high tech, high nutrient, inert substrate scapes -- but I also love NO tech, rich substrate scapes, too!
This thread is three-sided:
But there is a new modern kind of fish bowl, one where plants, substrate, bacteria, water changes, and proper inhabitant selection all work together to create healthy, mini ecosystem-worlds in our homes:

My first bowl attempt in 2020

My second bowl, a true "no tech" in 2021

My third bowl scape (no tech) in 2023, and by far my favorite and most successful!
The point is, these are smaller, affordable, beautiful little worlds of light to enliven our living spaces and create art, nature, and beauty -- often with very little maintenance and upkeep besides a partial water change and feeding the fish.

quano_aqua on Insta

waterplantslover on insta

hanahiyori1112 on insta


Sono aqua pfm on Insta and on Youtube is one of the pioneers of this method, and
deserves a TON of credit for popularizing this technique across many Japanese communities!

kazuaki387 on insta

qball_aquatics on insta has many small bowl scapes.
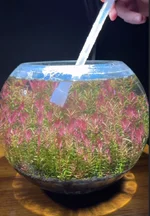
Nanoscape on insta

syo_aqua_plants on insta follows the "Sono" method.

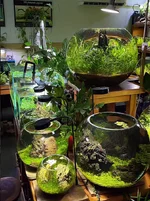
Aquadream in Vietnam on insta and on Youtube has TONS of no-tech bowl scapes.
Almost 20 bowls in his store/gallery. Lots of info on his youtube channel!

pokomama_medaka on insta

tinyecosystems_ on insta, also sells "kits" to make your own tiny ecosystem jars.

the_bettabowl_project on insta

MJ Aquascaping bowl on youtube, beautiful setup.

MJ Aquascaping vase on Youtube

MD Fishtanks on Youtube has done a few planted no tech bowls

aquashopuha on insta

jp72363 on insta

y0shi_n9 on Insta

kermitDE on Reddit

buiscape on insta has a tiny Fluval bowl scape with crabs!

nakayamachiyomi on insta

ichistarium on insta

chandan0616 on instagram

Few-Focus8050 on Reddit
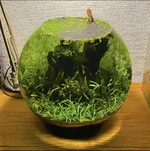
KrishTheBaker on Reddit and on Youtube

@HardeeParty here on Scape Crunch

@bradquade here on Scape Crunch

10-gal bowl featured on Tank Tested on Youtube
And that's just the ones I have found over the last few years! I have no doubt there are many, many more out there.
I'll add to this thread as I find them, and would love it if you would, too!
I'm known here for high tech, high nutrient, inert substrate scapes -- but I also love NO tech, rich substrate scapes, too!
This thread is three-sided:
- To act as a journal for my new No-Tech bowl scape, and
- To act as a discussion board for no/low tech bowl scapes, and
- To collect and share accounts and examples of bowl scapes from around the world!
But there is a new modern kind of fish bowl, one where plants, substrate, bacteria, water changes, and proper inhabitant selection all work together to create healthy, mini ecosystem-worlds in our homes:
My first bowl attempt in 2020
My second bowl, a true "no tech" in 2021
My third bowl scape (no tech) in 2023, and by far my favorite and most successful!
What does No Tech mean?
In general, it means that these scapes have:- No Filter
- No Heater
- No Air Pump
- No Skimmer
- No CO2
- No Circulation
- A Light (usually low to medium-powered)
- A Substrate (inert, aquasoil, or sand-capped soil like Walstad method)
- Plants (usually quite low-tech plants, though a surprising number will thrive in this method!)
- Inhabitants (Since these bowls are usually between 2-12 gallons on average, this limits selection to nano fish, shrimp, and snails).
The point is, these are smaller, affordable, beautiful little worlds of light to enliven our living spaces and create art, nature, and beauty -- often with very little maintenance and upkeep besides a partial water change and feeding the fish.
Gallery and Links to bowl scapers:
quano_aqua on Insta
waterplantslover on insta
hanahiyori1112 on insta
Sono aqua pfm on Insta and on Youtube is one of the pioneers of this method, and
deserves a TON of credit for popularizing this technique across many Japanese communities!
kazuaki387 on insta
qball_aquatics on insta has many small bowl scapes.
Nanoscape on insta
syo_aqua_plants on insta follows the "Sono" method.
Aquadream in Vietnam on insta and on Youtube has TONS of no-tech bowl scapes.
Almost 20 bowls in his store/gallery. Lots of info on his youtube channel!
pokomama_medaka on insta
tinyecosystems_ on insta, also sells "kits" to make your own tiny ecosystem jars.
the_bettabowl_project on insta
MJ Aquascaping bowl on youtube, beautiful setup.
MJ Aquascaping vase on Youtube
MD Fishtanks on Youtube has done a few planted no tech bowls
aquashopuha on insta
jp72363 on insta
y0shi_n9 on Insta
kermitDE on Reddit
buiscape on insta has a tiny Fluval bowl scape with crabs!
nakayamachiyomi on insta
ichistarium on insta
chandan0616 on instagram
Few-Focus8050 on Reddit
KrishTheBaker on Reddit and on Youtube
@HardeeParty here on Scape Crunch
@bradquade here on Scape Crunch
10-gal bowl featured on Tank Tested on Youtube
And that's just the ones I have found over the last few years! I have no doubt there are many, many more out there.
I'll add to this thread as I find them, and would love it if you would, too!
61 Replies
·
4073 views

Supporting
I Donated 2026
Rockstar
There are several threads discussing the new Aquael Hypermax 4500BT. I'm sure many would like some reports on it's performance over time. We have a thread discussing nano canister filters. We're all waiting for one of @Naturescapes_Rocco in depth write-ups discussing his filtration set-up. @Pepere and @*Ci* have unique set-ups as well, @Kwyet has used a matten filter, and we have several other members running sumps. That doesn't even include all those running sponge and HOB filters.
The idea is that we can consolidate a lot of filter information in one place making it easier to find rather than searching through so many threads. Maybe this won't work but I thought it was worth giving it a try. Perhaps it may be better listed as an article at some point.
I'm going to get things started by discussing factors I feel are most important to me when choosing a filter.
1) Filtration Performance: This goes without saying. The filter’s primary job is to keep our water clean and free of anything that harms the inhabitants. Of course, there are multiple factors that play into this. Some say flow is most critical, while others claim media volume is most important. Are there other factors? I still have limited experience, but my view, having done considerable reading, is that flow tends to be a bit overblown. You’ll see recommendations of anywhere from 4 to 10 times turnover rate with most leaning toward the higher end of that. I don’t think turnover rate is really the detail to be concerned about, at least with heavily planted tanks like are the norm here. I think the focus should be simply on ensuring flow achieves the goal of effectively moving water through the system to remove toxins/waste, delivering nutrients, and aiding gas (oxygen/CO2) transfer. If a turnover rate of 3 or 4 does that without dead spots in the tank, you should be good. After all, most of us here are plant focused and therefore, the fish we generally have are smaller community species that typically don’t care for high flow (there are, of course, exceptions).
I think there’s a simpler answer regarding media volume; more is better. Obviously, there must be a balance between internal volume and overall size of the filter. Real estate in and around our aquarium stands is precious. Filters like the Fluval FX6 and the newest Aquael Hypermax are huge. If you’re going for one of those, you’re likely putting it on a large tank with plenty of space underneath but again, it’s a matter of finding the right balance that provides the performance you need in a manageable size.
2) Reliability/Durability: This is where solid reviews come in handy and why getting feedback from users here is invaluable. Filtration performance becomes moot if the filter isn’t running, or worse yet, just flooded your house. Being able to easily source spare parts is also valuable, which is why sticking to the top well-known brands is often a safe route. It’s also why many aquarists place canister filters in protective containers, something else to consider when taking into account, size of filter. (this is something I should really do as I’ve had to clean up a few significant spills after filter maintenance and not getting the top secured in place properly )
)
3) Tie – Maintenance/Noise Level: These two factors are equally important to me. If the filter is a pain to maintain, I’m going to put it off, and that’s bad. It affects the performance. But equally important to me is how noisy it is. I tend to be sensitive to annoying little sounds regardless of where I am; at home, in the car, at work, you name it. If the aquarium is in a part of the house I spend a lot of time in, well then, it’s even more important.
I don’t know if Oase was first to do it, but the idea of the prefilter was, I think, a game changer for many. I imagine it was derived from people installing foam filters on the intake pipes. Having an easily removable section with foam filters that catch a lot of large particles before entering the primary filter chamber is a great idea, resulting in expanded intervals between main filter head removals for cleaning.
Another aspect of maintenance is ease of priming. This could also be an aspect of performance but I don’t think it is quite as important. I’m not sure there is a canister filter that is truly or consistently easy to prime. Some may start out that way, but over time, become less and less so. This is an area I’d really like to see product designers put more serious thought. My experience so far is with Oase and the Fluval 07 series. Hated the Fuval priming and I’m just so-so with the Oase. Let me know your experience with priming other brands.
As for noise, I don’t mind the slight hum of an impeller as long as it’s steady and consistent, much the same way some people, including myself when I was younger, like the smooth steady sound of a fan at night to help them sleep. It’s when the sound becomes inconsistent, I’m bothered. I also don’t care for the sound of splashing/trickling water while I’m focused on other things. Only when I’m camping near the banks of a creek or other body of water is this OK . This is one of the main reasons I’m not a fan of HOB filters. I’m also tweaking my CO2 reactor designs to minimize the bubble sounds of CO2 entering the reactor.
4) Cost: Let’s be clear, the cost doesn’t stop when you pay the retail price for the filter. There’s the cost of media and spare parts plus the cost of electricity. What’s the rated wattage of the filter. I see the Aquael filters claim to consume lower power and are therefore cheaper to run. What about special filter cartridges or foam. Is it easy to cut foam filters from inexpensive bulk material? How often are gasket replacements necessary, or are there common issues with parts failing over time. Of two Fluval 07 filters I’ve used, both needed replacement impeller shafts. Oase Biomaster filters seem to have an issue with the input/output head often needing replaced.
I admit cost isn’t a critical factor for me, but I know it is for many others, so this is another instance where finding the right balance is key, in this case, the balance between price and performance.
Share your thoughts. Do these factors seem to align with yours or do you think I’m way off base. Tell us what types and brands of filters you prefer and why.
The idea is that we can consolidate a lot of filter information in one place making it easier to find rather than searching through so many threads. Maybe this won't work but I thought it was worth giving it a try. Perhaps it may be better listed as an article at some point.
I'm going to get things started by discussing factors I feel are most important to me when choosing a filter.
1) Filtration Performance: This goes without saying. The filter’s primary job is to keep our water clean and free of anything that harms the inhabitants. Of course, there are multiple factors that play into this. Some say flow is most critical, while others claim media volume is most important. Are there other factors? I still have limited experience, but my view, having done considerable reading, is that flow tends to be a bit overblown. You’ll see recommendations of anywhere from 4 to 10 times turnover rate with most leaning toward the higher end of that. I don’t think turnover rate is really the detail to be concerned about, at least with heavily planted tanks like are the norm here. I think the focus should be simply on ensuring flow achieves the goal of effectively moving water through the system to remove toxins/waste, delivering nutrients, and aiding gas (oxygen/CO2) transfer. If a turnover rate of 3 or 4 does that without dead spots in the tank, you should be good. After all, most of us here are plant focused and therefore, the fish we generally have are smaller community species that typically don’t care for high flow (there are, of course, exceptions).
I think there’s a simpler answer regarding media volume; more is better. Obviously, there must be a balance between internal volume and overall size of the filter. Real estate in and around our aquarium stands is precious. Filters like the Fluval FX6 and the newest Aquael Hypermax are huge. If you’re going for one of those, you’re likely putting it on a large tank with plenty of space underneath but again, it’s a matter of finding the right balance that provides the performance you need in a manageable size.
2) Reliability/Durability: This is where solid reviews come in handy and why getting feedback from users here is invaluable. Filtration performance becomes moot if the filter isn’t running, or worse yet, just flooded your house. Being able to easily source spare parts is also valuable, which is why sticking to the top well-known brands is often a safe route. It’s also why many aquarists place canister filters in protective containers, something else to consider when taking into account, size of filter. (this is something I should really do as I’ve had to clean up a few significant spills after filter maintenance and not getting the top secured in place properly
)3) Tie – Maintenance/Noise Level: These two factors are equally important to me. If the filter is a pain to maintain, I’m going to put it off, and that’s bad. It affects the performance. But equally important to me is how noisy it is. I tend to be sensitive to annoying little sounds regardless of where I am; at home, in the car, at work, you name it. If the aquarium is in a part of the house I spend a lot of time in, well then, it’s even more important.
I don’t know if Oase was first to do it, but the idea of the prefilter was, I think, a game changer for many. I imagine it was derived from people installing foam filters on the intake pipes. Having an easily removable section with foam filters that catch a lot of large particles before entering the primary filter chamber is a great idea, resulting in expanded intervals between main filter head removals for cleaning.
Another aspect of maintenance is ease of priming. This could also be an aspect of performance but I don’t think it is quite as important. I’m not sure there is a canister filter that is truly or consistently easy to prime. Some may start out that way, but over time, become less and less so. This is an area I’d really like to see product designers put more serious thought. My experience so far is with Oase and the Fluval 07 series. Hated the Fuval priming and I’m just so-so with the Oase. Let me know your experience with priming other brands.
As for noise, I don’t mind the slight hum of an impeller as long as it’s steady and consistent, much the same way some people, including myself when I was younger, like the smooth steady sound of a fan at night to help them sleep. It’s when the sound becomes inconsistent, I’m bothered. I also don’t care for the sound of splashing/trickling water while I’m focused on other things. Only when I’m camping near the banks of a creek or other body of water is this OK
. This is one of the main reasons I’m not a fan of HOB filters. I’m also tweaking my CO2 reactor designs to minimize the bubble sounds of CO2 entering the reactor.4) Cost: Let’s be clear, the cost doesn’t stop when you pay the retail price for the filter. There’s the cost of media and spare parts plus the cost of electricity. What’s the rated wattage of the filter. I see the Aquael filters claim to consume lower power and are therefore cheaper to run. What about special filter cartridges or foam. Is it easy to cut foam filters from inexpensive bulk material? How often are gasket replacements necessary, or are there common issues with parts failing over time. Of two Fluval 07 filters I’ve used, both needed replacement impeller shafts. Oase Biomaster filters seem to have an issue with the input/output head often needing replaced.
I admit cost isn’t a critical factor for me, but I know it is for many others, so this is another instance where finding the right balance is key, in this case, the balance between price and performance.
Share your thoughts. Do these factors seem to align with yours or do you think I’m way off base. Tell us what types and brands of filters you prefer and why.
130 Replies
·
8118 views

Uh oh! Made the leap and purchased a UNS 60L aquarium today to replace my UNS 5N. It's going to go on the edge of my kitchen island, so keeping equipment minimal and attractive is going to be a priority here.
The aesthetic goal is something resembling an Iwagumi that can be viewed from 270 degrees. Biggest inspiration currently is this scape by @qball_aquatics in Sydney. I'm not a huge Iwagumi person and I normally like substantial hardscape, but something about the plant selection here scales so perfectly in this long shallow tank, so I'm simply going to copy it.
UNS 60L Dimensions: 24" x 8" x 8"
Tentative Equipment List
Filter: Oase Filtosmart 60
Inflow/outflow: ASG 10mm Stainless Steel Inflow/Outflow pipes
Light: Chihiros CII RGB or ONF Flat Nano - intentionally going for a short light for more of a spotlight effect with shadowing on the outer edges
CO2: Paintball setup, potentially mounted horizontally with brackets under the counter
Plants:
Glosso or HC carpet
Eleocharis parvula for height around the stones
Echinodorus 'Aflame" centerpiece plant
Livestock:
Blue dream neocaridina
Maybe chili rasboras
How does this setup sound? Very open to suggestions.
The aesthetic goal is something resembling an Iwagumi that can be viewed from 270 degrees. Biggest inspiration currently is this scape by @qball_aquatics in Sydney. I'm not a huge Iwagumi person and I normally like substantial hardscape, but something about the plant selection here scales so perfectly in this long shallow tank, so I'm simply going to copy it.
UNS 60L Dimensions: 24" x 8" x 8"
Tentative Equipment List
Filter: Oase Filtosmart 60
Inflow/outflow: ASG 10mm Stainless Steel Inflow/Outflow pipes
Light: Chihiros CII RGB or ONF Flat Nano - intentionally going for a short light for more of a spotlight effect with shadowing on the outer edges
CO2: Paintball setup, potentially mounted horizontally with brackets under the counter
Plants:
Glosso or HC carpet
Eleocharis parvula for height around the stones
Echinodorus 'Aflame" centerpiece plant
Livestock:
Blue dream neocaridina
Maybe chili rasboras
How does this setup sound? Very open to suggestions.
18 Replies
·
836 views

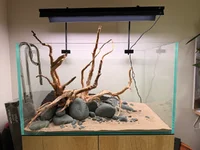
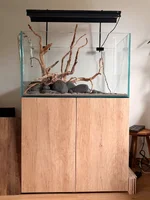
I’m starting this build with no experience in aquascaping other than keeping a large low tech community, fish focussed tank many years ago. I’m pleased with my hard scape but I think that will be the easy part. I’ll document all my ups and downs here and hopefully end up with my dream scape 
Aquasys 230L 90x55x53cm
Week Aqua L series lighting
Oase bio master 2 thermo 350
CO2 still to add
Stainless steel Lily pipes
Local basalt pebbles
Spider wood
Tropica Aqua Soil
Sand Foreground
I’m planning a dark start which gives me time to plan the planing and fish. I have some ideas but welcome suggestions!
Aquasys 230L 90x55x53cm
Week Aqua L series lighting
Oase bio master 2 thermo 350
CO2 still to add
Stainless steel Lily pipes
Local basalt pebbles
Spider wood
Tropica Aqua Soil
Sand Foreground
I’m planning a dark start which gives me time to plan the planing and fish. I have some ideas but welcome suggestions!
11 Replies
·
106 views
