
Welcome to ScapeCrunch
We are ScapeCrunch, the place where planted aquarium hobbyists come to build relationships and support each other. When you're tired of doom scrolling, you've found your home here.
Social Feed

Staff member
I Donated 2026
Founding Member
Hi everyone -
This is our new forum where members can post their aquariums and ask for help with the aquascaping of it. It is a way to take advice and counsel from your online family in a safe and friendly environment. Together we learn better.
Most of us are NOT professional aquascapers. Most haven't won global aquascaping contests. BUT, we can certainly share our perspectives that may prove valuable to you in your journey to making your aquarium beautiful. This is what makes forum's GREAT. Learning and improving your skill in a slower-paced environment.
I am NO aquascaper. I am a pretty decent observer though and love to deconstruct things to better understand them. This can be useful when learning aquascaping especially when done with a humble spirit.
Here is an example of what I mean. It's my deconstruction of George Farmer's One-Pot Iwagumi from ScapeFu. Now I can't promise everyone will get a deep analysis like this if you post your aquarium but it gives you an idea of what can be done and learned.

George Farmer is well known in the aquascaping world. He is the co-founder of the UK Aquatic Plants Society and an incredibly talented aquascaper. I wrote about George in the past and referred to him as one of aquascaping’s most influential people. I still feel that way. So, when I came across a post by George on how he took a single pot (hence, the title of his work) of Tropica’s 1-2-Grow series Micranthemum sp. “Monte Carlo” and challenged himself to use it to create an entire aquascape, I was quite intrigued!
The idea was simple. Take one pot of Micranthemum and plant it in a basic iwagumi style aquascape and see if it will grow enough to create a complete aquascape. It reminds me of the experiment done by Amano and pictured in his first book, Nature Aquarium World, only that, I believe, Amano used Glossostigma in that scape.
The issue with these challenges is that few have the Buddha-like patience necessary to wait for the single pot to grow out. Most of us, myself included, would cave and order a few more pots to get it to fill in quicker! Of course, a less dense planting is also more susceptible to algae outbreaks so a skilled hand is necessary to maintain a good growing routine under these circumstances.
To deal with some of the issues, George used the “dry-start” technique that helps establish small-root plants before raising the tank’s water column. This is possible because no taller plants are being used that would otherwise require the water column to be higher. I typically use this method to start my foregrounds and, once it’s established, I raise the water and only then plant the middle and backgrounds.

As you can see below, maintaining a high humidity environment is critical for this to work. Additionally, starting with healthy plants that were grown hydroponically (emersed) increases the odds of this method working well without much die off.

As you can see from the image that started this post, George succeeded in his challenge giving testament to his unusual level of self-control. Outstanding! However, what caught my eye even more than the great growth he got out of the plant was the overall aquascape he created that, at least from the post, seemed to be glossed over.
Did George simply throw some rocks in to the aquarium haphazardly? Hmm… This could be a chance to see how good of an aquascaper George really is! Whenever you get a chance to look at the work done by an artist either quickly or without much thought, you get a chance to see how much that artist is doing subconsciously. How much have they internalized of the art they have worked so hard to master? This is what people mean when they say, “It comes so naturally to him.” (Usually followed by, “I hate him!“)
I’m digressing! Let’s take this opportunity we have at hand to analyze the work done by our friend, George, when we know he really didn’t spend a ton of time planning the aquascape. Let’s see how much George has internalized! We promise, George, we won’t hate you in the end!
George mentions that he used a simple 7 stone iwagumi. Although there isn’t a rule regarding the number of stones, time has shown that odd numbers work best for the overall aquascape. In my opinion, the more stones, the more complex (and more difficult) the layout.
Let’s highlight the seven stones George chose to use. Did you see them in the original picture above? Count the colors below.

In an iwagumi, each stone has a purpose in the overall aquascape. It’s true synergy in that one stone without the others would be “less”. However, while the group working in harmony is what makes a good iwagumi, each stone playing its role is also critical to make the aquascape harmonious.
The primary or anchor rock is called Oyaishi and it is your primary focal point. It should be the most majestic or striking rock. The second (or balancing) rock is called Fukuishi and it goes on either side of the Oyaishi rock. The third rock, called Soeishi, supports Oyaishi and sits alongside the Fukuishi. Finally, Suteishi rocks balance out the overall layout and give it complexity. Let’s see how George placed the rocks and why.

The Oyaishi is definitely the largest, most striking rock in the layout. It’s balanced by Fukuishi that is what you would expect and want. Soeshi is properly supporting Oyaishi and balancing the layout on the right (the traditional Sanzon iwagumi). Suteishi rocks are placed in locations that continue to support and balance the over all layout. Certainly the complexity of the layout is increased with the Suteishi George placed.
George’s placement of the Oyaishi is almost spot on. It is said that you want it to be about 2/3rds from the top of the aquascape to give it a focal point. We’ll confirm is George placed it at the true focal point of the aquascape later, but for now, see how he did hit the 2/3rd mark in the Rule of Thirds.

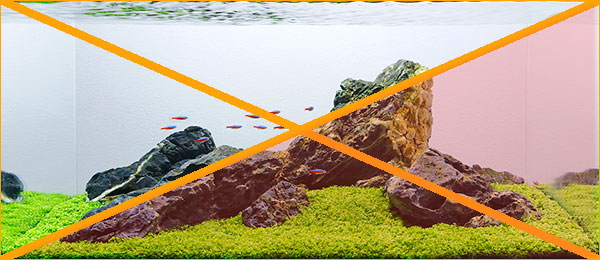
Let’s deconstruct George’s rock placement and see why he placed the Suteishi the way he did. Below you can see the back right rock removed. Do you see how the layout is out of balance? The layout is too heavy to the left. It’s subtle, but a critical element, in my opinion.
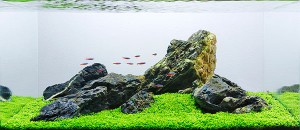
What is we remove the rock in the middle of the layout? What do you think it does to the overall impression?
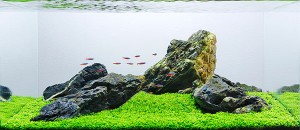
Something is missing, right? It’s OK, but less complex than with the Suteishi stone there. George could have left it out but the overall layout is better with it in there. Remember, add until adding something detracts from the overall aquascape. There is a fine line with this type of element and it requires a very experienced understanding of aquascape layout. Impressive, George!
How about removing the back left rock? What does that do? Let’s see.
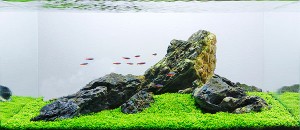
Wow! That really throws off balance, doesn’t it? I get the feeling the aquarium’s going to tip over with so much weight on the right side. Definitely better having that left rock to balance out the layout.
My only issue with the left rock is that bright white strip going down its side. My eyes immediately drift to it. I understand it’s natural veining in the rock and that the other rocks also have albeit to a lesser extent. Nevertheless, I think it would be better without it. See below what it would look like without the vein. What do you think?
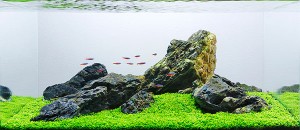
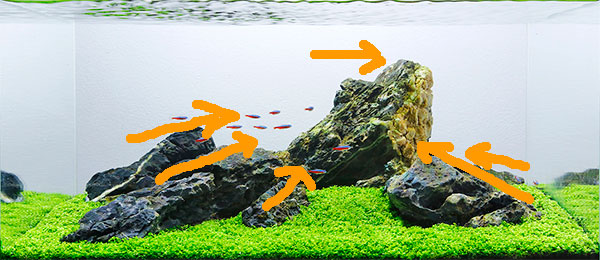
Before moving away from the iwagumi style, I want to point out the direction of the rocks. The style tells us that the Oyaishi should be angled in a direction rather than be straight up and down. This gives a much more dynamic and natural impression of a current or movement. George does this well.
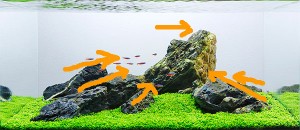
The supporting rocks should be angled to the Oyaishi in support of it but not conflict with the flow or movement created by the Oyaishi. Again, George does this exceptionally well. See the image below where I’ve highlighted the direction of movement. And, as a show of how masterful he is, George even photographed the school of Cardinals swimming in the exact direction of movement (current) that the Oyaishi depicts. Genius and pro tip to you beginners!
One of the more famous of these rules is the rule of thirds. Essentially, this rule says that a layout is better (more dynamic) if your focal point is placed in one of the lines or intersection of lines found at the layout’s mathematical thirds. It’s hard to explain but easy to see. Here is the rule superimposed on George’s aquascape.
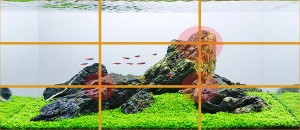
Bingo! This was the first rule I ran on the aquascape and it reinforced my initial impressions that this layout had something special. As you can see, George has hit the rule of thirds out of the park!
I’ve circled in red the area where there’s a critical intersection. Each represents a focal point with the top right one being the primary. It’s uncanny how George did this. Take a look at how the Oyaishi is sitting right on the third line.
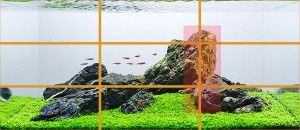
The weight of the aquascape is sitting right on the third line almost perfectly. How did you do this George?? I couldn’t have done it any better even if I had measured it exactly. Also, in the next image, notice how the bottom weight of the aquascape sits right on the lower third line.
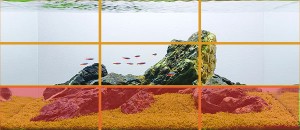
George has not only laid out the hardscape in a fantastic and complex 7 stone iwagumi style, but he’s managed to do it following the rule of thirds also perfectly! This was so striking to me that I actually reached out to George to confirm that he didn’t measure the layout as he installed it. He confirmed he only “eyeballed” it. I’m jealous…
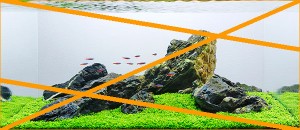
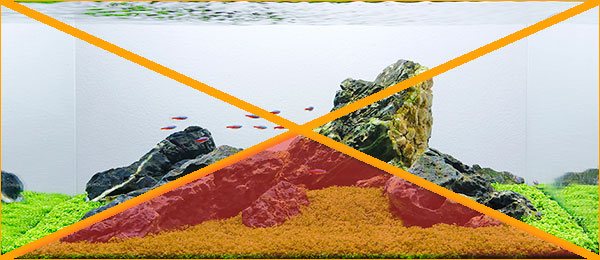
Once again, George seems to be right on the line with the golden triangles. Notice the diagonal line going from bottom left to top right. It intersects the Fukuishi and Oyaishi stones perfectly. The weight of the stones is mostly in the lower right isosceles triangle with the opposite triangle being white space. This yin-and-yang with white space is very important and I rarely see it with beginner and intermediate aquascapes. Only the more advanced artists now the importance of white space and what it can do to the composition.
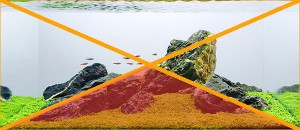
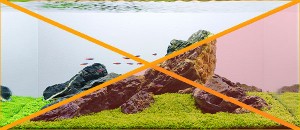
The two images below depict how simple triangles can also be brought into an aquascape to add complexity and pleasing symmetry. These triangles are subtle and you may not notice them at first glance. However, your brain picks them up and it feels that something is right or correct about this aquascape. It feels natural for some reason. One of those reasons is the use of triangles!
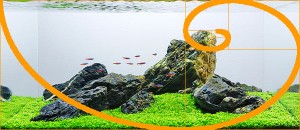
Let’s see how well the One-Pot Iwagumi does in terms of the golden spiral and it’s indication of the primary focal point.
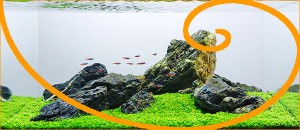
The golden spiral is a beautiful and mystical mathematical formula that is used to indicate the primary focal point of a work of art. The thought is that the piece’s primary focal point should be where the spiral ends.
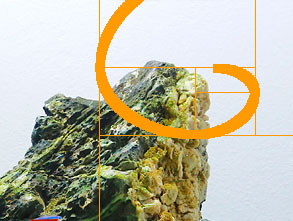
As you can see, George placed the top of the Oyaishi stone at almost the exact position indicated by the spiral. This is where the eye will look. How uncanny that he did this without much thought!
I was so intrigued that I ran the most complicated formula that subdivides the spiral type into sub-areas to see just how close he got to the mathematical idea. See the result below. His positioning of the Oyaishi stone would not change even if he had run this formula prior to positioning it. Extremely well done!
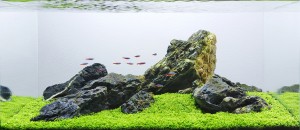
ONE-POT IWAGUMI
This aquascape achieves perspective and depth of field by using smaller stones and placing them closer to the front pane while larger ones are to the back. This gives an impression of depth. The aquascape certainly looks larger than what it really is. This is difficult to do when you only use rocks and one type of plant.
It is more common to see larger items upfront with smaller items transitioning to the back in some aquascape styles. This gives the impression of items in the back being very far away.
My sense of perspective here is looking from a distance at weathered and worn mountain peaks that are surrounded by a sea of grass or low trees. I get the feeling of openness. A wind-swept mountain.
What do you feel when taking it all in? Describe you feeling? Can you almost smell something? These are the things that are, at the end of the day, most important in judging an aquascape.
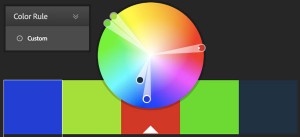
Color is so important to an aquascape but not many people focus on it. To me, proper use of color completes an aquascape. Improper use can severely detract from it. Make it less than it what it could have been.
One of my upcoming posts will be on the use of color theory in aquascapes. For now, however, let’s just focus on some basics. Colors can impact us mentally and physically. Being able to use colors consciously and harmoniously can help you create spectacular results.
Colors can be harmonious to one another. Some are complimentary, others analogous. One model is called triadic and it’s what George’s aquascape uses. Taking a quote from the above linked site on color theory:
The blue/black slate color serves as an accent to the green. I then picked up on George’s choice to use Cardinals with their red and blue. Just the right colors in the color wheel to accentuate the green.
It’s interesting that George first put red eye Tetras but felt they were wrong because they got lost into the background. I totally agree. Picking the right fish to complement the composition is harder than most people think. Unfortunately, the fish are usually an afterthought and the aquascape suffers for it.
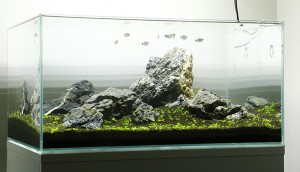
In this case, George recognized something was wrong and chose Cardinals instead. Again, I totally agree…and so does the color wheel.
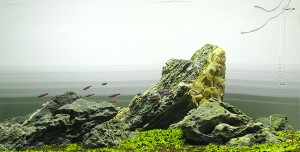
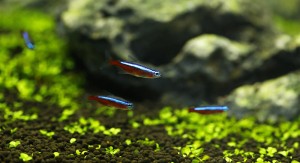 Notice also how the small size of the Cardinals and their swimming habit complement the overall composition. Any bigger and the fish would detract from the aquascape and throw off the entire perceptive. George does an excellent job here in terms of the color, size and swimming habits.
I think George’s intention with this challenge was to show people that you can create a complete aquascape with only one tiny pot of plants. In so doing, he has also revealed much deeper teachings some of which we discussed in this humble analysis. I’m sure as I continue to think about this composition, I will see many more things that I have so far overlooked. This is especially true as I’ve not had the privilege of studying the details that it contains.
It is well known that it takes many years of practice to make something look effortless and natural. With this aquascape, George has done just that. He has executed an iwagumi with masterful skill. At first blush, it looks natural and simple, almost minimalistic. It is only when you start to deconstruct it to its bones that it’s brilliance shows itself.
Well done, George. Very well done.
All the best,
Art
Here is a great video of the aquascape in progress:
Important Note: The unmodified images used in this article except for color_wheel are the copyrighted work of George Farmer and used with permission. Modified images are copyrighted by ScapeFu.com All Rights Reserved.
This is our new forum where members can post their aquariums and ask for help with the aquascaping of it. It is a way to take advice and counsel from your online family in a safe and friendly environment. Together we learn better.
Most of us are NOT professional aquascapers. Most haven't won global aquascaping contests. BUT, we can certainly share our perspectives that may prove valuable to you in your journey to making your aquarium beautiful. This is what makes forum's GREAT. Learning and improving your skill in a slower-paced environment.
I am NO aquascaper. I am a pretty decent observer though and love to deconstruct things to better understand them. This can be useful when learning aquascaping especially when done with a humble spirit.
Here is an example of what I mean. It's my deconstruction of George Farmer's One-Pot Iwagumi from ScapeFu. Now I can't promise everyone will get a deep analysis like this if you post your aquarium but it gives you an idea of what can be done and learned.
George Farmer is well known in the aquascaping world. He is the co-founder of the UK Aquatic Plants Society and an incredibly talented aquascaper. I wrote about George in the past and referred to him as one of aquascaping’s most influential people. I still feel that way. So, when I came across a post by George on how he took a single pot (hence, the title of his work) of Tropica’s 1-2-Grow series Micranthemum sp. “Monte Carlo” and challenged himself to use it to create an entire aquascape, I was quite intrigued!
The idea was simple. Take one pot of Micranthemum and plant it in a basic iwagumi style aquascape and see if it will grow enough to create a complete aquascape. It reminds me of the experiment done by Amano and pictured in his first book, Nature Aquarium World, only that, I believe, Amano used Glossostigma in that scape.
The issue with these challenges is that few have the Buddha-like patience necessary to wait for the single pot to grow out. Most of us, myself included, would cave and order a few more pots to get it to fill in quicker! Of course, a less dense planting is also more susceptible to algae outbreaks so a skilled hand is necessary to maintain a good growing routine under these circumstances.
To deal with some of the issues, George used the “dry-start” technique that helps establish small-root plants before raising the tank’s water column. This is possible because no taller plants are being used that would otherwise require the water column to be higher. I typically use this method to start my foregrounds and, once it’s established, I raise the water and only then plant the middle and backgrounds.
As you can see below, maintaining a high humidity environment is critical for this to work. Additionally, starting with healthy plants that were grown hydroponically (emersed) increases the odds of this method working well without much die off.
As you can see from the image that started this post, George succeeded in his challenge giving testament to his unusual level of self-control. Outstanding! However, what caught my eye even more than the great growth he got out of the plant was the overall aquascape he created that, at least from the post, seemed to be glossed over.
Did George simply throw some rocks in to the aquarium haphazardly? Hmm… This could be a chance to see how good of an aquascaper George really is! Whenever you get a chance to look at the work done by an artist either quickly or without much thought, you get a chance to see how much that artist is doing subconsciously. How much have they internalized of the art they have worked so hard to master? This is what people mean when they say, “It comes so naturally to him.” (Usually followed by, “I hate him!“)
I’m digressing! Let’s take this opportunity we have at hand to analyze the work done by our friend, George, when we know he really didn’t spend a ton of time planning the aquascape. Let’s see how much George has internalized! We promise, George, we won’t hate you in the end!
Initial Impressions
At first blush, this seems to be a very good aquascape in the iwagumi style. I don’t have the luxury of going too deeply into the iwagumi style in this analysis, but I am planning an article that will go into iwagumi’s history and incorporation into aquascaping. For the time being, please look at the above link and my post on Reciprocity by James Findley for great iwagumi overviews.George mentions that he used a simple 7 stone iwagumi. Although there isn’t a rule regarding the number of stones, time has shown that odd numbers work best for the overall aquascape. In my opinion, the more stones, the more complex (and more difficult) the layout.
Let’s highlight the seven stones George chose to use. Did you see them in the original picture above? Count the colors below.
In an iwagumi, each stone has a purpose in the overall aquascape. It’s true synergy in that one stone without the others would be “less”. However, while the group working in harmony is what makes a good iwagumi, each stone playing its role is also critical to make the aquascape harmonious.
The primary or anchor rock is called Oyaishi and it is your primary focal point. It should be the most majestic or striking rock. The second (or balancing) rock is called Fukuishi and it goes on either side of the Oyaishi rock. The third rock, called Soeishi, supports Oyaishi and sits alongside the Fukuishi. Finally, Suteishi rocks balance out the overall layout and give it complexity. Let’s see how George placed the rocks and why.
The Oyaishi is definitely the largest, most striking rock in the layout. It’s balanced by Fukuishi that is what you would expect and want. Soeshi is properly supporting Oyaishi and balancing the layout on the right (the traditional Sanzon iwagumi). Suteishi rocks are placed in locations that continue to support and balance the over all layout. Certainly the complexity of the layout is increased with the Suteishi George placed.
George’s placement of the Oyaishi is almost spot on. It is said that you want it to be about 2/3rds from the top of the aquascape to give it a focal point. We’ll confirm is George placed it at the true focal point of the aquascape later, but for now, see how he did hit the 2/3rd mark in the Rule of Thirds.
Let’s deconstruct George’s rock placement and see why he placed the Suteishi the way he did. Below you can see the back right rock removed. Do you see how the layout is out of balance? The layout is too heavy to the left. It’s subtle, but a critical element, in my opinion.

What is we remove the rock in the middle of the layout? What do you think it does to the overall impression?

Something is missing, right? It’s OK, but less complex than with the Suteishi stone there. George could have left it out but the overall layout is better with it in there. Remember, add until adding something detracts from the overall aquascape. There is a fine line with this type of element and it requires a very experienced understanding of aquascape layout. Impressive, George!
How about removing the back left rock? What does that do? Let’s see.

Wow! That really throws off balance, doesn’t it? I get the feeling the aquarium’s going to tip over with so much weight on the right side. Definitely better having that left rock to balance out the layout.
My only issue with the left rock is that bright white strip going down its side. My eyes immediately drift to it. I understand it’s natural veining in the rock and that the other rocks also have albeit to a lesser extent. Nevertheless, I think it would be better without it. See below what it would look like without the vein. What do you think?

Before moving away from the iwagumi style, I want to point out the direction of the rocks. The style tells us that the Oyaishi should be angled in a direction rather than be straight up and down. This gives a much more dynamic and natural impression of a current or movement. George does this well.
The supporting rocks should be angled to the Oyaishi in support of it but not conflict with the flow or movement created by the Oyaishi. Again, George does this exceptionally well. See the image below where I’ve highlighted the direction of movement. And, as a show of how masterful he is, George even photographed the school of Cardinals swimming in the exact direction of movement (current) that the Oyaishi depicts. Genius and pro tip to you beginners!
Rule of Thirds
As I’ve explained in the past, there are tried and true rules that have developed over centuries dealing with optimal layouts. These rules use mathematical equations that to humans represent the ideal. We’ve come to know these rules as the golden rules of layout and they can be seen in all great works of art, from paintings to photographs to aquascapes. I use these rules to see how close an aquascape comes to ideal layout.One of the more famous of these rules is the rule of thirds. Essentially, this rule says that a layout is better (more dynamic) if your focal point is placed in one of the lines or intersection of lines found at the layout’s mathematical thirds. It’s hard to explain but easy to see. Here is the rule superimposed on George’s aquascape.
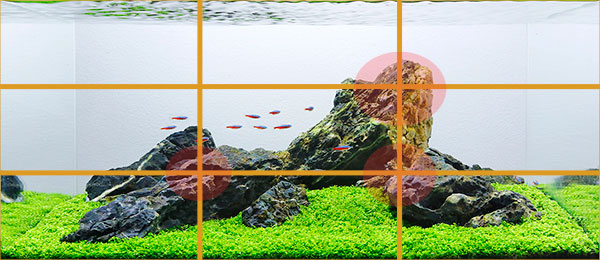
Bingo! This was the first rule I ran on the aquascape and it reinforced my initial impressions that this layout had something special. As you can see, George has hit the rule of thirds out of the park!
I’ve circled in red the area where there’s a critical intersection. Each represents a focal point with the top right one being the primary. It’s uncanny how George did this. Take a look at how the Oyaishi is sitting right on the third line.

The weight of the aquascape is sitting right on the third line almost perfectly. How did you do this George?? I couldn’t have done it any better even if I had measured it exactly. Also, in the next image, notice how the bottom weight of the aquascape sits right on the lower third line.
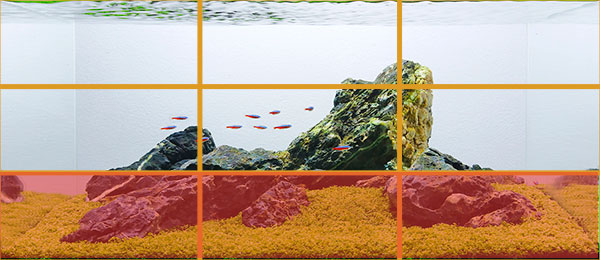
George has not only laid out the hardscape in a fantastic and complex 7 stone iwagumi style, but he’s managed to do it following the rule of thirds also perfectly! This was so striking to me that I actually reached out to George to confirm that he didn’t measure the layout as he installed it. He confirmed he only “eyeballed” it. I’m jealous…
Golden Triangles
The rule of thirds is only one of the rules of layout design that really impacts the overall composition. The proper use of triangles is just as important. You see, our brains are trained to see triangles for some reason. It’s a pattern that is hard-wired into us. We feel triangles are natural, comforting and give an overall impression of order. Let’s see if George did as well as he did with thirds?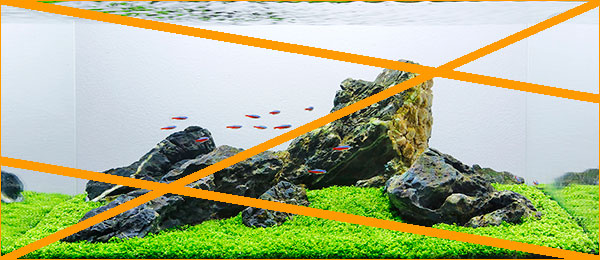
Once again, George seems to be right on the line with the golden triangles. Notice the diagonal line going from bottom left to top right. It intersects the Fukuishi and Oyaishi stones perfectly. The weight of the stones is mostly in the lower right isosceles triangle with the opposite triangle being white space. This yin-and-yang with white space is very important and I rarely see it with beginner and intermediate aquascapes. Only the more advanced artists now the importance of white space and what it can do to the composition.
The two images below depict how simple triangles can also be brought into an aquascape to add complexity and pleasing symmetry. These triangles are subtle and you may not notice them at first glance. However, your brain picks them up and it feels that something is right or correct about this aquascape. It feels natural for some reason. One of those reasons is the use of triangles!
Golden Spiral and Focal Point
So George seems to be a master of hitting the thirds and the triangles. It is obvious that his many years of working with aquascapes and noticing what works and what doesn’t have paid off. He is naturally placing key elements of the composition in just the right places as dictated by the golden rules. He does this with his gut. “It comes naturally to him.” No, we don’t hate him, though, because his gut is the result of years of practice and observation.Let’s see how well the One-Pot Iwagumi does in terms of the golden spiral and it’s indication of the primary focal point.

The golden spiral is a beautiful and mystical mathematical formula that is used to indicate the primary focal point of a work of art. The thought is that the piece’s primary focal point should be where the spiral ends.
As you can see, George placed the top of the Oyaishi stone at almost the exact position indicated by the spiral. This is where the eye will look. How uncanny that he did this without much thought!
I was so intrigued that I ran the most complicated formula that subdivides the spiral type into sub-areas to see just how close he got to the mathematical idea. See the result below. His positioning of the Oyaishi stone would not change even if he had run this formula prior to positioning it. Extremely well done!

Depth of Field and Perspective
Depth of field and perspective are just tricks used to give the impression that the aquascape is much larger than it seems. It accentuates the 3D space occupied and expands it.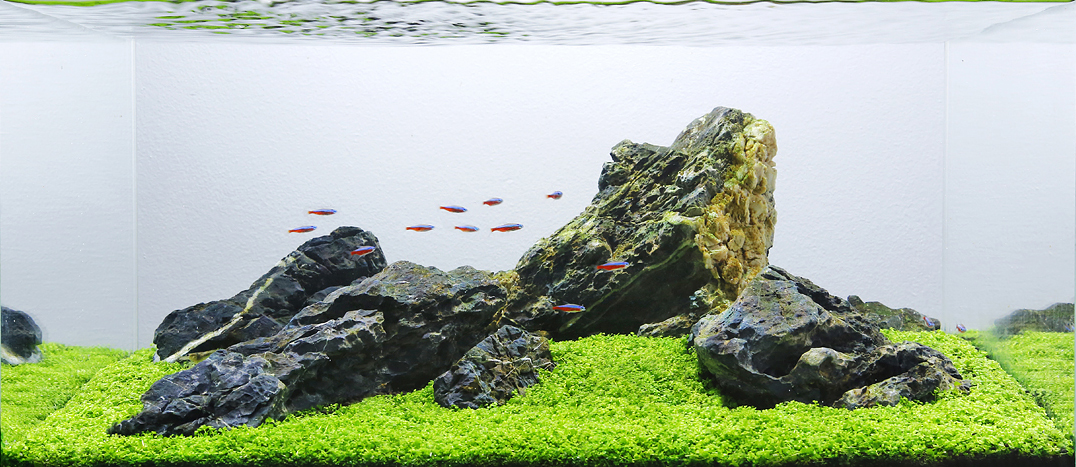
ONE-POT IWAGUMI
This aquascape achieves perspective and depth of field by using smaller stones and placing them closer to the front pane while larger ones are to the back. This gives an impression of depth. The aquascape certainly looks larger than what it really is. This is difficult to do when you only use rocks and one type of plant.
It is more common to see larger items upfront with smaller items transitioning to the back in some aquascape styles. This gives the impression of items in the back being very far away.
My sense of perspective here is looking from a distance at weathered and worn mountain peaks that are surrounded by a sea of grass or low trees. I get the feeling of openness. A wind-swept mountain.
What do you feel when taking it all in? Describe you feeling? Can you almost smell something? These are the things that are, at the end of the day, most important in judging an aquascape.
Color Choices

Color is so important to an aquascape but not many people focus on it. To me, proper use of color completes an aquascape. Improper use can severely detract from it. Make it less than it what it could have been.
One of my upcoming posts will be on the use of color theory in aquascapes. For now, however, let’s just focus on some basics. Colors can impact us mentally and physically. Being able to use colors consciously and harmoniously can help you create spectacular results.
Colors can be harmonious to one another. Some are complimentary, others analogous. One model is called triadic and it’s what George’s aquascape uses. Taking a quote from the above linked site on color theory:
The image above is what I got when I used George’s aquascape and ran it through the color wheel analyzer. The triadic color scheme is obvious. George uses green to dominate and the other colors accent it.
The blue/black slate color serves as an accent to the green. I then picked up on George’s choice to use Cardinals with their red and blue. Just the right colors in the color wheel to accentuate the green.
It’s interesting that George first put red eye Tetras but felt they were wrong because they got lost into the background. I totally agree. Picking the right fish to complement the composition is harder than most people think. Unfortunately, the fish are usually an afterthought and the aquascape suffers for it.

In this case, George recognized something was wrong and chose Cardinals instead. Again, I totally agree…and so does the color wheel.

 Notice also how the small size of the Cardinals and their swimming habit complement the overall composition. Any bigger and the fish would detract from the aquascape and throw off the entire perceptive. George does an excellent job here in terms of the color, size and swimming habits.
Final Impressions
If you read all the way down here, you know we’ve looked at George Farmer’s One-Pot Iwagumi from many different perspectives. We’ve deconstructed it and discussed it’s individual parts. These parts were put together, apparently without too much thought, by one of the true masters of aquascaping. It is obvious that he has, in fact, internalized many things that most people would need to carefully plan. I stand in awe.I think George’s intention with this challenge was to show people that you can create a complete aquascape with only one tiny pot of plants. In so doing, he has also revealed much deeper teachings some of which we discussed in this humble analysis. I’m sure as I continue to think about this composition, I will see many more things that I have so far overlooked. This is especially true as I’ve not had the privilege of studying the details that it contains.
It is well known that it takes many years of practice to make something look effortless and natural. With this aquascape, George has done just that. He has executed an iwagumi with masterful skill. At first blush, it looks natural and simple, almost minimalistic. It is only when you start to deconstruct it to its bones that it’s brilliance shows itself.
Well done, George. Very well done.
All the best,
Art
Here is a great video of the aquascape in progress:
Important Note: The unmodified images used in this article except for color_wheel are the copyrighted work of George Farmer and used with permission. Modified images are copyrighted by ScapeFu.com All Rights Reserved.
8 Replies
·
4379 views


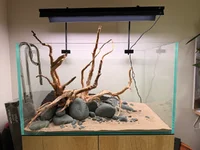
I’m starting this build with no experience in aquascaping other than keeping a large low tech community, fish focussed tank many years ago. I’m pleased with my hard scape but I think that will be the easy part. I’ll document all my ups and downs here and hopefully end up with my dream scape 
Aquasys 230L 90x55x53cm
Week Aqua L series lighting
Oase bio master 2 thermo 350
CO2 still to add
Stainless steel Lily pipes
Local basalt pebbles
Spider wood
Tropica Aqua Soil
Sand Foreground
I’m planning a dark start which gives me time to plan the planing and fish. I have some ideas but welcome suggestions!
Aquasys 230L 90x55x53cm
Week Aqua L series lighting
Oase bio master 2 thermo 350
CO2 still to add
Stainless steel Lily pipes
Local basalt pebbles
Spider wood
Tropica Aqua Soil
Sand Foreground
I’m planning a dark start which gives me time to plan the planing and fish. I have some ideas but welcome suggestions!
13 Replies
·
118 views


I Donated 2026
Expert in Residence
MOTM Winner
Started a new tank with the idea of show casing Lagenandra meeboldii which I have not showcased before. Wanted to feature Hygrophila lower Hlaingbwe, but I removed it later as I think it would be too large for this tank.
New substrate, new filter, squeezed filter mulm from the other matured tank, then ran the tank one week day before planting. 100% water change after planting, then 100% water change every other day since then. Dosing 1ml APT3 after water change day, and remineralizing to 5dGH using APT Sky. Trying out the low water column dosing approach for the initial period.
Filter: Oase 250
Lights: Week aqua a430 80%
Substrate: APT Feast
Was going to Journal about startup issues, however, it seems like the tank has already stabilized, skipping diatoms and green dust phase.
Freshly planted for a couple of days:
13/2/2026
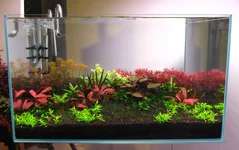
Replanted the tops for Myriophyllum roraima, Cut and replanted Rotala blood red to begin building up the bush form. Trimmed old leaves
Foreground seems a bit blocky for now, so I think I'lll move stuff round again. Probably when the BV grows out some more.
Pic on 23/2/2026
Readings at this stage:
Potassium: 2.3ppm
Ammonia: 0.1ppm
reduce water changes to 2 times a week.

New substrate, new filter, squeezed filter mulm from the other matured tank, then ran the tank one week day before planting. 100% water change after planting, then 100% water change every other day since then. Dosing 1ml APT3 after water change day, and remineralizing to 5dGH using APT Sky. Trying out the low water column dosing approach for the initial period.
Filter: Oase 250
Lights: Week aqua a430 80%
Substrate: APT Feast
Was going to Journal about startup issues, however, it seems like the tank has already stabilized, skipping diatoms and green dust phase.
Freshly planted for a couple of days:
13/2/2026
Replanted the tops for Myriophyllum roraima, Cut and replanted Rotala blood red to begin building up the bush form. Trimmed old leaves
Foreground seems a bit blocky for now, so I think I'lll move stuff round again. Probably when the BV grows out some more.
Pic on 23/2/2026
Readings at this stage:
Potassium: 2.3ppm
Ammonia: 0.1ppm
reduce water changes to 2 times a week.
95 Replies
·
6906 views

Supporting
I Donated 2026
From
With the death of Christel Kasselmann, the global aquaristics community loses one of its most significant pioneers of aquarium botany. We, the aquarists of Berlin-Tegel 1912 e.V., mourn the outstanding expert and long-time companion and friend of our hobby.
On her numerous expeditions to the tropics, she explored the natural biotopes of Echinodorus, Cryptocoryne, and others. Her insights into water values, light, and substrate at the natural site revolutionized plant care in the aquarium.
Her book "Aquarienpflanzen" combines botanical precision with practical value and has been a staple of reading for countless aquarians for decades.
Through her first descriptions, lectures, and publications, Christel Kasselmann has shaped and enriched aquarium botany like few others.
As aquarists of Berlin-Tegel 1912 e.V., we bow to her life's work.
Her knowledge, passion, and work will live on in our aquariums and in the hearts of our association family, in every wave and bloom of the plants she dedicated her life to.
With the death of Christel Kasselmann, the global aquaristics community loses one of its most significant pioneers of aquarium botany. We, the aquarists of Berlin-Tegel 1912 e.V., mourn the outstanding expert and long-time companion and friend of our hobby.
On her numerous expeditions to the tropics, she explored the natural biotopes of Echinodorus, Cryptocoryne, and others. Her insights into water values, light, and substrate at the natural site revolutionized plant care in the aquarium.
Her book "Aquarienpflanzen" combines botanical precision with practical value and has been a staple of reading for countless aquarians for decades.
Through her first descriptions, lectures, and publications, Christel Kasselmann has shaped and enriched aquarium botany like few others.
As aquarists of Berlin-Tegel 1912 e.V., we bow to her life's work.
Her knowledge, passion, and work will live on in our aquariums and in the hearts of our association family, in every wave and bloom of the plants she dedicated her life to.
1 Replies
·
48 views


I Donated 2026
My wife and I agreed we'd ideally be moving in the next 6-12 months. There's the possibly it could be sooner if the right place pops up, and could possibly be longer, although not ideal. This has made me pause and reconsider setting up my 120p in this house (and a 20 gallon too!). The thought of having the tank up and running for possibly a short period of time before having to break it down and move it sounds pretty terrible compared to moving all of individual components. I currently have my 75p, so I'm not tankless and would need to move that.
Location would still be in the same general region (20-40 mile radius) and we'd likely maintain overlap between homes for a 1 month.
What would you do?
Location would still be in the same general region (20-40 mile radius) and we'd likely maintain overlap between homes for a 1 month.
What would you do?
3 Replies
·
66 views

Supporting
Trying a true journal format. Let me know if it's too much writing. My natural tendency is to bullet point everything.
The Mishap That Started It All
This whole project began at 6:30 a.m., courtesy of my Oase Biomaster Thermo 250 deciding to serenade me with impeller noise while I was trying to work from home. Biofilm on the impeller — nothing dramatic — but the sound was maddening, especially with an 8 a.m. call with our London office looming. So I did what any aquarist does under pressure: a lightning‑fast pre‑filter and impeller clean.That’s when the universe decided to intervene.
While disconnecting the hoses — the same routine I’ve done countless times — the lock failed. Suddenly a vacuum of water blasted across the floor of my upstairs alcove “office.” I yanked the intake and outflow from my 60U, stopping the torrent, but not before a solid gallon had soaked into the floorboards.
My wife woke up to the sound of chaos and the sight of me standing in a puddle. Understandably, she was not thrilled. The alcove has cathedral ceilings, so every noise echoes, and the massive 8‑foot cabinet we built with her dad years ago makes cleaning underneath nearly impossible. It’s not a space designed for aquariums, humidity, or early‑morning filter geysers.
As we cleaned, she admitted she hated having tanks and equipment out in the open upstairs. Fair enough. When we built the house, the plan was always for my “stuff” to live in the downstairs office while she had the rest of the house. But during COVID she needed privacy for patient calls, so I gave her the office and moved my stuff upstairs. Now her role has changed — two days in the hospital, one day from home — and the need for that arrangement is gone.
So I floated the idea: What if I moved everything back downstairs, consolidated the two smaller tanks into one larger, beautifully executed setup — something like the living room tank she actually likes? Less noise, less humidity upstairs, and I get a proper scaping space again.
To my mild shock, she was completely on board. From a mishap came opportunity.
Choosing the Tank
Once the idea settled, I had to pick the right aquarium. I landed on the AquaEl Ultrascaper 90 — the dimensions are perfect, and I’d been eyeing it ever since researching the Skylight Hyperspot and AquaEl’s filter lineup. The tank was designed with the scapers at AquaShow in Poland, and their sample layouts are right up there with ADA, ADG, and Green Aqua imo.Finding one in the U.S. was the next challenge. I reached out to the AquaEl rep, asked about the Hypermax for my living room tank, and inquired about Ultrascaper 90 availability. He pointed me to Fish Tanks Direct — and with a discount code in hand, I placed the order for the snow variant. My only quandy was to go for the cheaper one and get a Netlea AT5S to hang or try their newer attractive but inferior light option (RGB vs WBG). I chose to try their light as it looked interesting and the PAR on paper is more than enough.
Link for reference:https://fishtanksdirect.com/aquael-ultrascape-90-with-ultra-slim-snow-tank-light-cabinet/
Atlanta Weekend & Tank Comparisons
Right after ordering, we had a weekend trip to Atlanta for one of my wife’s appointments. On Friday we visited the botanical garden, grabbed food, and while she was at her appointment Saturday, I made the rounds to three local fish stores. The Aquarium was an option but a Saturday solo but spending roughly $100 to be around 10 million families sounded less enjoyable than exploring ATL suburbs and seeing the stores and their tanks.Premiere Aquatics had a beautiful setup UNS 90U and one for sale as well but at nearly $2,000 out the door it wasn't a great deal. Plus the tank is taller than I wanted, it wasn’t the right fit. I did pick up two gorgeous rose swords and a great piece of ghost wood.
I went to one store in Alpharetta but it was out of literally everything, not sure if they are doing poorly or just sell out fast and under order. I did buy a crinum there. Plus I liked driving from Premier to their.
Then I got lucky at Optimum Aquarium — they had an AquaEl Ultrascaper 90 in stock that had arrived that week, priced at a very respectable $1,000 (without the light). If the cabinet had been white, I would’ve bought it on the spot. They also had a wide range of tanks, which let me compare my choice to the Fluval Opti White 90 (a very reasonable $700) and several Aquatlantis rimless tanks I didn’t even know were available in the U.S. Their shallow 80 is especially cool — tank, stand, and light for $830, I would get a different color but I like the concept. They also had a bunch of healthy Dwarf Sag for $3 dollars so I bought a 4 bunches to use as I couldn't find dwarf chain swords easily online and heleiatium tenellum is a little too small.
My takeaways:
- Fluval Opti White 90: Nice tank but a bit small and too tall, the stand feels cheap and lightweight. Attractive for the price, but not my pick.
- Aquatlantis: Surprisingly impressive. I’d choose them over Fluval at similar price points.
- UNS 90U: The stands are unquestionably superior. The tank mitering is spectacular.
- AquaEl Ultrascaper 90:
- Stand: Best flat‑pack stand I’ve seen, though still a flat‑pack.
- Glass: Equal quality to UNS but no mitering.
- Dimensions: 90 × 60 × 45 — absolutely perfect.
- Incredible depth
- Lower height makes it ideal for seated viewing
- Easier to work in
- Better top‑down perspective


13 Replies
·
910 views

I recently set up my first big (to me) tank. I've been into this hobby for a couple of years but limited to a 20 gallon and a couple 10 gallon tanks in my office. I decided it was time to splurge and set up a nice 75 gallon system that can become a more appropriately-scaled Dutch tank. Here it is shortly after planting:
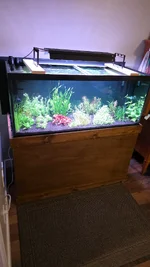
I like to save money where possible, so I ended up building my own tank stand as well as a Yugang reactor. I wanted to document these things to show everyone that it is quite attainable with a set of tools and a weekend of work.
So, here is the first post. Tank Stand Build:
When researching simple lumber stands, I found this great video:
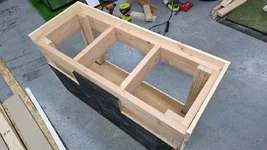
I used it as a guideline to build a simple dimensional lumber stand. My stand is 49" long, 19" wide, and 28" tall. This gives approximately 1/2" of clearance around the 75 gallon aquarium footprint and keeps the tank low enough that I can reach over the rim and touch the bottom substrate without straining. As shown in the photo, I used 2x6 lumber for the upper frame so that I could avoid using a centerspan support. This makes it so much easier to access the space under the tank. I used two 8ft 2x6 and six 8ft 2x4 studs. Total cost at home depot was under $50.
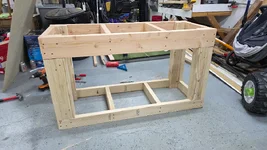
Once the structural frame was complete, I started thinking about how to dress it up as a piece of furniture that I didnt hate to have in my home. I ended up deciding to do a very simple trim with 1x3 boards on the bottom and 1x4 on the top. The top trim is offset upwards from the frame such that it covers the plastic trim on the tank when it is on the stand. I also used a piece of scrap plywood from my garage to act as a back panel and shear support to prevent racking of the frame. The 1x3 and 1x4 boards came out to $15
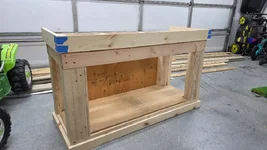
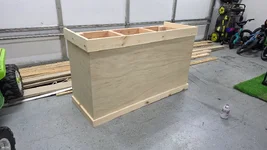
To finish it off, I bought a sheet of 1/8" "utility board" plywood for another $15. I cut it to wrap around the sides and front.
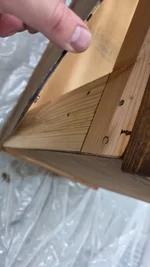
Now how to access the bottom? I thought about this a lot and ultimately decided on the cheapest/simplest/most lame approach. I bought some magnets from Harbor Freight for $5. I lucked out and these magnets were nearly the same size as the heads on the screws I used, so I simply put them on 4 corner screws and then added matching magnets on the front plywood panel at the 4 corners. It actually works really well and makes it simple to take the front panel off for filter access. It saved me hours of work and the cost of building actual cabinet doors, and I like how clean the final product ends up looking.
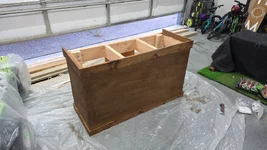
Lastly, I stained using dark walnut stain. Pine needs conditioner, so I did that first and then did one coat of stain. I then did about 4 coats of spray on oil-based polyurethane to seal it up.
The last thing I did was add a sheet of styrofoam insulation on top of the frame to help even out any bumps in the lumber. I made it as flat as possible, but dimensional lumber is not meant for this kind of thing and has imperfections. The styrofoam is peace of mind for me to make sure the tank rim gets fully supported all the way around.
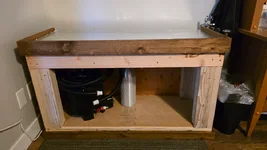
I'm really happy with how it turned out. Total cost for me was around $110, but I had some scrap plywood at home for the back panel and the bottom shelf where my filters sit. If you need to buy a sheet, figure another $40 bucks or so. Total time investment was maybe like 8 hours over the weekend and then the hours of waiting between coats of stain and poly. Tools used were a miter saw, circular saw, drill, driver, nailer, and sander.
I like to save money where possible, so I ended up building my own tank stand as well as a Yugang reactor. I wanted to document these things to show everyone that it is quite attainable with a set of tools and a weekend of work.
So, here is the first post. Tank Stand Build:
When researching simple lumber stands, I found this great video:
I used it as a guideline to build a simple dimensional lumber stand. My stand is 49" long, 19" wide, and 28" tall. This gives approximately 1/2" of clearance around the 75 gallon aquarium footprint and keeps the tank low enough that I can reach over the rim and touch the bottom substrate without straining. As shown in the photo, I used 2x6 lumber for the upper frame so that I could avoid using a centerspan support. This makes it so much easier to access the space under the tank. I used two 8ft 2x6 and six 8ft 2x4 studs. Total cost at home depot was under $50.
Once the structural frame was complete, I started thinking about how to dress it up as a piece of furniture that I didnt hate to have in my home. I ended up deciding to do a very simple trim with 1x3 boards on the bottom and 1x4 on the top. The top trim is offset upwards from the frame such that it covers the plastic trim on the tank when it is on the stand. I also used a piece of scrap plywood from my garage to act as a back panel and shear support to prevent racking of the frame. The 1x3 and 1x4 boards came out to $15
To finish it off, I bought a sheet of 1/8" "utility board" plywood for another $15. I cut it to wrap around the sides and front.
Now how to access the bottom? I thought about this a lot and ultimately decided on the cheapest/simplest/most lame approach. I bought some magnets from Harbor Freight for $5. I lucked out and these magnets were nearly the same size as the heads on the screws I used, so I simply put them on 4 corner screws and then added matching magnets on the front plywood panel at the 4 corners. It actually works really well and makes it simple to take the front panel off for filter access. It saved me hours of work and the cost of building actual cabinet doors, and I like how clean the final product ends up looking.
Lastly, I stained using dark walnut stain. Pine needs conditioner, so I did that first and then did one coat of stain. I then did about 4 coats of spray on oil-based polyurethane to seal it up.
The last thing I did was add a sheet of styrofoam insulation on top of the frame to help even out any bumps in the lumber. I made it as flat as possible, but dimensional lumber is not meant for this kind of thing and has imperfections. The styrofoam is peace of mind for me to make sure the tank rim gets fully supported all the way around.
I'm really happy with how it turned out. Total cost for me was around $110, but I had some scrap plywood at home for the back panel and the bottom shelf where my filters sit. If you need to buy a sheet, figure another $40 bucks or so. Total time investment was maybe like 8 hours over the weekend and then the hours of waiting between coats of stain and poly. Tools used were a miter saw, circular saw, drill, driver, nailer, and sander.
8 Replies
·
476 views
Staff member
I Donated 2026
Founding Member
The theme for this month's contest is: Shades of Green
Please take a picture of shades of green in your aquarium. Be as artistic and creative as you like.
The rules:
A $25 store credit from BurrAqua thanks to @Burr740!

Good Luck!
Please take a picture of shades of green in your aquarium. Be as artistic and creative as you like.
The rules:
- Submissions are allowed between August 16 and August 23.
- Voting will start on August 23 at 12:01 am Eastern time.
- Voting will end on August 30 at 11:30 pm Eastern time.
A $25 store credit from BurrAqua thanks to @Burr740!
Good Luck!
6 Replies
·
326 views

Journal 22 gallon long bookshelf
Time to start a new thread.
I’ll fill in some details later, but I’m working on the hardscape now. Any and all criticism is appreciated. The vision is nothing more, and nothing less, than something appealing to the eye.
90cm x 30cm x 30cm Lifegard Aquatics ultra clear bookshelf tank. Buce and anubias on the hardscape, stems towards the back and center, mid to front carpet with some changes in shade and texture down to a flat grade on the right side of the tank.
Lily pipe inlet and skimmer will be in the back left corner with the outflow in the front left to hopefully achieve circular flow. I’ll be running an in-line diffuser. Light will be the P600 Pro that I regrettably did not upside to 900. Oh well. I’ll mount it high and hopefully it’ll have enough spread.
I have some dragon stone and red lava rock rubble I’ll use at the base to blend into the substrate, as well as some stratum I may or may not cap with.


I’ll fill in some details later, but I’m working on the hardscape now. Any and all criticism is appreciated. The vision is nothing more, and nothing less, than something appealing to the eye.
90cm x 30cm x 30cm Lifegard Aquatics ultra clear bookshelf tank. Buce and anubias on the hardscape, stems towards the back and center, mid to front carpet with some changes in shade and texture down to a flat grade on the right side of the tank.
Lily pipe inlet and skimmer will be in the back left corner with the outflow in the front left to hopefully achieve circular flow. I’ll be running an in-line diffuser. Light will be the P600 Pro that I regrettably did not upside to 900. Oh well. I’ll mount it high and hopefully it’ll have enough spread.
I have some dragon stone and red lava rock rubble I’ll use at the base to blend into the substrate, as well as some stratum I may or may not cap with.
250 Replies
·
27004 views
Staff member
I Donated 2026
Founding Member
This is the future home for the announcements when someone obtains an achievement badge. Let the games begin!
2034 Replies
·
55866 views

Supporting
I Donated 2026
Rockstar
Article Contributor
Skip to the actual journal here.
I'm known here for high tech, high nutrient, inert substrate scapes -- but I also love NO tech, rich substrate scapes, too!
This thread is three-sided:
But there is a new modern kind of fish bowl, one where plants, substrate, bacteria, water changes, and proper inhabitant selection all work together to create healthy, mini ecosystem-worlds in our homes:

My first bowl attempt in 2020

My second bowl, a true "no tech" in 2021

My third bowl scape (no tech) in 2023, and by far my favorite and most successful!
The point is, these are smaller, affordable, beautiful little worlds of light to enliven our living spaces and create art, nature, and beauty -- often with very little maintenance and upkeep besides a partial water change and feeding the fish.

quano_aqua on Insta

waterplantslover on insta

hanahiyori1112 on insta


Sono aqua pfm on Insta and on Youtube is one of the pioneers of this method, and
deserves a TON of credit for popularizing this technique across many Japanese communities!

kazuaki387 on insta

qball_aquatics on insta has many small bowl scapes.
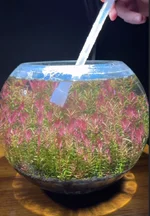
Nanoscape on insta

syo_aqua_plants on insta follows the "Sono" method.

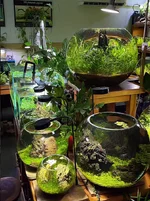
Aquadream in Vietnam on insta and on Youtube has TONS of no-tech bowl scapes.
Almost 20 bowls in his store/gallery. Lots of info on his youtube channel!

pokomama_medaka on insta

tinyecosystems_ on insta, also sells "kits" to make your own tiny ecosystem jars.

the_bettabowl_project on insta

MJ Aquascaping bowl on youtube, beautiful setup.

MJ Aquascaping vase on Youtube

MD Fishtanks on Youtube has done a few planted no tech bowls

aquashopuha on insta

jp72363 on insta

y0shi_n9 on Insta

kermitDE on Reddit

buiscape on insta has a tiny Fluval bowl scape with crabs!

nakayamachiyomi on insta

ichistarium on insta

chandan0616 on instagram

Few-Focus8050 on Reddit
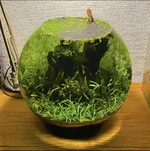
KrishTheBaker on Reddit and on Youtube

@HardeeParty here on Scape Crunch

@bradquade here on Scape Crunch

10-gal bowl featured on Tank Tested on Youtube
And that's just the ones I have found over the last few years! I have no doubt there are many, many more out there.
I'll add to this thread as I find them, and would love it if you would, too!
I'm known here for high tech, high nutrient, inert substrate scapes -- but I also love NO tech, rich substrate scapes, too!
This thread is three-sided:
- To act as a journal for my new No-Tech bowl scape, and
- To act as a discussion board for no/low tech bowl scapes, and
- To collect and share accounts and examples of bowl scapes from around the world!
But there is a new modern kind of fish bowl, one where plants, substrate, bacteria, water changes, and proper inhabitant selection all work together to create healthy, mini ecosystem-worlds in our homes:
My first bowl attempt in 2020
My second bowl, a true "no tech" in 2021
My third bowl scape (no tech) in 2023, and by far my favorite and most successful!
What does No Tech mean?
In general, it means that these scapes have:- No Filter
- No Heater
- No Air Pump
- No Skimmer
- No CO2
- No Circulation
- A Light (usually low to medium-powered)
- A Substrate (inert, aquasoil, or sand-capped soil like Walstad method)
- Plants (usually quite low-tech plants, though a surprising number will thrive in this method!)
- Inhabitants (Since these bowls are usually between 2-12 gallons on average, this limits selection to nano fish, shrimp, and snails).
The point is, these are smaller, affordable, beautiful little worlds of light to enliven our living spaces and create art, nature, and beauty -- often with very little maintenance and upkeep besides a partial water change and feeding the fish.
Gallery and Links to bowl scapers:
quano_aqua on Insta
waterplantslover on insta
hanahiyori1112 on insta
Sono aqua pfm on Insta and on Youtube is one of the pioneers of this method, and
deserves a TON of credit for popularizing this technique across many Japanese communities!
kazuaki387 on insta
qball_aquatics on insta has many small bowl scapes.
Nanoscape on insta
syo_aqua_plants on insta follows the "Sono" method.
Aquadream in Vietnam on insta and on Youtube has TONS of no-tech bowl scapes.
Almost 20 bowls in his store/gallery. Lots of info on his youtube channel!
pokomama_medaka on insta
tinyecosystems_ on insta, also sells "kits" to make your own tiny ecosystem jars.
the_bettabowl_project on insta
MJ Aquascaping bowl on youtube, beautiful setup.
MJ Aquascaping vase on Youtube
MD Fishtanks on Youtube has done a few planted no tech bowls
aquashopuha on insta
jp72363 on insta
y0shi_n9 on Insta
kermitDE on Reddit
buiscape on insta has a tiny Fluval bowl scape with crabs!
nakayamachiyomi on insta
ichistarium on insta
chandan0616 on instagram
Few-Focus8050 on Reddit
KrishTheBaker on Reddit and on Youtube
@HardeeParty here on Scape Crunch
@bradquade here on Scape Crunch
10-gal bowl featured on Tank Tested on Youtube
And that's just the ones I have found over the last few years! I have no doubt there are many, many more out there.
I'll add to this thread as I find them, and would love it if you would, too!
61 Replies
·
4081 views