Welcome to ScapeCrunch

We are ScapeCrunch, the place where planted aquarium hobbyists come to build relationships and support each other. When you're tired of doom scrolling, you've found your home here.

Horizontal CO2 Reactor - Yugang 鱼缸 Reactor

Ahh I see. Yes you have an uphill battle with that sump for sure. In all honesty though, that is an overkill setup for a planted tank. Not taking away from your hard work and desire to have as much filtration power as possible though.
Ah, but I'm trying to do the impossible, as it's not just a planted tank. I have 10 x 4" fish & 50 x 1" fish as well.
My tank started out as a fish only tank & now I'm trying to add plants into the equation. I'm going for easy care types such as Amazon Swords, anubias & Java ferns.


Your calculations will include both surface area of your tank and the sump added together.
Thanks.

The reactor pump was just a spare pump I happened to have on hand. You literally need something with enough power to run water through the reactor, that’s it. Too much splashing will allow co2 escape unnecessarily and make the reactor noisy.

OK, so I'm thinking maybe a 500 - 600 LPH, which won't be too expensive & I have plenty of room in my sump to run the whole thing in the return chamber.
Thanks so much for your help.
 
😲 That's a lot of fish for 50g, but I'm sure you're aware of that.
For those types of plants, you' don't really need a lot of CO2. While a Yugang reactor is more efficient, perhaps a simple inline diffuser would meet your needs, as long as you don't mind the micro-bubbles.
 
That's a lot of fish for 50g, but I'm sure you're aware of that.

Hence the need for the Fluidized bed sump.
For those types of plants, you' don't really need a lot of CO2. While a Yugang reactor is more efficient, perhaps a simple inline diffuser would meet your needs, as long as you don't mind the micro-bubbles.
Yes, I agree, but I just can't live with the bubbles in the tank.
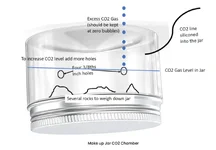
So far I've used a ceramic diffuser, a limewood diffuser, an in tank passive diffuser (see attached) all run from a soda stream bottle via a regulator/bubble counter & no matter how hard I run the CO2 the drop checker is always blue.
 

Attachments

  • Screenshot 2026-08-08 122652.webp
    Screenshot 2026-08-08 122652.webp
    43.2 KB · Views: 11
Last edited:
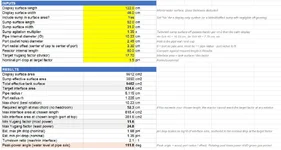
Just did a few quick calculations to determine the reactor size & this is what AI has come up with.
By upgrading to a 90mm pipe, you can significantly reduce the physical footprint. Your horizontal Yugang reactor section now needs to be a minimum of 52.5 cm (20.7 inches) long. To safely handle your high 1.0 pH drop without the gas pocket backing up, use an adjusted length of 63 cm (24.8 inches).
This appears to be getting too large to accommodate into my system & too complicated for what I need. It also recommends a 3000LPH flow rate.
That appears to be in-line with the calculator I posted yesterday in terms of size, flow rate seems high though I'm no expert. 4" sch 40 would need a min length of 52.3cm. You can shorten it if you go higher in diameter.

Yugang CO2 Reactor - A Guide

1786211690595.webp
 
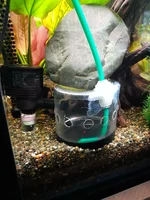
Finally settled on this reactor, see attached.
Drilled more holes in it & put a 185Lph powerhead that also powers the undergravel filter a little way away from it to increase the water flow through it.
Works a treat!
It's only about 70mm in diameter & 80mm high, so very unobtrusive when hidden at the back of the tank.

Very simple & costs virtually nothing. No plumbing, no disruption of the existing filter system.
Sometimes the simplest thing is the best.

It's in the rear back corner where you can see the green CO2 tubing. The return spray bar is at that end at the top & the overflow is at the opposite end at the rear at the top.
This gives the CO2 a chance to absorb a little into the tank before exiting & going into the sump that has the fluidized bed in it, which I assume will remove most of the CO2 due to the turbulence from the wavemakers.


20260814_104600.webp20260814_104622.webp
 
Been experimenting with this reactor & I can only get it to absorb about 1.5 bubbles per second before it goes into overflow.
I had the reactor positioned near to the powerhead for the UG filter & have now changed it so that the output of the powerhead is actually inside the reactor. (Powerhead is 420 L/Hr)
What a difference that makes! I can now pretty much put whatever output of CO2 into the reactor, without it going into overflow through the holes. Currently have it outputting 3 to 4 bubbles per second with no problems whatsoever. I probably won't run it any harder than that, otherwise it will use too much CO2.
 
I am setting up a new tank, slightly larger than my previous one, and contemplating what reactor design I will use.

My tank is 120 * 50 * 50 cm, 80 gallons.
Tank surface area - 120 * 50 = 600.
Reactor target area = 600 / 17.7 = 338 cm2.

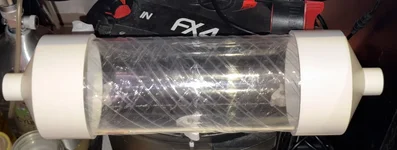
I bought below transparent tube, diameter 11 cm, and couplings to 1 inch filter tube for only for USD 10.6 altogether.

For target surface area I would need this to be 31 cm long.

So my first option would be to build the below.

The tube has a good diameter which would help with a gentle flow, therefore I believe I could do without a bypass and have the full FX4 flow in the reactor, with overflow mode.

I would just have to drill 2 holes, for CO2 and for manual purge, and job done. Let's say 10 minutes work.

1791291171146.webp

Indeed, roughly the diameter of my FX4 filter, and just 25% of the length of my tank.

I consider alternatively to build a box type reactor, also for less than 10 USD and even a bit shorter. For the box reactor I would probably opt for a bypass.

To be continued ....
 
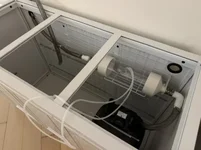
An update on the build of my new tank. I made quite a few reactors over the past years, and this is how I am doing it now with that experience.

My tank will be 120 * 50 * 50 cm3, and I tried to have the reactor as compact as possible built in the cabinet.

1791668937154.webp

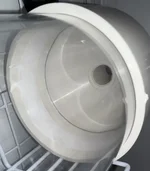
I don't glue the acrylic pipe to the PVC, a tight fit using teflon tape works well. If needed, I can take it apart and shorten the tube a bit as this one exceeds my default ratio of 17.7 and I might want a little less CO2 in my tank.

1791669066649.webp

I always found it hard to connect the CO2 and manual purging line, until I found the trick to use a softer airline tube, and fit that in a tight hole. Nu glue involved.

1791669290863.webp

I hope these simple practical tips can help for anyone who likes some DIY.
 
I don't glue the acrylic pipe to the PVC, a tight fit using teflon tape works well. If needed, I can take it apart and shorten the tube a bit as this one exceeds my default ratio of 17.7 and I might want a little less CO2 in my tank.
This is brilliant! Gluing acrylic to PVC is a pain in the butt, as the cement for it is very thin and messy. I'm making a couple new reactors now and will give this a shot.
 
I am buying my components on TaoBao, a local platform sourcing from China. They ship internationally, but not sure if it works for the US.

It would be very helpful for US based hobbyists to have a shopping list online, so that anyone can order easily and build the reactor with clear tips and instructions. I can buy the components for around 10 USD (80 gallon tank), and could build perhaps 4 reactors in an hour. Cheap and easy, if you know how to do it.
 
Last edited:
Yes, the teflon tape tip for the acrylic/pvc connection is excellent.

I must admit that not using a sealant or adhesive of any kind on the two airline tubing joints would drive me crazy with worry about sudden and drastic loss of tank water due to failure. I am a natural worrier though, I admit.
 
I must admit that not using a sealant or adhesive of any kind on the two airline tubing joints would drive me crazy with worry about sudden and drastic loss of tank water due to failure.
There is no need to worry, if it is done well. Use flexible airline tube, not the harder CO2 pressure tube. Then, drill the hole smaller than the tube outer diameter. Cut the tube end with scissors to a sharp point, and use the sharp point to pull the tube though the hole. The connection will be stronger than most glues would achieve. Zero risk.
 
There is no need to worry, if it is done well. Use flexible airline tube, not the harder CO2 pressure tube. Then, drill the hole smaller than the tube outer diameter. Cut the tube end with scissors to a sharp point, and use the sharp point to pull the tube though the hole. The connection will be stronger than most glues would achieve. Zero risk.

Lol, I'm still not brave enough, when there are other more secure alternatives. The failure of that connection would be catastrophic if the reactor is below tank level (as most are I expect).
 

Top 10 Trending Threads

Back
Top