Welcome to ScapeCrunch
We are ScapeCrunch, the place where planted aquarium hobbyists come to build relationships and support each other. When you're tired of doom scrolling, you've found your home here.
Social Feed
Journal 32 Gallon Dutch Corner
Hello All! I saw GreggZ post about this website on one of the Facebook groups and figured I'd come start a journal over here and join the conversation.
Specs

Ultimately, I resurrected it when progress on the 125 stalled due to the pandemic and responsibilities at home. Since that time, the tank has essentially been existing in the background as a low tech set up without much thought given to it: sponge filter, in-tank ceramic diffuser, osmocote balls, little no water column dosing, unscaped.
Fast forward a couple of years, and I now have enough time to be engaged in the hobby again and ramp this tank back up. I started preparing for this over this past summer by making some modifications to the build. I wanted a glass lid to limit evaporation and keep fish from jumping. I re-purposed the douglas fir from the enclosure pictured above and used it to make a lid with openings for the filter inflow and outflow and a lip to hold a sheet of glass. I am very happy with the way it turned out.


I also made some changes underneath the tank. I took a piece of white oak plywood Ieft over from the 125 build and installed a panel to hold electronic equipment. The open space on the electronics wall is where I plan to put a controller. I purchased a GHL ProfiLux Mini Wifi for the 125 that has been sitting in the box, so figured why not put it on this tank in the meantime. I also installed a proper mount to hold the CO2 cylinder upright and secure.

For aesthetics and to keep the kids out, I made some panels to hide the equipment under the stand. I would have loved to have used douglas fir for this, but couldn't justify spending a couple hundred dollars to buy a sheet when I still had extra white oak plywood leftover from the 125 build. My wife doesn't care for the two-tone look, but I don't mind it too much.

There isn't much to show in terms of the actual tank yet. Most of the plants are still growing out or converting over from emersed form, so I'll save tank shots for a later date. The plants I currently have in the tank are Dutch staples:
Specs
- Dimensions: W24 x D18 x H18 (in)
- Eheim Pro Ultra G90 w/surface skimming intake
- Pressurized CO2 via inline diffuser
- 6 x 24W T5Ho
- 3 mm river gravel
Ultimately, I resurrected it when progress on the 125 stalled due to the pandemic and responsibilities at home. Since that time, the tank has essentially been existing in the background as a low tech set up without much thought given to it: sponge filter, in-tank ceramic diffuser, osmocote balls, little no water column dosing, unscaped.
Fast forward a couple of years, and I now have enough time to be engaged in the hobby again and ramp this tank back up. I started preparing for this over this past summer by making some modifications to the build. I wanted a glass lid to limit evaporation and keep fish from jumping. I re-purposed the douglas fir from the enclosure pictured above and used it to make a lid with openings for the filter inflow and outflow and a lip to hold a sheet of glass. I am very happy with the way it turned out.
I also made some changes underneath the tank. I took a piece of white oak plywood Ieft over from the 125 build and installed a panel to hold electronic equipment. The open space on the electronics wall is where I plan to put a controller. I purchased a GHL ProfiLux Mini Wifi for the 125 that has been sitting in the box, so figured why not put it on this tank in the meantime. I also installed a proper mount to hold the CO2 cylinder upright and secure.
For aesthetics and to keep the kids out, I made some panels to hide the equipment under the stand. I would have loved to have used douglas fir for this, but couldn't justify spending a couple hundred dollars to buy a sheet when I still had extra white oak plywood leftover from the 125 build. My wife doesn't care for the two-tone look, but I don't mind it too much.
There isn't much to show in terms of the actual tank yet. Most of the plants are still growing out or converting over from emersed form, so I'll save tank shots for a later date. The plants I currently have in the tank are Dutch staples:
- vallisneria
- hygrophila difformis
- green myrio
- crypt wendtii tropica
- bacopa caroliniana
- red tiger lotus
- ludwigia ovalis
- cardamine lyrata
- java fern mini trident
- mini christmas moss
- fissidens fontanus
- Dutch it up!
- Save time where I can. For now I'm buying premade ferts and mix for reconstituting RODI water and keeping light around medium intensity to make plant growth more manageable.
63 replies
·
12292 views


This is the future home for the announcements when someone obtains an achievement badge. Let the games begin!
1966 replies
·
45632 views
Journal High-Tech 90P Build
Hi guys!
I'm new here, but not entirely new to planted tanks though I've been out of the hobby for the better part of the last decade between kids and moving a couple of times - but finally in a spot where I can do something again. I'm mostly going to be making things up as I go along, but plan on a lot of automation (I want to integrate everything into home assistant) and a lot of DIY as I love the challenge of building things out myself.
The starting point:
I picked up a 90P rimless, low-iron tank on a great deal.
.webp")
I have a rough idea in my head for a stand to be built from plywood - just have a couple other house projects to finish off before starting that built.
Wife says I can only have one aquarium, so for this tank, I want to go all out with a sump to allow for auto top off, and auto water changes, auto fertilizer dosing etc. etc. I have half a plan in my mind.
I've also started on the light fixture which I've modeled up in CAD, and plan on making out of an 8020 extrusion, and some 3D printed bits.

I'm using bridgelux gen 3 thrive CW (3000k) and WW (5000k) LED strips which have super high CRI at 98+ along with some specific XPE2 wavelengths that I'll solder onto some starboards. Far Red (730nm), Red (654nm), Cyan (495nm), Blue (455nm), Visible UV (415nm). Each segment of the white channels will be on its own driver so I can adjust left to right brightness in thirds, and each colour channel on its own driver so I can vary each channel on a time-based approach.
These will be run from a custom PCB board with Meanwell N-LDD drivers, and will run ESPHome on an ESP32 so it can link up with my Home Assistant installation.

That's it for now, this will probably be a very slow build so be warned if you follow along!
I'm new here, but not entirely new to planted tanks though I've been out of the hobby for the better part of the last decade between kids and moving a couple of times - but finally in a spot where I can do something again. I'm mostly going to be making things up as I go along, but plan on a lot of automation (I want to integrate everything into home assistant) and a lot of DIY as I love the challenge of building things out myself.
The starting point:
I picked up a 90P rimless, low-iron tank on a great deal.
I have a rough idea in my head for a stand to be built from plywood - just have a couple other house projects to finish off before starting that built.
Wife says I can only have one aquarium, so for this tank, I want to go all out with a sump to allow for auto top off, and auto water changes, auto fertilizer dosing etc. etc. I have half a plan in my mind.
I've also started on the light fixture which I've modeled up in CAD, and plan on making out of an 8020 extrusion, and some 3D printed bits.
I'm using bridgelux gen 3 thrive CW (3000k) and WW (5000k) LED strips which have super high CRI at 98+ along with some specific XPE2 wavelengths that I'll solder onto some starboards. Far Red (730nm), Red (654nm), Cyan (495nm), Blue (455nm), Visible UV (415nm). Each segment of the white channels will be on its own driver so I can adjust left to right brightness in thirds, and each colour channel on its own driver so I can vary each channel on a time-based approach.
These will be run from a custom PCB board with Meanwell N-LDD drivers, and will run ESPHome on an ESP32 so it can link up with my Home Assistant installation.
That's it for now, this will probably be a very slow build so be warned if you follow along!
1 replies
·
35 views

Added 4 red fire cherry shrimps recently and I saw them for few days but now haven’t seen them for more than a week. Should I assume they are dead? Have checked the skimmer and don’t see them.

7 replies
·
109 views
Since the tanks have been in such a state of disarray, I’ve been focusing on moving everything to emersed until life sorts itself out.
How I transition from submersed to emersed depends on the growth form of the plant.
Plants that are primarily basal form (not stems) go in square nursery pots with one of two substrates. First choice is long fiber sphagnum (dried and then rehydrated) topped with aquasoil, straight aquasoil, or a mix of peat moss/perlite/coco coir/aquasoil. The sphagnum wicks better than aquasoil. Alternatively, I use straight aquasoil, I line the bottom of the pots with a coffee filter to keep the substrate from falling through. Both work equally well. The bin needs to be filled with a little more water than if dried sphagnum is used which is why the first method is preferable.
The nursery pots are kept in a clear plastic container. Sterilite are the typical go-to, but I actually prefer the tall clear shoe boxes from Walmart. They have built in ventilation holes which is handy because I need to drill holes in the sides of any other container near the lid rim. Ventilation is key.
The shoe boxes are cheap too. I fill the bins as much as possible but a little leftover space is okay.
After filling the bins with pots, I fill all the voids with live sphagnum and fill with enough distilled water to saturate the sphagnum. The sphagnum has antimicrobial properties (so I’ve read, and it seems to check out in practice). This keeps the water from developing algae almost entirely. I dress the tops with live sphagnum too if something needs a little help rooting. Depending on the space, I throw rhizome plants right into the sphagnum as well. They develop excellent root systems and are very easily removed and cleaned when needed compared to conventional soil.
I fertilize everything with a foliar spray of Maxsea 16-16-16 diluted to 1 teaspoon per gallon. It’s a kelp based fertilizer with micronutrients. I highly recommend it.


I’ll follow up with emersed stem plant propogation and other methods for the full greenhouse.
How I transition from submersed to emersed depends on the growth form of the plant.
Plants that are primarily basal form (not stems) go in square nursery pots with one of two substrates. First choice is long fiber sphagnum (dried and then rehydrated) topped with aquasoil, straight aquasoil, or a mix of peat moss/perlite/coco coir/aquasoil. The sphagnum wicks better than aquasoil. Alternatively, I use straight aquasoil, I line the bottom of the pots with a coffee filter to keep the substrate from falling through. Both work equally well. The bin needs to be filled with a little more water than if dried sphagnum is used which is why the first method is preferable.
The nursery pots are kept in a clear plastic container. Sterilite are the typical go-to, but I actually prefer the tall clear shoe boxes from Walmart. They have built in ventilation holes which is handy because I need to drill holes in the sides of any other container near the lid rim. Ventilation is key.
The shoe boxes are cheap too. I fill the bins as much as possible but a little leftover space is okay.
After filling the bins with pots, I fill all the voids with live sphagnum and fill with enough distilled water to saturate the sphagnum. The sphagnum has antimicrobial properties (so I’ve read, and it seems to check out in practice). This keeps the water from developing algae almost entirely. I dress the tops with live sphagnum too if something needs a little help rooting. Depending on the space, I throw rhizome plants right into the sphagnum as well. They develop excellent root systems and are very easily removed and cleaned when needed compared to conventional soil.
I fertilize everything with a foliar spray of Maxsea 16-16-16 diluted to 1 teaspoon per gallon. It’s a kelp based fertilizer with micronutrients. I highly recommend it.
I’ll follow up with emersed stem plant propogation and other methods for the full greenhouse.
6 replies
·
91 views

Journal Waterbox 20g AIO Planted Tank
NC AL’s Waterbox 20g AIO Planted Tank
Current view as of 5/26/26

Current view as of 5/26/26
Tank: Waterbox 20 AIO
Return pump: AI Axis 40
Lighting: (2) AI Blade Fresh 12”
Dosing pump: Ecotech Marine
CO2 injected
The purpose of this tank is to maintain a healthy planted tank for at least 1 year. There is a stipulation that I must be able to do this using my tap water for water changes.
22 replies
·
249 views
Journal 75P - Journey Into High Tech
Inspiration, Goals, & Considerations
I've had an interest in aquariums since a young age and had my own aquarium with fish like Angelfish and Mollies around middle school. Growing up, my dad had a bigger tank with Blood Parrots and Silver Dollars. Over 10 years ago, I had a low maintenance 55 gallon planted tank. I was pretty proud of it, but always envied the high tech tanks I saw on forums/social media and told myself when I broke that tank down that the next time I set up a tank, it would be like what I envied. At the end of 2024, I set up a small low tech 5 gallon planted tank to help scratch my aquarium itch, which really only reaccelerated my desire for setting up a high tech tank. And now, here we are!
The size of the tank was mostly dictated by the space. I originally planned on something around 30 gallons, but my LFS had the UNS 75P in stock and after measuring and discussing with my wife, we agreed it would work for the space. The tank is between the kitchen and living room, which is essentially a play area for my son, so lighting needs to be adjusted to make sure he's not blinded by the light when looking up at the tank.
Generally, I'd like to have a visually pleasing aquarium with lots of fish and plants that's peaceful to enjoy. I'd like to automate / reduce as much friction as possible and I realize there's still plenty I need to learn, so I'll need to have patience when things go wrong. I want to keep away from anything that's hard to get out of the tank once it's in (duckweed, moss, pest snails, etc). I felt like sharing prices below might give value to anyone in the future that's looking to start where I did with a high tech tank.
Specs (prices include sales tax)
Tank:
Lighting:
Filtration:
Co2:
Inflow & Outflow Pipes:
Substrate & Hardscape:
Fertilization:
Other Misc Equipment:
Chihiros CO2 Drop Checker
5 x Oase ShutOff Valve 16/22
Inkbird WiFi ITC-308 - $38
SwitchBot Leak Detectors - $15 each
"Stand"
Because the guts are located in a kitchen cabinet, I didn't want to screw directly into it and damage it. I was also concerned silicone would not be able to dry and outgas properly when sealing the edges. I opted to line the cabinet with contact paper. It's essentially a giant sticker, so I lined the sides, bottoms, and a second layer over the bottom edges/joints. I built a 3 panel "stand" inside of the cabinet so I could house everything and screw into the plywood without any concerns. I used 1 sheet of 3/4" Maple plywood and coated 1 side with a latex primer followed by a layer of latex white paint. This is mostly for water resistance and not necessarily water proof. I placed a silicone cabinet liner under the right side equipment. I made a shelf to place the EcoFlow on so if there's a catastrophic leak it's off the bottom.
One consideration I hadn't thought about was how "cramped" the cabinet would be since I placed the EcoFlow on a shelf with a "wall", which essentially made the work area much tighter.
Cable Management: Raceway and cable clips
Water
Express Water RO5DX - $160
Coming soon
I've had an interest in aquariums since a young age and had my own aquarium with fish like Angelfish and Mollies around middle school. Growing up, my dad had a bigger tank with Blood Parrots and Silver Dollars. Over 10 years ago, I had a low maintenance 55 gallon planted tank. I was pretty proud of it, but always envied the high tech tanks I saw on forums/social media and told myself when I broke that tank down that the next time I set up a tank, it would be like what I envied. At the end of 2024, I set up a small low tech 5 gallon planted tank to help scratch my aquarium itch, which really only reaccelerated my desire for setting up a high tech tank. And now, here we are!
The size of the tank was mostly dictated by the space. I originally planned on something around 30 gallons, but my LFS had the UNS 75P in stock and after measuring and discussing with my wife, we agreed it would work for the space. The tank is between the kitchen and living room, which is essentially a play area for my son, so lighting needs to be adjusted to make sure he's not blinded by the light when looking up at the tank.
Generally, I'd like to have a visually pleasing aquarium with lots of fish and plants that's peaceful to enjoy. I'd like to automate / reduce as much friction as possible and I realize there's still plenty I need to learn, so I'll need to have patience when things go wrong. I want to keep away from anything that's hard to get out of the tank once it's in (duckweed, moss, pest snails, etc). I felt like sharing prices below might give value to anyone in the future that's looking to start where I did with a high tech tank.
Specs (prices include sales tax)
Tank:
UNS 75P (8mm Glass - 29.52" x 17.71" x 17.71") - $519
UNS Atmos Backlight - $274
Lid - Working on getting a custom lid made
Lighting:
Chihiros WRGB II Pro 60 - $263
Chihiros WRGB II Pro Shades- $40
3D Printed Side Shades - Still need to do this
Chihiros Hanging Rope Kit- $37
Chihiros LED Lights Hanging Stand Kit - $64
Chihiros WRGB II Pro Shades- $40
3D Printed Side Shades - Still need to do this
Chihiros Hanging Rope Kit- $37
The mounting screws provided protruded beyond the bracket and would not fit with the backlight. I ended up getting washers and placing them outside the bracket to limit the screw depth.
Really disliked the fact that the stand was branded with Chihiros and visible when looking into the aquarium.
UNS Light Hanging Bar - $105
Filtration:
Oase BioMaster 2 Thermo 850 - $461
Oase tubing - Included with filter
Co2:
Misc. 10lb Cylinder - $118 (includes CO2)
CO2 Art PRO-SE Regulator - $105
Aqua Rocks Colorado Small Yugang Reactor 19mm w/ 90 degree elbows - $150
Inflow & Outflow Pipes:
Aqua Rocks Colorado Stainless Steel Lily Pipes 17mm - $54
Aqua Rocks Colorado Lily Pipe Clipper - $11
Substrate & Hardscape:
UNS Controsoil - Black, 'normal' used as a base and ‘fine’ on top - ~$129
CaribSea Super Naturals- Jungle River Sand (foreground sand) - $42 (only used a small mount of the bag - will user remainder in upcoming tank)
UNS Controsand Santa Fe (used as accent around dragon stone) - $57 (only used a small mount of the bag - will user remainder in upcoming tank)
UNS Controsand Sequoia (used as accent around dragon stone) - $52 (only used a small mount of the bag - will user remainder in upcoming tank)
I was surprised how dirty these rocks were and how much rinsing was required. For the price point, I felt like they should have come pre-washed.
Driftwood & Dragon Stone from Aquarium Co-Op - $111
Fertilization:
Burr Aqua Micros and Macros
Chihiros Magnetic Stirrers - $100
Battery Backup & PowerEcoFlow DELTA 3 Max (2kwh) - $680
Unfortunately prolonged power outages are not uncommon for us. We've been without power for multiple consecutive days, 7 days being the longest. This battery backup gives me some peace of mind knowing the tank can run for some time uninterrupted giving me the flexibility to get the generator out and running at a later time, refill with gas, etc. I believe run time will be around 12 hours.
Other Misc Equipment:
Chihiros CO2 Drop Checker
5 x Oase ShutOff Valve 16/22
Inkbird WiFi ITC-308 - $38
SwitchBot Leak Detectors - $15 each
"Stand"
Because the guts are located in a kitchen cabinet, I didn't want to screw directly into it and damage it. I was also concerned silicone would not be able to dry and outgas properly when sealing the edges. I opted to line the cabinet with contact paper. It's essentially a giant sticker, so I lined the sides, bottoms, and a second layer over the bottom edges/joints. I built a 3 panel "stand" inside of the cabinet so I could house everything and screw into the plywood without any concerns. I used 1 sheet of 3/4" Maple plywood and coated 1 side with a latex primer followed by a layer of latex white paint. This is mostly for water resistance and not necessarily water proof. I placed a silicone cabinet liner under the right side equipment. I made a shelf to place the EcoFlow on so if there's a catastrophic leak it's off the bottom.
One consideration I hadn't thought about was how "cramped" the cabinet would be since I placed the EcoFlow on a shelf with a "wall", which essentially made the work area much tighter.
Cable Management: Raceway and cable clips
Water
Express Water RO5DX - $160
I saw this recommended by @Naturescapes_Rocco, and feel like the value is pretty hard to beat. I waited until it was on sale to purchase, but even at the $190 list price, it's great. Water source is an artesian spring (well). From the tap, TDS measures 56. In my 5g, I've used water straight from the tap, but opted for RO so I can keep things consistent with this setup. TDS after initial filter flushing was 0 (yeah, 0!).
55 Gallon Brute Trash Can, 44 Gallon Brute Trash Can, 32 Gallon Greenmade Trash Can, and 2x dollys.I need to improve this setup because it's a PITA. RO goes into the 55g, then I need to transfer it to the 44g to fill the tank. The 32g was originally what I purchased because that was the biggest Costco had, but it didn't hold enough water to fill the tank, so I had to rethink my plans. Seeing the 55g in person, I wasn't confident I could fit 2 side by side in the space I set up the RO in (which I couldn't). This setup is very clunky and requires a lot of water moving to make it to the tank. I've been using the 32g for waste water so I could water plants with it, but I might get worn down quickly and send it down the drain.
Plants (all UNS TC)- Homalomena Sp Sekadau South (babysitter)
- Hydrocotyle Tripartita (potentially babysitter)
- Alternanthera Reineckii Rosanervig (initially planned as babysitter, but may keep some in long term)
- Hemianthus Callitrichoides 'Cuba'
- Rotala Rotundifolia Blood Red
- Anubias Nana Petite
- Micranthemum 'Monte Carlo'
- Alternanthera Reineckii 'Mini'
- Echinodorus Rose
Coming soon
- 25x Red Neon Blue Eye Rainbow
- 7x C005 Corydoras pantanalensis
- 3x C123 Yellow Cory 'Rio Nanay'
- Aphyosemion bivittatum 'Funge' Pair
- 5x Stiphodon rutilaureus Goby
- 1x True Siamese Algae Eaters
- 1x Bamboo Shrimp
- 8x Amano Shrimp
53 replies
·
3185 views
Several members of this forum have greatly contributed to testing the concept of Horizontal CO2 Reactor , and I am so happy that collectively we have succeeded to push some true innovation. @Unexpected successfully pioneered the first horizontal reactor on his bigger tank, was kind enough to call it ‘Yugang reactor’ and inspired several followers with that. Also to mention @RickyV who took CO2 injection to a new level with a 1000-gallon system, achieving a 1.0 pH drop in just 38 minutes. Thank you to all who have contributed, and I believe hobbyist will find most answers in the Horizontal CO2 Reactor thread on this forum and hopefully feel that CO2 is easier than it used to be with bubble reactors.
My journey started about 2 years ago, when I was doing some measurements and calculations on my bubble reactor and got to the idea of the CO2 Spray Bar. I built probably 10 versions / prototypes of CO2 Spray Bar, spent many days measuring pH profiles, so that I could share my insights with the community on UKAPS. The horizontal reactor is based on the physics principles of the CO2 Spray Bar, and test results are applicable to both. I was at the time so happy with my CO2 Spray Bar that I gave no priority to building the horizontal reactor and thanks again to @Unexpected for his initiative and courage. I am currently also using the horizontal reactor, but my love and in certain situations preference for CO2 Spray Bar remains.
I discovered this morning that both threads on CO2 Spray Bar and Horizontal CO2 reactor have now been removed by the UKAPS admins. This may have happened in the past few weeks, not sure as I am not a regular UKAPS visitor anymore. These threads represent probably several hundred hours work, aiming to be a lasting and valuable contribution to the hobby, lots of measurement data, comparisons and calculations, and many pages of posts from fellow hobbyists. Even posts in several journals featuring the CO2 Spray Bar or Horizontal Reactor have been deleted or edited by admins. Thumbs up to forum rules, but very few will disagree that these all stand or fall with forum governance and integrity to individual members as well as the community.
While having the Horizontal CO2 Reactor now well documented on this forum, I believe it is a loss for the hobby if we would lose the insights on CO2 Spray Bar. It offers the same performance as the Horizontal CO2 Reactor, can be made for perhaps 5-10 USD and one hour DIY work. When I have more time I may create a new thread on this forum, with similar detail as what was deleted in UKAPS, with various prototypes and measurements. For now I hope it is useful if I just post a quick summary.
The first prototype CO2 Spray Bar, as I was testing late 2021 / early 2022.


The CO2 Spray Bar in the front of the tank, was in my tank barely visible. In my 200 liter tank I used a transparent half pipe, and achieved 1.5 pH drop with very good stability. It is from the experiments with the Spray Bar that I took the 17.7 ratio for the calculation of Horizontal Reactor dimension.
Some forum members pushed back on the idea having anything in the front, so I started experimenting with CO2 Spray Bar in the back of the tank.


I hope the above pictures help to understand the CO2 Spray Bar, and perhaps inspire fellow hobbyists to try it in their tanks. Having a simple half-pipe in a tank is easier than building an inline horizontal CO2 reactor, and may be especially attractive for small tanks.
For any further questions or help, please post below or send me an PM. I may start a more detailed thread when I have a bit more time and/or see there is interest from fellow hobbyists.
Thank you for reading, and thank you to ScapeCrunch for giving us a good home for our hobby.
My journey started about 2 years ago, when I was doing some measurements and calculations on my bubble reactor and got to the idea of the CO2 Spray Bar. I built probably 10 versions / prototypes of CO2 Spray Bar, spent many days measuring pH profiles, so that I could share my insights with the community on UKAPS. The horizontal reactor is based on the physics principles of the CO2 Spray Bar, and test results are applicable to both. I was at the time so happy with my CO2 Spray Bar that I gave no priority to building the horizontal reactor and thanks again to @Unexpected for his initiative and courage. I am currently also using the horizontal reactor, but my love and in certain situations preference for CO2 Spray Bar remains.
I discovered this morning that both threads on CO2 Spray Bar and Horizontal CO2 reactor have now been removed by the UKAPS admins. This may have happened in the past few weeks, not sure as I am not a regular UKAPS visitor anymore. These threads represent probably several hundred hours work, aiming to be a lasting and valuable contribution to the hobby, lots of measurement data, comparisons and calculations, and many pages of posts from fellow hobbyists. Even posts in several journals featuring the CO2 Spray Bar or Horizontal Reactor have been deleted or edited by admins. Thumbs up to forum rules, but very few will disagree that these all stand or fall with forum governance and integrity to individual members as well as the community.
While having the Horizontal CO2 Reactor now well documented on this forum, I believe it is a loss for the hobby if we would lose the insights on CO2 Spray Bar. It offers the same performance as the Horizontal CO2 Reactor, can be made for perhaps 5-10 USD and one hour DIY work. When I have more time I may create a new thread on this forum, with similar detail as what was deleted in UKAPS, with various prototypes and measurements. For now I hope it is useful if I just post a quick summary.
The first prototype CO2 Spray Bar, as I was testing late 2021 / early 2022.
The CO2 Spray Bar in the front of the tank, was in my tank barely visible. In my 200 liter tank I used a transparent half pipe, and achieved 1.5 pH drop with very good stability. It is from the experiments with the Spray Bar that I took the 17.7 ratio for the calculation of Horizontal Reactor dimension.
Some forum members pushed back on the idea having anything in the front, so I started experimenting with CO2 Spray Bar in the back of the tank.
I hope the above pictures help to understand the CO2 Spray Bar, and perhaps inspire fellow hobbyists to try it in their tanks. Having a simple half-pipe in a tank is easier than building an inline horizontal CO2 reactor, and may be especially attractive for small tanks.
For any further questions or help, please post below or send me an PM. I may start a more detailed thread when I have a bit more time and/or see there is interest from fellow hobbyists.
Thank you for reading, and thank you to ScapeCrunch for giving us a good home for our hobby.
55 replies
·
10292 views
Started a new tank with the idea of show casing Lagenandra meeboldii which I have not showcased before. Wanted to feature Hygrophila lower Hlaingbwe, but I removed it later as I think it would be too large for this tank.
New substrate, new filter, squeezed filter mulm from the other matured tank, then ran the tank one week day before planting. 100% water change after planting, then 100% water change every other day since then. Dosing 1ml APT3 after water change day, and remineralizing to 5dGH using APT Sky. Trying out the low water column dosing approach for the initial period.
Filter: Oase 250
Lights: Week aqua a430 80%
Substrate: APT Feast
Was going to Journal about startup issues, however, it seems like the tank has already stabilized, skipping diatoms and green dust phase.
Freshly planted for a couple of days:
13/2/2026

Replanted the tops for Myriophyllum roraima, Cut and replanted Rotala blood red to begin building up the bush form. Trimmed old leaves
Foreground seems a bit blocky for now, so I think I'lll move stuff round again. Probably when the BV grows out some more.
Pic on 23/2/2026
Readings at this stage:
Potassium: 2.3ppm
Ammonia: 0.1ppm
reduce water changes to 2 times a week.

New substrate, new filter, squeezed filter mulm from the other matured tank, then ran the tank one week day before planting. 100% water change after planting, then 100% water change every other day since then. Dosing 1ml APT3 after water change day, and remineralizing to 5dGH using APT Sky. Trying out the low water column dosing approach for the initial period.
Filter: Oase 250
Lights: Week aqua a430 80%
Substrate: APT Feast
Was going to Journal about startup issues, however, it seems like the tank has already stabilized, skipping diatoms and green dust phase.
Freshly planted for a couple of days:
13/2/2026
Replanted the tops for Myriophyllum roraima, Cut and replanted Rotala blood red to begin building up the bush form. Trimmed old leaves
Foreground seems a bit blocky for now, so I think I'lll move stuff round again. Probably when the BV grows out some more.
Pic on 23/2/2026
Readings at this stage:
Potassium: 2.3ppm
Ammonia: 0.1ppm
reduce water changes to 2 times a week.
61 replies
·
4246 views
This is a quick guide for anyone wants to DIY a set of double stage co2 system.
The main components for this co2 system:
Rebranded ASA(victor SGT500) stainless steel double stage regulator, 40 psi max output
Peter Paul E52 series stainless steel solenoid, 4 watts
Swagelok M series metering valve, angle pattern with vernier handle.


DIY parts list:
1. CGA320 nipple and nut set(with washer), 1.5 inch nipple/stem, stainless steel.
2. Victor SGT500 stainless steel bar stock double stage regulator, 1/4 female npt ports.
3. 1/4 male npt to 1/8 male npt adapter, short form hex, stainless steel.
4. 1/8 female npt to 1/8 male npt, 45 degree elbow, stainless steel. Parker 2-2-SVE-SS, Brennan 5503-02-02-SS
5. Peter Paul E52 solenoid, wired conduit casing, stainless steel, 1/8 female npt inlet/outlet.
6. 1/8 male npt to 1/4 compression tube port elbow, Swagelok part number SS-400-2-2
7. Swagelok 1/4 OD port connector, part number SS-401-PC
8. Swagelok M series metering valve, part number SS-4MA-MH
9. Swagelok 1/4 OD tube stub to 1/8 male npt adapter, part number SS-4-TA-1-2
10. bubble counter.
--The grey teflon tape in video is high density type for stainless steel to stainless steel fitting/thread connections.
Questions, answers and discussion on how to build are all welcome.
happy aquascaping.
The main components for this co2 system:
Rebranded ASA(victor SGT500) stainless steel double stage regulator, 40 psi max output
Peter Paul E52 series stainless steel solenoid, 4 watts
Swagelok M series metering valve, angle pattern with vernier handle.
DIY parts list:
1. CGA320 nipple and nut set(with washer), 1.5 inch nipple/stem, stainless steel.
2. Victor SGT500 stainless steel bar stock double stage regulator, 1/4 female npt ports.
3. 1/4 male npt to 1/8 male npt adapter, short form hex, stainless steel.
4. 1/8 female npt to 1/8 male npt, 45 degree elbow, stainless steel. Parker 2-2-SVE-SS, Brennan 5503-02-02-SS
5. Peter Paul E52 solenoid, wired conduit casing, stainless steel, 1/8 female npt inlet/outlet.
6. 1/8 male npt to 1/4 compression tube port elbow, Swagelok part number SS-400-2-2
7. Swagelok 1/4 OD port connector, part number SS-401-PC
8. Swagelok M series metering valve, part number SS-4MA-MH
9. Swagelok 1/4 OD tube stub to 1/8 male npt adapter, part number SS-4-TA-1-2
10. bubble counter.
--The grey teflon tape in video is high density type for stainless steel to stainless steel fitting/thread connections.
Questions, answers and discussion on how to build are all welcome.
happy aquascaping.
13 replies
·
1031 views
I started my first tank as an adult about a year ago, and have posted updates on it in my other journal , the Beginner Scaper Journal. I had intended the other journal to be a journey for this new tank but there were so many variables and many questions about the other set up that i thought it would best to start this new journal.
I am going to hold on to my beginner/amateur flair to the post since I think this is such a great hobby and want newcomers to know that everyone started as an amateur
Tank Inspiration
Dennis Wong's planted tanks. If you guys don't know who this is, I have already served a good purpose by introducing you to the founder of the 2Hr aquarist. He has a scientific horticulturist approach to planted tank that resonates well to my scientific mind. He is one of the few that I have read and listened to who mentions the different schools of thoughts when it comes to managing planted tanks and does not stick with a single approach.
Anyways a long winded rambling to say that everyone should read through the 2hr aquarist website. His products are all called APT (Advanced planted tank), and i think that is what his company was called before. His current display tanks are all planted tanks, which are beautiful mostly without hardscape but with lush plant growth and do not follow the rules of Dutch scaping. To anyone who wants to understand his philosophy more, i would recommend in addition to the website watch some videos where he has been interviewed.
I wanted to re-create this type of tank, but obviously as a beginner/amateur. I am hoping to learn more about growing plants with my ultimate goal to advance to a next scape which might be more nature style where i can take the knowledge from growing plants and now incorporate hardscape to it.
Equipment
Tank
- Waterbox mini 25
Background
Fish List (Preliminary)
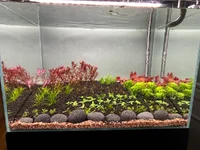
Photos
photo 1 - Day 11
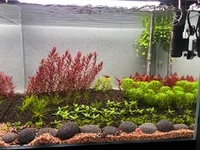
Photo 2 - Day 20
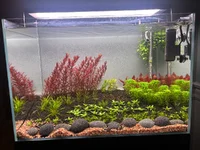
Photo 3 - Day 21 - Current - Testing - Ammonia 0, Nitrate about 10 on API kit - Changed filter outlet location to get reduced current
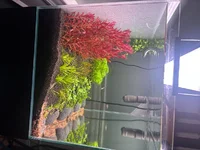
Photo 4 - Day 21 - Side view
Thanks for reading so far!
There has been some good growth, some expected filamentous algae/diatmos and some melting, all expected hopefully this would not get too bad.
The Rotala blood red, Florida and Ludwigea arcuata are doing great. Both the florida and Arcuata seems to do much better on the aquasoil than on my prior intert substrate.
Blyxa melted a little but getting better, the Tulunadensis is struggling. The rest holding stable.
Interesting observation - The Rotala blood red, started putting out lot of roots and side shoots which i think is mainly because the plant was being pushed by the current to almost bend sideways and I believe it is thinking that it close the surface and doing its thing. With the changed filter outlet location I am hoping that it will be more erect and when i cut and replant there will be less roots. 2hr aquarist has written about this as well, but i think the bending sideways leading to rooting is not mentioned.
I am not liking the layout as much as i thought i would. Have been discussing with BurrAqua and have some suggestions but still thinking about this. Thoughts and suggestions welcome. Hopefully lot of people with (@Burr740 , @Dennis Wong @Art @techman81 @Pepere @Unexpected @Naturescapes_Rocco @Jeff Miotke @BenB @DutchMuch ) and without experience will follow and share this tank journey with me.
This is a great forum and i have tagged people that i am familiar with on the forum who have answered my questions and helped.
I am going to hold on to my beginner/amateur flair to the post since I think this is such a great hobby and want newcomers to know that everyone started as an amateur
Tank Inspiration
Dennis Wong's planted tanks. If you guys don't know who this is, I have already served a good purpose by introducing you to the founder of the 2Hr aquarist. He has a scientific horticulturist approach to planted tank that resonates well to my scientific mind. He is one of the few that I have read and listened to who mentions the different schools of thoughts when it comes to managing planted tanks and does not stick with a single approach.
Anyways a long winded rambling to say that everyone should read through the 2hr aquarist website. His products are all called APT (Advanced planted tank), and i think that is what his company was called before. His current display tanks are all planted tanks, which are beautiful mostly without hardscape but with lush plant growth and do not follow the rules of Dutch scaping. To anyone who wants to understand his philosophy more, i would recommend in addition to the website watch some videos where he has been interviewed.
I wanted to re-create this type of tank, but obviously as a beginner/amateur. I am hoping to learn more about growing plants with my ultimate goal to advance to a next scape which might be more nature style where i can take the knowledge from growing plants and now incorporate hardscape to it.
Equipment
Tank
- Waterbox mini 25
- 60 cm x 40 cm x 40 cm
- 90 liters or 24 gallons
- This is a big upgrade from my 29 gallon standard tank. The silicone work is flawless.
- It does come with a leveling mat.
- It is deeper and slightly taller than a 60P or UNS 60U. I thought it would be useful to have more depth.
- Background - Thanks to @Jeff Miotke suggestion
- Waterbox stand - Black
- The main contention is that it does not come with side holes like some of the other expensive stands do.
- It just comes with opening in the back, so getting the tubing out is messy.
- The door attachment is a soft close but it needs to be leveled which can be finicky
- I did add a magnetic holder for tools and will add some light as well at some point.
- It does come with leveling foot holders.
- It is nicely built other wise.
- I wish it came with a pull out like the Oase stands but guess would be very expensive.
- Overall Ok, but nothing to highly recommend about.
- Oase Biomaster 350 thermo
- Replaced the biological media with Seachem Matrix
- Replaced one of the foams with Seachem Matrix as well.
- Steel lily pipes from GLA with extension. I think many of liked this company. But I personally would not buy anything again from them. They had quality control issues with this. One of the holders were metal and other acrylic and they would not send me another metal one. These are not the cheapest especially and you also have to buy extension separately. These are made by a chinese company and not made by GLA.
- I used to have glass lily pipes but got tired of cleaning them.
- I read many people commenting that using a skimmer attached to the inflow or outflow might be a pain to adjust, so ended up getting the Oase Crystal skim
- Fzone Co2 inline diffuser
- These work great and this is the second one that i have gotten. Trouble free but might need to replace parts of it if it gets clogged. Important thing is that it can be opened to clean.
- I have a Fzone dual stage regulator
- Cheapest that i could find and works very well - highly recommend
- I use RO water and remineralize it with APT Sky to a GH of around 4. Use the calculator on APT webpage.
- My goals are to have a low KH, and GH of around 4 - 5.
- APT feast about 12 Liters
- You can read about my experience cycling it here using Dark Start (sort of)
- I did not want Aquasoil in the front of the tank and wanted a thin lining of gravel so used a gravel from Carribsea, and some smooth lava stones to separate them. More about this later but i don't really like the way it turned out.
- Chihiros WRGB II - 10th anniv edition - 60 cm.
Background
- Left - Rotala blood red
- Middle - Rotala Tulunadensis (From Burr Aqua)
- Right - Alteranthera Reineckii Rosaefolia
- Left - Blyxa Joponica
- Middle - Ludwigea Arcuata, Pogostemon Decannensis, Rotala Florida, Staurogyne Repens
- Right - Syngonathus Belem/Macrocaulon(From Burr Aqua)
- Left - Lobelia cardinalis mini
- Middle/Right - S.Repens and Montecarlo
- Still to come - Eleocharis Aricularis mini (in the place where the stones are)
- Clump of Hydrocortyle Tripartita to absorb nitrogen - Trust me you do not want this plant for any other reason, will take over your tank and get everything into a tangled mess.
Fish List (Preliminary)
- 4 Rasbora espei
- 2 Otos
- Will be adding more from my prior tank
- Lighting - 30% - 8 am - 3 pm
- Co2 - 40 ppm by Hanna co2 kit, 5 am - 3 pm
- Fertilizer - APT 1 - Still not settled on a routine but the recommended dose for daily dosing would be about 2.3 ml and i do about 2-3 ml every 3 days.
- Water changes 75% every 3 - 4 days, will make it weekly in the next couple of weeks
Photos
photo 1 - Day 11
Photo 2 - Day 20
Photo 3 - Day 21 - Current - Testing - Ammonia 0, Nitrate about 10 on API kit - Changed filter outlet location to get reduced current
Photo 4 - Day 21 - Side view
Thanks for reading so far!
There has been some good growth, some expected filamentous algae/diatmos and some melting, all expected hopefully this would not get too bad.
The Rotala blood red, Florida and Ludwigea arcuata are doing great. Both the florida and Arcuata seems to do much better on the aquasoil than on my prior intert substrate.
Blyxa melted a little but getting better, the Tulunadensis is struggling. The rest holding stable.
Interesting observation - The Rotala blood red, started putting out lot of roots and side shoots which i think is mainly because the plant was being pushed by the current to almost bend sideways and I believe it is thinking that it close the surface and doing its thing. With the changed filter outlet location I am hoping that it will be more erect and when i cut and replant there will be less roots. 2hr aquarist has written about this as well, but i think the bending sideways leading to rooting is not mentioned.
I am not liking the layout as much as i thought i would. Have been discussing with BurrAqua and have some suggestions but still thinking about this. Thoughts and suggestions welcome. Hopefully lot of people with (@Burr740 , @Dennis Wong @Art @techman81 @Pepere @Unexpected @Naturescapes_Rocco @Jeff Miotke @BenB @DutchMuch ) and without experience will follow and share this tank journey with me.
This is a great forum and i have tagged people that i am familiar with on the forum who have answered my questions and helped.
145 replies
·
13264 views