Welcome to ScapeCrunch
We are ScapeCrunch, the place where planted aquarium hobbyists come to build relationships and support each other. When you're tired of doom scrolling, you've found your home here.
Social Feed
Journal Landen 90p
Picked up this Landen tank the beginning of November from a local hobbyist who purchased it in August, set it up and quickly realized it was too large for the space they had available. It is now the replacement for my old ADA 90p that had a corner seam split in June. The ADA was an old logo tank and was a store display for many years before I got it in 2018. I had rescaped the tank only a couple months prior to the failure.
The new tank is sold as a 55gal Landen 90p but is also listed as 59.4 gallons. It is 90cm x 50cm x 50cm, rather than the usual 45cm 90p. The tank came with a new Fluval 407. This probably won't be a super quick build. I'm limited in what I can do physically due to a bad back. I set up a new 20gal low tech Caridina tank a few months that still has like half the plants floating. So the set up of this tank won't happen until I finish planting the 20 and get my high tech 60p under control(the Monte Carlo carpet is like 4in thick rn.) I had hoped to have these taken care of by the end of the year but had RSV in November followed by covid in December. The aquariums have definitely been a bit neglected.
The overall goal is a fairly easy to maintain planted aquarium. Id like to have a fairly traditional nature aquarium. A triangle aquascape, mostly slow growing plants, not a lot of stems, medium light, CO2, one of the leaner dosing schedules, and hopefully not 50% weekly water changes. I can't physically handle the trimming and replanting of stems in a tank this size anymore. And I want fish again! I've got 3 shrimp tanks at the moment. While I did pick up some pygmy corydoras a few months back, they 100% live in a shrimp tank. lol. Probably some sort of pencilfish. In the past, I've often ended up with a pair of wild type Apistos and Pencils. We'll see though... Other options might be Pseudomugil luminatus, some of the small gouramis such as a Trichopsis species or other SA dwarf cichlids. If I don't go with a dwarf cichlid, I will probably add a high quality Neocaridina variety and give them a 6+ month head start.
Here is the current details for this build. Much of this is still to be decided. I’ll update as things begin to progress, along with some pictures.
Tank: Landen 90p, 59.4 gallons, 90cm x 50cm x 50cm or approx 36" x 20" x 20"
Filter: Eheim 2217 & Fluval 407 - The 2217 currently has a cerges reactor inline
Heater: Hydor 300w inline, probably
CO2: Probably use a custom built SS regulator that will run two separate tanks, 15lb tank, cerges reactor running inline on the 2217
**This is currently running my 60p. I may try to run a line to this tank but there’s a doorway in between the two stands. Otherwise I will probably use a different setup. I currently have everything but a second co2 tank, though not as stainless and shiny.
Lighting: 36" BuildMyLED XB custom spectrum w/dimmer x 2. Light levels will be set by par meter.
Substrate: Probably Pool Filter Sand, and/or UNS controsoil. I haven't decided quite yet.
Hardscape: The manzanita from the last 90p scape has mostly been used elsewhere. I do still have manzanita but would probably require some more. I’ve got a bunch of Malaysian driftwood and mopani that I need to dig through. Leaning more toward the Malaysian driftwood. I have a wide variety of smaller pieces along with a few larger ones.
Plan on using dragon stone. The last aquascape in the 90p used seiryu but was set up as Caridina tank. Even in the short time it was running I struggled to keep the water soft enough. I decided I'd rather not use it on a large scale again.
One of my saltwater LFS set up a freshwater section last year that may have lasted 3 months. They still had a box of dragon stone shoved on a back shelf. I was hoping to pick up a enough to use more as accents than anything else. I don't really have a much of a budget for this build, but rock was going to be a large portion of it. My sister went by the LFS before xmas planning to buy a gift certificate for me. When she mentioned I planned to use it for the dragon stone, they offered to sell the entire box for $20. Which is how I ended up with a 70lb box of dragon stone for this build...
Plants:
I am all over the place on how to plant this tank. Right now I've got more plants than I know what to do with. Okay, maybe I know what to do with them, but more of a lack of space. Although, I've probably sold off half of the plants I had this time last year.
Livestock: Not sure how I want to stock this tank I do want fish, not another shrimp only tank.
4 replies
·
2036 views

I started my first tank as an adult about a year ago, and have posted updates on it in my other journal , the Beginner Scaper Journal. I had intended the other journal to be a journey for this new tank but there were so many variables and many questions about the other set up that i thought it would best to start this new journal.
I am going to hold on to my beginner/amateur flair to the post since I think this is such a great hobby and want newcomers to know that everyone started as an amateur
Tank Inspiration
Dennis Wong's planted tanks. If you guys don't know who this is, I have already served a good purpose by introducing you to the founder of the 2Hr aquarist. He has a scientific horticulturist approach to planted tank that resonates well to my scientific mind. He is one of the few that I have read and listened to who mentions the different schools of thoughts when it comes to managing planted tanks and does not stick with a single approach.
Anyways a long winded rambling to say that everyone should read through the 2hr aquarist website. His products are all called APT (Advanced planted tank), and i think that is what his company was called before. His current display tanks are all planted tanks, which are beautiful mostly without hardscape but with lush plant growth and do not follow the rules of Dutch scaping. To anyone who wants to understand his philosophy more, i would recommend in addition to the website watch some videos where he has been interviewed.
I wanted to re-create this type of tank, but obviously as a beginner/amateur. I am hoping to learn more about growing plants with my ultimate goal to advance to a next scape which might be more nature style where i can take the knowledge from growing plants and now incorporate hardscape to it.
Equipment
Tank
- Waterbox mini 25
Background
Fish List (Preliminary)
Photos
photo 1 - Day 11
Photo 2 - Day 20
Photo 3 - Day 21 - Current - Testing - Ammonia 0, Nitrate about 10 on API kit - Changed filter outlet location to get reduced current
Photo 4 - Day 21 - Side view
Thanks for reading so far!
There has been some good growth, some expected filamentous algae/diatmos and some melting, all expected hopefully this would not get too bad.
The Rotala blood red, Florida and Ludwigea arcuata are doing great. Both the florida and Arcuata seems to do much better on the aquasoil than on my prior intert substrate.
Blyxa melted a little but getting better, the Tulunadensis is struggling. The rest holding stable.
Interesting observation - The Rotala blood red, started putting out lot of roots and side shoots which i think is mainly because the plant was being pushed by the current to almost bend sideways and I believe it is thinking that it close the surface and doing its thing. With the changed filter outlet location I am hoping that it will be more erect and when i cut and replant there will be less roots. 2hr aquarist has written about this as well, but i think the bending sideways leading to rooting is not mentioned.
I am not liking the layout as much as i thought i would. Have been discussing with BurrAqua and have some suggestions but still thinking about this. Thoughts and suggestions welcome. Hopefully lot of people with (@Burr740 , @Dennis Wong @Art @techman81 @Pepere @Unexpected @Naturescapes_Rocco @Jeff Miotke @BenB @DutchMuch ) and without experience will follow and share this tank journey with me.
This is a great forum and i have tagged people that i am familiar with on the forum who have answered my questions and helped.
I am going to hold on to my beginner/amateur flair to the post since I think this is such a great hobby and want newcomers to know that everyone started as an amateur
Tank Inspiration
Dennis Wong's planted tanks. If you guys don't know who this is, I have already served a good purpose by introducing you to the founder of the 2Hr aquarist. He has a scientific horticulturist approach to planted tank that resonates well to my scientific mind. He is one of the few that I have read and listened to who mentions the different schools of thoughts when it comes to managing planted tanks and does not stick with a single approach.
Anyways a long winded rambling to say that everyone should read through the 2hr aquarist website. His products are all called APT (Advanced planted tank), and i think that is what his company was called before. His current display tanks are all planted tanks, which are beautiful mostly without hardscape but with lush plant growth and do not follow the rules of Dutch scaping. To anyone who wants to understand his philosophy more, i would recommend in addition to the website watch some videos where he has been interviewed.
I wanted to re-create this type of tank, but obviously as a beginner/amateur. I am hoping to learn more about growing plants with my ultimate goal to advance to a next scape which might be more nature style where i can take the knowledge from growing plants and now incorporate hardscape to it.
Equipment
Tank
- Waterbox mini 25
- 60 cm x 40 cm x 40 cm
- 90 liters or 24 gallons
- This is a big upgrade from my 29 gallon standard tank. The silicone work is flawless.
- It does come with a leveling mat.
- It is deeper and slightly taller than a 60P or UNS 60U. I thought it would be useful to have more depth.
- Background - Thanks to @Jeff Miotke suggestion
- Waterbox stand - Black
- The main contention is that it does not come with side holes like some of the other expensive stands do.
- It just comes with opening in the back, so getting the tubing out is messy.
- The door attachment is a soft close but it needs to be leveled which can be finicky
- I did add a magnetic holder for tools and will add some light as well at some point.
- It does come with leveling foot holders.
- It is nicely built other wise.
- I wish it came with a pull out like the Oase stands but guess would be very expensive.
- Overall Ok, but nothing to highly recommend about.
- Oase Biomaster 350 thermo
- Replaced the biological media with Seachem Matrix
- Replaced one of the foams with Seachem Matrix as well.
- Steel lily pipes from GLA with extension. I think many of liked this company. But I personally would not buy anything again from them. They had quality control issues with this. One of the holders were metal and other acrylic and they would not send me another metal one. These are not the cheapest especially and you also have to buy extension separately. These are made by a chinese company and not made by GLA.
- I used to have glass lily pipes but got tired of cleaning them.
- I read many people commenting that using a skimmer attached to the inflow or outflow might be a pain to adjust, so ended up getting the Oase Crystal skim
- Fzone Co2 inline diffuser
- These work great and this is the second one that i have gotten. Trouble free but might need to replace parts of it if it gets clogged. Important thing is that it can be opened to clean.
- I have a Fzone dual stage regulator
- Cheapest that i could find and works very well - highly recommend
- I use RO water and remineralize it with APT Sky to a GH of around 4. Use the calculator on APT webpage.
- My goals are to have a low KH, and GH of around 4 - 5.
- APT feast about 12 Liters
- You can read about my experience cycling it here using Dark Start (sort of)
- I did not want Aquasoil in the front of the tank and wanted a thin lining of gravel so used a gravel from Carribsea, and some smooth lava stones to separate them. More about this later but i don't really like the way it turned out.
- Chihiros WRGB II - 10th anniv edition - 60 cm.
Background
- Left - Rotala blood red
- Middle - Rotala Tulunadensis (From Burr Aqua)
- Right - Alteranthera Reineckii Rosaefolia
- Left - Blyxa Joponica
- Middle - Ludwigea Arcuata, Pogostemon Decannensis, Rotala Florida, Staurogyne Repens
- Right - Syngonathus Belem/Macrocaulon(From Burr Aqua)
- Left - Lobelia cardinalis mini
- Middle/Right - S.Repens and Montecarlo
- Still to come - Eleocharis Aricularis mini (in the place where the stones are)
- Clump of Hydrocortyle Tripartita to absorb nitrogen - Trust me you do not want this plant for any other reason, will take over your tank and get everything into a tangled mess.
Fish List (Preliminary)
- 4 Rasbora espei
- 2 Otos
- Will be adding more from my prior tank
- Lighting - 30% - 8 am - 3 pm
- Co2 - 40 ppm by Hanna co2 kit, 5 am - 3 pm
- Fertilizer - APT 1 - Still not settled on a routine but the recommended dose for daily dosing would be about 2.3 ml and i do about 2-3 ml every 3 days.
- Water changes 75% every 3 - 4 days, will make it weekly in the next couple of weeks
Photos
photo 1 - Day 11
Photo 2 - Day 20
Photo 3 - Day 21 - Current - Testing - Ammonia 0, Nitrate about 10 on API kit - Changed filter outlet location to get reduced current
Photo 4 - Day 21 - Side view
Thanks for reading so far!
There has been some good growth, some expected filamentous algae/diatmos and some melting, all expected hopefully this would not get too bad.
The Rotala blood red, Florida and Ludwigea arcuata are doing great. Both the florida and Arcuata seems to do much better on the aquasoil than on my prior intert substrate.
Blyxa melted a little but getting better, the Tulunadensis is struggling. The rest holding stable.
Interesting observation - The Rotala blood red, started putting out lot of roots and side shoots which i think is mainly because the plant was being pushed by the current to almost bend sideways and I believe it is thinking that it close the surface and doing its thing. With the changed filter outlet location I am hoping that it will be more erect and when i cut and replant there will be less roots. 2hr aquarist has written about this as well, but i think the bending sideways leading to rooting is not mentioned.
I am not liking the layout as much as i thought i would. Have been discussing with BurrAqua and have some suggestions but still thinking about this. Thoughts and suggestions welcome. Hopefully lot of people with (@Burr740 , @Dennis Wong @Art @techman81 @Pepere @Unexpected @Naturescapes_Rocco @Jeff Miotke @BenB @DutchMuch ) and without experience will follow and share this tank journey with me.
This is a great forum and i have tagged people that i am familiar with on the forum who have answered my questions and helped.
153 replies
·
13584 views

Journal 100x40x40 Nivliw's Planted Tank
Hello everyone,
Today I finally moved from my old aquarium, a Juwel Rio 180, to a new optiwhite tank built by Genesi Acquari.
I decided to make this change for two main reasons. First, I never really liked the aesthetics of the Rio 180, and its plastic frame made it somewhat limiting when it came to using lily pipes and other cleaner-looking hardware. Second, I had been dealing with persistent staghorn algae issues, so I thought it would be a good opportunity to start fresh.
For reference, this was the Rio 180 before I dismantled it today:

Most of the plants in this new setup were taken from the Rio 180 before dismantling it today. I trimmed healthy tops from the old plants and replanted them in this aquarium, hoping they will establish themselves properly and grow much better under the new conditions.
And here is the new tank on day one:

June 3rd, 2026
Some additional shots of the new setup:


What do you think of the setup so far?
At the moment, the Monte Carlo looks a bit "lifted" rather than hugging the substrate. Is this something I should be concerned about, or will it naturally settle and develop into a proper carpet as it adapts and produces new growth?
As mentioned above, most of the plants were transferred from the Rio 180 that I dismantled today, so they may need some time to adjust.
Thank you all for stopping by, and I look forward to hearing your thoughts and suggestions!
Today I finally moved from my old aquarium, a Juwel Rio 180, to a new optiwhite tank built by Genesi Acquari.
I decided to make this change for two main reasons. First, I never really liked the aesthetics of the Rio 180, and its plastic frame made it somewhat limiting when it came to using lily pipes and other cleaner-looking hardware. Second, I had been dealing with persistent staghorn algae issues, so I thought it would be a good opportunity to start fresh.
For reference, this was the Rio 180 before I dismantled it today:
Most of the plants in this new setup were taken from the Rio 180 before dismantling it today. I trimmed healthy tops from the old plants and replanted them in this aquarium, hoping they will establish themselves properly and grow much better under the new conditions.
And here is the new tank on day one:
Tank Specifications
- Tank: Optiwhite aquarium by Genesi Acquari
- Dimensions: 100 × 40 × 40 cm
- Volume: 160 L
- Lighting: Chihiros WRGB II Pro 90
- CO₂: Inline diffuser with refillable cylinder
- Filter: Oase BioMaster 2 Thermo 600
- Substrate: Dennerle Black Gravel 1–2 mm
- Additional equipment:
- OaseSkim (which I will likely remove soon and replace with glass lily pipes featuring an integrated surface skimmer),
- Neo Flow Reliever
- Hanna's digital testers For no3 po4 and fe
Water Parameters
- pH: 7.1 → 5.8 with CO₂ running
- KH: 0
- GH: 5–7
- TDS: 120 ppm
- NO₃: 6–7 ppm
- PO₄: 1.25 ppm
Setup Date
June 3rd, 2026
Some additional shots of the new setup:
Questions
What do you think of the setup so far?
At the moment, the Monte Carlo looks a bit "lifted" rather than hugging the substrate. Is this something I should be concerned about, or will it naturally settle and develop into a proper carpet as it adapts and produces new growth?
As mentioned above, most of the plants were transferred from the Rio 180 that I dismantled today, so they may need some time to adjust.
Thank you all for stopping by, and I look forward to hearing your thoughts and suggestions!
13 replies
·
235 views

Hello Welcome, Lelindre
Welcome to ScapeCrunch, @Lelindre!
We would love to get to know you. Please tell us about yourself. What tank do you have?
We would love to get to know you. Please tell us about yourself. What tank do you have?
0 replies
·
7 views
replies
Legacy View
About me:
I've been keeping planted aquariums and shrimp breeding tanks for almost a decade and for the majority of that time aquariums were my primary hobby. In 2021 I had ~30 tanks running simultaneously containing almost 200 types of plants that I had collected over a 5 year period and more than a dozen types of shrimp. In this time, it was harder for me to not setup new tanks than it was to grow any aquatic plant sent my way. Below are some of the tanks I've kept over the years.


At the end of 2021 I moved from Texas to Massachusetts and gave away all of my plants, tanks, and shrimp to friends I had made over the years. It took some time to find a permanent place to live so I didn't have any tanks until I was unexpectedly given an ADA 120P in summer of 2023.
The early days of the 120P:
I went through the typical tank start growing pains with a diatoms phase, green hair algae, and every other issue one would expect from a new tank. Even with the new tank difficulties, it only took me 2 months to get to a healthy tank again. For the next 1.5 years, everything went smoothly and the tank went through many iterations.

Setup on June 28th

Diatoms outbreak on July 19th

Green hair algae outbreak by August 18th

Everything was cleaned up and growing great by September 1st
The start of the disaster:
In February 2025, I started running into issues. BBA started growing in small tufts on the substrate and green hair algae started attacking the old growth on the plants. I'd run into this issue in the past and was usually able to fix it pretty quickly by dialing in the CO2, cleaning the substrate, cleaning filters, and replanting only the most healthy tops of the plants. Even after doing this multiple times, I haven't had any luck fixing the algae. It always comes back


The start of the algae

Multiple trim and replant cycles along with some new plants

Relatively clean after a trim and replant cycle

10 days later
Where I am today:
I'm getting so frustrated by the persistent issues that I'm about ready to shut down this tank. As a last ditch effort, I purchased a pack of healthy plants from Burr740 to see if healthy plants can help me get through the algae phase and get back into a good place.

The tank as of January 2nd 2026. The healthiest plants in the tank were received earlier this week from Burr740.

Really poor color on my plants with a lot of green algae on the lower leaves. The nice looking bacopa is from Burr740. The original stems of Bacopa have barely grown in the last month. If I pull them up, there are very few roots.

Another example of the old growth issues. The Limnophila mini vietnam also has not grown at all in the last month. Lots of algae grows on the substrate as well.

Another comparison of Burr's Ludwigia sp. red vs mine. Very slow growth and poor rooting.

Really weak older growth on Rotala sp. singapore and poor coloration compared to Burr's plants. This plant has always been very easy for me to keep and this is part of why I'm thinking there is something big that I'm missing. Didiplis diandra is another easy plant that keeps melting at the base and its making very little progress because of this.
Below is the key information about the tank.
Tank size: ADA 120P (120 cm x 45 cm x 45 cm)
Lighting: 3x NiloCG Prizms ran at the lowest setting for each channel. Lights are on for 7 hours a day. I want to increase the lighting, but any time I do the algae gets significantly worse
Filtration: Oase Biomaster 600 and a SunSun HW-303B. There's a spraybar on the bottom left that points along the length of the tank at substrate level and the other output is on the top right corner of the tank pushing the opposite direction.
CO2: Vertical reactor on the SunSun filter and a Sera reactor on the Oase. CO2 comes on 4 hours before lights on and turns off 1 hr before lights off. Drop checker is yellow when lights turn on. The pH drop is ~1.4-1.5 at lights on (5.8 at lights on and 7.3 when water is fully degassed). Plants start pearling within 10 minutes of the lights coming on.
Substrate: A mix of ADA aquasoil, Fluval stratum, and Controsoil. A bag of Controsoil was added ~2 months ago to try and give the plants a boost. The remaining substrate is from when I setup the tank and is almost certainly not providing much nutrition or buffering capacity.
Water change schedule: Weekly 70-80% water changes with tap water coming from the MWRA (water report here). KH is ~2. GH is less than 1(3.7 PPM Ca, 0.7 PPM Mg based on the report). Water is treated with sodium carbonate at the water treatment plant to increase the pH to ~9.2, but the pH rapidly decreases after the water comes out of the tap. One potential issue is the tap water is extremely cold. It comes out at ~50F and I add a mix of water from the tap along with heated water. The temperature drops to ~60F for 2-3 hours whenever I water change. I don't keep any livestock so I'm not sure if this is a problem. This was not something I needed to consider back in Texas.
Remineralization: I add 22 PPM calcium and 6 PPM magnesium at water change
Fertilization: 20N-6P-26K is added immediately after water change. A second dose at 10N-3P-13K is added halfway through the week. Micros are Burr740's most recent recipe dosed at 0.15 PPM Fe 3x per week.
Temperature: Tank is heated to 73F during the winter. During the more mild parts of the year I remove the heater and go with whatever the ambient temperature is.
It looks like I'm doing everything right on paper and based on my past experience keeping tanks, but there is clearly some major issue ongoing. Right now I'm thinking its inconsistency in the CO2 that I'm just not seeing (I just started the CO2 2 hours earlier last week because I was noticing the drop checker wasn't always yellow at lights on), not enough light, or too cold of water during water changes. I want to keep some records through this journal to keep myself engaged with the tank and to make sure I'm being consistent with everything. I'm also hoping some additional eyes can help me see where I'm going wrong because I really, really miss having a nice looking tank.
I've been keeping planted aquariums and shrimp breeding tanks for almost a decade and for the majority of that time aquariums were my primary hobby. In 2021 I had ~30 tanks running simultaneously containing almost 200 types of plants that I had collected over a 5 year period and more than a dozen types of shrimp. In this time, it was harder for me to not setup new tanks than it was to grow any aquatic plant sent my way. Below are some of the tanks I've kept over the years.
At the end of 2021 I moved from Texas to Massachusetts and gave away all of my plants, tanks, and shrimp to friends I had made over the years. It took some time to find a permanent place to live so I didn't have any tanks until I was unexpectedly given an ADA 120P in summer of 2023.
The early days of the 120P:
I went through the typical tank start growing pains with a diatoms phase, green hair algae, and every other issue one would expect from a new tank. Even with the new tank difficulties, it only took me 2 months to get to a healthy tank again. For the next 1.5 years, everything went smoothly and the tank went through many iterations.
Setup on June 28th
Diatoms outbreak on July 19th
Green hair algae outbreak by August 18th
Everything was cleaned up and growing great by September 1st
The start of the disaster:
In February 2025, I started running into issues. BBA started growing in small tufts on the substrate and green hair algae started attacking the old growth on the plants. I'd run into this issue in the past and was usually able to fix it pretty quickly by dialing in the CO2, cleaning the substrate, cleaning filters, and replanting only the most healthy tops of the plants. Even after doing this multiple times, I haven't had any luck fixing the algae. It always comes back
The start of the algae
Multiple trim and replant cycles along with some new plants
Relatively clean after a trim and replant cycle
10 days later
Where I am today:
I'm getting so frustrated by the persistent issues that I'm about ready to shut down this tank. As a last ditch effort, I purchased a pack of healthy plants from Burr740 to see if healthy plants can help me get through the algae phase and get back into a good place.
The tank as of January 2nd 2026. The healthiest plants in the tank were received earlier this week from Burr740.
Really poor color on my plants with a lot of green algae on the lower leaves. The nice looking bacopa is from Burr740. The original stems of Bacopa have barely grown in the last month. If I pull them up, there are very few roots.
Another example of the old growth issues. The Limnophila mini vietnam also has not grown at all in the last month. Lots of algae grows on the substrate as well.
Another comparison of Burr's Ludwigia sp. red vs mine. Very slow growth and poor rooting.
Really weak older growth on Rotala sp. singapore and poor coloration compared to Burr's plants. This plant has always been very easy for me to keep and this is part of why I'm thinking there is something big that I'm missing. Didiplis diandra is another easy plant that keeps melting at the base and its making very little progress because of this.
Below is the key information about the tank.
Tank size: ADA 120P (120 cm x 45 cm x 45 cm)
Lighting: 3x NiloCG Prizms ran at the lowest setting for each channel. Lights are on for 7 hours a day. I want to increase the lighting, but any time I do the algae gets significantly worse
Filtration: Oase Biomaster 600 and a SunSun HW-303B. There's a spraybar on the bottom left that points along the length of the tank at substrate level and the other output is on the top right corner of the tank pushing the opposite direction.
CO2: Vertical reactor on the SunSun filter and a Sera reactor on the Oase. CO2 comes on 4 hours before lights on and turns off 1 hr before lights off. Drop checker is yellow when lights turn on. The pH drop is ~1.4-1.5 at lights on (5.8 at lights on and 7.3 when water is fully degassed). Plants start pearling within 10 minutes of the lights coming on.
Substrate: A mix of ADA aquasoil, Fluval stratum, and Controsoil. A bag of Controsoil was added ~2 months ago to try and give the plants a boost. The remaining substrate is from when I setup the tank and is almost certainly not providing much nutrition or buffering capacity.
Water change schedule: Weekly 70-80% water changes with tap water coming from the MWRA (water report here). KH is ~2. GH is less than 1(3.7 PPM Ca, 0.7 PPM Mg based on the report). Water is treated with sodium carbonate at the water treatment plant to increase the pH to ~9.2, but the pH rapidly decreases after the water comes out of the tap. One potential issue is the tap water is extremely cold. It comes out at ~50F and I add a mix of water from the tap along with heated water. The temperature drops to ~60F for 2-3 hours whenever I water change. I don't keep any livestock so I'm not sure if this is a problem. This was not something I needed to consider back in Texas.
Remineralization: I add 22 PPM calcium and 6 PPM magnesium at water change
Fertilization: 20N-6P-26K is added immediately after water change. A second dose at 10N-3P-13K is added halfway through the week. Micros are Burr740's most recent recipe dosed at 0.15 PPM Fe 3x per week.
Temperature: Tank is heated to 73F during the winter. During the more mild parts of the year I remove the heater and go with whatever the ambient temperature is.
It looks like I'm doing everything right on paper and based on my past experience keeping tanks, but there is clearly some major issue ongoing. Right now I'm thinking its inconsistency in the CO2 that I'm just not seeing (I just started the CO2 2 hours earlier last week because I was noticing the drop checker wasn't always yellow at lights on), not enough light, or too cold of water during water changes. I want to keep some records through this journal to keep myself engaged with the tank and to make sure I'm being consistent with everything. I'm also hoping some additional eyes can help me see where I'm going wrong because I really, really miss having a nice looking tank.
115 replies
·
9610 views
Journal High-Tech 90P Build
Hi guys!
I'm new here, but not entirely new to planted tanks though I've been out of the hobby for the better part of the last decade between kids and moving a couple of times - but finally in a spot where I can do something again. I'm mostly going to be making things up as I go along, but plan on a lot of automation (I want to integrate everything into home assistant) and a lot of DIY as I love the challenge of building things out myself.
The starting point:
I picked up a 90P rimless, low-iron tank on a great deal.
.webp")
I have a rough idea in my head for a stand to be built from plywood - just have a couple other house projects to finish off before starting that built.
Wife says I can only have one aquarium, so for this tank, I want to go all out with a sump to allow for auto top off, and auto water changes, auto fertilizer dosing etc. etc. I have half a plan in my mind.
I've also started on the light fixture which I've modeled up in CAD, and plan on making out of an 8020 extrusion, and some 3D printed bits.

I'm using bridgelux gen 3 thrive CW (3000k) and WW (5000k) LED strips which have super high CRI at 98+ along with some specific XPE2 wavelengths that I'll solder onto some starboards. Far Red (730nm), Red (654nm), Cyan (495nm), Blue (455nm), Visible UV (415nm). Each segment of the white channels will be on its own driver so I can adjust left to right brightness in thirds, and each colour channel on its own driver so I can vary each channel on a time-based approach.
These will be run from a custom PCB board with Meanwell N-LDD drivers, and will run ESPHome on an ESP32 so it can link up with my Home Assistant installation.

That's it for now, this will probably be a very slow build so be warned if you follow along!
I'm new here, but not entirely new to planted tanks though I've been out of the hobby for the better part of the last decade between kids and moving a couple of times - but finally in a spot where I can do something again. I'm mostly going to be making things up as I go along, but plan on a lot of automation (I want to integrate everything into home assistant) and a lot of DIY as I love the challenge of building things out myself.
The starting point:
I picked up a 90P rimless, low-iron tank on a great deal.
I have a rough idea in my head for a stand to be built from plywood - just have a couple other house projects to finish off before starting that built.
Wife says I can only have one aquarium, so for this tank, I want to go all out with a sump to allow for auto top off, and auto water changes, auto fertilizer dosing etc. etc. I have half a plan in my mind.
I've also started on the light fixture which I've modeled up in CAD, and plan on making out of an 8020 extrusion, and some 3D printed bits.
I'm using bridgelux gen 3 thrive CW (3000k) and WW (5000k) LED strips which have super high CRI at 98+ along with some specific XPE2 wavelengths that I'll solder onto some starboards. Far Red (730nm), Red (654nm), Cyan (495nm), Blue (455nm), Visible UV (415nm). Each segment of the white channels will be on its own driver so I can adjust left to right brightness in thirds, and each colour channel on its own driver so I can vary each channel on a time-based approach.
These will be run from a custom PCB board with Meanwell N-LDD drivers, and will run ESPHome on an ESP32 so it can link up with my Home Assistant installation.
That's it for now, this will probably be a very slow build so be warned if you follow along!
13 replies
·
341 views

I am anticipating setting up and planting a new tank in two weeks. This will be my second planted tank, but the first is only around a 6gallon display. I am still learning with most coming from internet searches and videos.
1) Referring to stem plants, when I watch videos of tank plantings the plants are always small. Just a few inches. The plants that have been shipped to me, or I see in stores, are always larger close to full grown. I know some are using tissue cultures but event those who are not the plants seem very small. The plants that are shipped to me, should I cut them down first before planting? My plan includes possibly Rotala Florida, Rotala wallichii, Rotala OJ, Rotala Macandra green/pink. I will most likely be ordering from Buceplant.
2) I have some Hygrophila Corymbosa compact that I really like. I want to plant them in the new tank. To do this, should these be trimmed down, trim some of the longer roots, or just plant as is? I am finding different advice online. Opinions welcomed.
9 replies
·
124 views
was travelling for the past 3 weeks, so this tank hasn't had any trimming, water changes, or maintenance.
Frankly, I'm liking this jungle look a bit more than my usually well-trimmed tank.
Frankly, I'm liking this jungle look a bit more than my usually well-trimmed tank.

5 replies
·
131 views
Hello Welcome, noisyground
Welcome to ScapeCrunch, @noisyground!
We would love to get to know you. Please tell us about yourself. What tank do you have?
We would love to get to know you. Please tell us about yourself. What tank do you have?
0 replies
·
11 views
replies
Legacy View
Journal 22 gallon long bookshelf
Time to start a new thread.
I’ll fill in some details later, but I’m working on the hardscape now. Any and all criticism is appreciated. The vision is nothing more, and nothing less, than something appealing to the eye.
90cm x 30cm x 30cm Lifegard Aquatics ultra clear bookshelf tank. Buce and anubias on the hardscape, stems towards the back and center, mid to front carpet with some changes in shade and texture down to a flat grade on the right side of the tank.
Lily pipe inlet and skimmer will be in the back left corner with the outflow in the front left to hopefully achieve circular flow. I’ll be running an in-line diffuser. Light will be the P600 Pro that I regrettably did not upside to 900. Oh well. I’ll mount it high and hopefully it’ll have enough spread.
I have some dragon stone and red lava rock rubble I’ll use at the base to blend into the substrate, as well as some stratum I may or may not cap with.
220 replies
·
23824 views
Hi all, first post. Thought it'd be fine to start a new thread specifically about yugang reactors for smaller tanks, under surface area 3000cm^2 (for the most part). Guess this could be a journal to some degree, but I think this thread is more for info than sharing my tank. I know people are generally using pvc pipes and fittings to DIY their reactors and to keep the cost down. I wanted something that looked super nice and was already "prebuilt". After scouring the internet for the longest time, I found that these PC water cooling reservoirs should serve that purpose.

Maybe someone's tested this already and found out that it doesn't work, but I wanted to put this out there since I haven't seen anything on it. I don't want to gatekeep this and I hope that this gives people another option since not everyone may have tools readily available. Since this is considered a PC component, there are a number of options available for fittings that I'll get into in a bit that make this great.
There are a few downsides though:
1. Limited diameters. I've only seen options for 50 or 60mm diameters. The 50mm ones have 40mm inner diameter, and 60mm ones I assume have 50mm inner.
2. Limited lengths. I've seen them as small as 6cm long all the way to 40cm long. The caps/lids range from 6-10mm thick.
Largest I've seen is 50mm and 400mm long. Useable diameter and length, let's say are 40mm and 380mm respectively. If you want a pH drop of 1.5, largest your surface area can be is 2690cm^2. Obviously you can stretch this if you don't need that large of a pH drop.


3. Standardized G 1/4" thread. This isn't as common a fitting (in the US at least). This thread size can be good or bad.
4. Some others mentioned later.
As for the upsides:
1. Clean look, no DIY necessary, no PVC glue, certain listings come with brackets and screws.
2. Inexpensive, I got a 210mm variant for ~$15USD
3. Outlet is offset to the side. You can rotate as necessary to control in overflow mode.
4. Others mentioned later.
Again, this is for PC water cooling. 95% of the parts I've seen are made of brass. They are however either chrome or nickel plated.
As of right now, I have my ADA 60P freshly cycling on a dark start. I was able to test the co2 functionality (not measure co2 levels). I am able to get a co2 bubble to develop inside and work with overflow. My "reactor" is 210mm long and has 50mm diameter. Calculating with the inner diameter (40mm on mine) and the useable length (190mm if you take away cap length), I should theoretically be able to get a ~1.4ph drop.
The filter I'm using is the Biomaster 350 thermo. Tubing is 5/8" for this, and this is one of the downsides I want to get into. This is for PC cooling like I mentioned and they generally don't use tubing that large. If you're running a filter that uses 12/16mm tubing instead of 5/8" (16/22mm) then you might have a much easier time finding fittings to work. G 1/4" thread is roughly a 1/2" opening. I'm not actually getting less flow with this because I realized the 16/22 quick tap valves I use actually have a 1/2" opening on the inside as well. This G 1/4" thread shouldn't be an issue then. FYI, G 1/4" is the same as 1/4" BSPP. (british standard pipe parallel)

I tried making my setup as NEATLY and good looking as possible. Above is my final work (as of now). I have some tube trimming to do though to make it nicer. Another thing I want to mention, the first time I tried this, I connected my outlet straight to the yugang reactor. I saw this thread reply (below) saying that their 2" pvc (~50mm) had no issue with the flow speed after adjusting their tap valve. That was not true in my experience. My reactor should be about the same size as this one, but the water rushes through very turbently:

It slowed the flow so much that almost all water was going through bypass even though valve was fully open. (Don't get cheap Y or T splitters either...)
Here's a video of the flow WITHOUT a bypass. Video starts with tap valve already slightly shut 25% of the way and slowly getting shut more as you can see:
View attachment IMG_7536.mov
It doesn't matter where you put the valve but I think it makes more sense to put it on the reactor side. You can control how slow the flow is that way. Ff you place it on bypass side, you can never slow down water through reactor that way - only more going to it.
You might ask, where's the co2 supposed to go if you don't have the inline accessory that I have? Well there's a threaded acrylic pipe that comes with this reactor if you look at listings. All you need to do is get a 4/6mm push connect to g1/4" male thread fitting for a few bucks and your issue is solved. The threaded acrylic pipe can also be screwed off and there are more extender fittings and such to replace that if you search them online. Options like the 60mm length reservoir I posted above may only have 2 outlets, but the larger 400mm example I gave has 4 holes with different hole positions too. You can place a purge valve that slightly works (there's literally a fitting for that too). The main outlet hole is still offset as well. (another example shown below) Any hole you don't want to use? Just buy a g1/4 plug. The benefit of using this PC cooling reservoir is the amount of fittings they have that can work for your needs.

For my setup, I ended up using a $3 dollar plastic garden hose splitter that has 3/4" GHT (garden hose thread) that was two valves on it (best of both worlds). I also bought the appropriate barbs to fit into it (so hosing can attach). Because I wanted to put this is my AquaForestAquarium Archaea cabinet, everything is packed really tight. Would be nicer if tubing had more room to move and didn't kink as easily. Just a tradeoff so you see I had to use elbow barbs and keep some tubing real short.
My fittings right now are brass but I found one seller on ebay (shipped from China) that has G 1/4" male thread to 5/8" barb in STAINLESS STEEL. However, it is BSPT (british standard pipe thread) so this one tapers inwards and will probably need teflon/very tight twist to seal with the o-ring. BSPT fitting can go into a BSPP threaded hole, but BSPP cannot go into BSPT. Someone correct me if I'm wrong about that, but I'm fairly certain that is the case.
If you've read to this point, I think this should be enough to understand what you can do with this PC cooling reservoir. It has limitations size wise and a need for a bypass if you don't want to slow the flow on your tank too much (depending on your filter), but it really is a nice cheap option that we can use for our hobby.
Please correct or question me anywhere!!!
--------------------------------------------
Just links to what I bought for anyone curious. I hope links are allowed. I don't have any commission to these. Just purely for info on what I have.
You can buy these for cheaper on AliExpress. I just didn't want to wait and paid a little more for the items. They're from the same supplier, but I also recommend finding a higher quality brand. The one I have is 50mm outer diameter. I think companies like Freezemod have higher quality ones, and they might be 60mm. Do your own research on this, I didn't do enough on this side.

Some other hard to find accessories:
- If you're trying to replace inlet cap, make sure the cap you find works. Here's one I found for 50mm diameter:
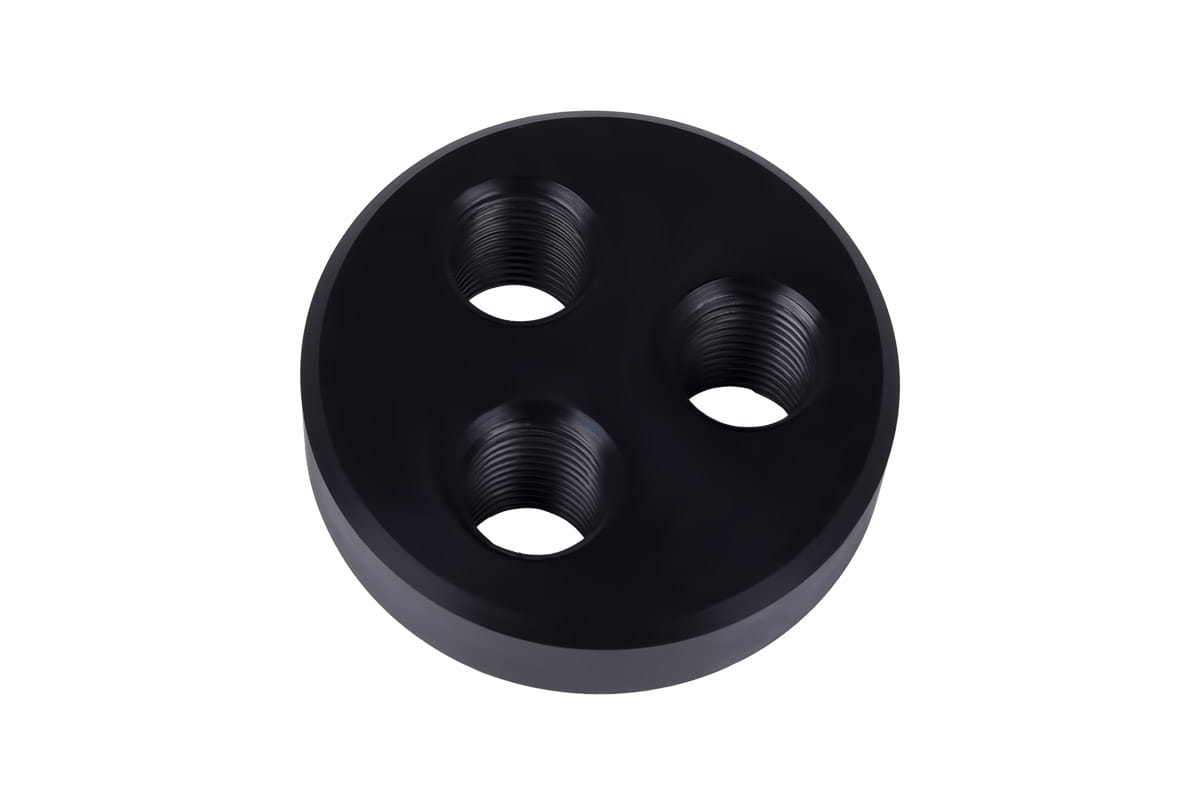
 shop.alphacool.com
- I believe the acrylic reservoir itself is this (please check yourself!!):
shop.alphacool.com
- I believe the acrylic reservoir itself is this (please check yourself!!):
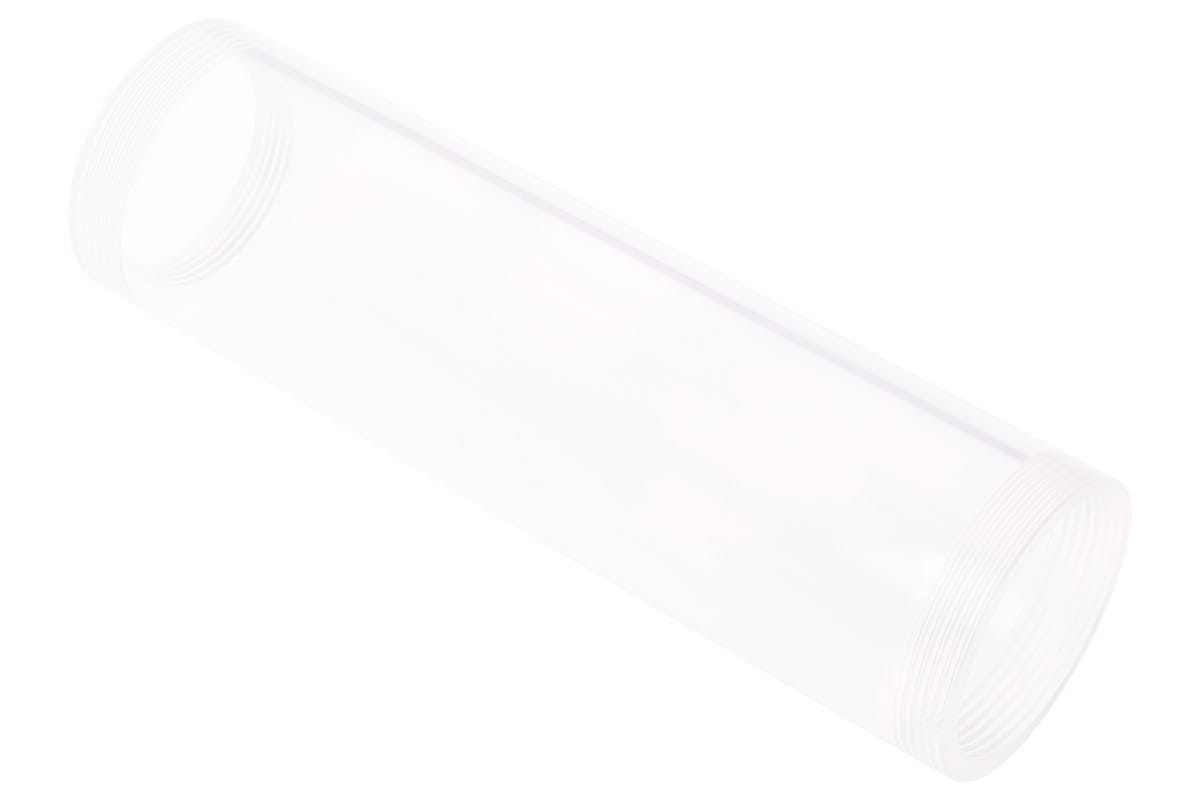 shop.alphacool.com
- This one is super nice, it's a rotatable cap replacement you can get. Set your in/outlets exactly where you want. I'm not sure if 50 or 60mm diameter though:
shop.alphacool.com
- This one is super nice, it's a rotatable cap replacement you can get. Set your in/outlets exactly where you want. I'm not sure if 50 or 60mm diameter though:
I also mentioned not wanting to have to drill anything. You might wonder how to attach those brackets without doing so. I bought adhesive stickers with screw ports from AliExpress, and used screws/washers that came with the reservoir:

Can probably get on Amazon as well. The adhesive first, then stack 3 washers next, bracket next, thread the screw through the bracket hole -> washers -> adhesive screw port.

-------------------------------
Random thought:
I found this one singular option that I've not tested. It looks so similar to the internal bypass option that yugang himself devised. (a prebuilt option at least) It's slotted but to be honest, I don't know if it would work well. If you search for aluminum pc water cooling reservoir, you will find this. Only comes in one size unfortunately. Again, I have NOT tested this.


Maybe someone's tested this already and found out that it doesn't work, but I wanted to put this out there since I haven't seen anything on it. I don't want to gatekeep this and I hope that this gives people another option since not everyone may have tools readily available. Since this is considered a PC component, there are a number of options available for fittings that I'll get into in a bit that make this great.
There are a few downsides though:
1. Limited diameters. I've only seen options for 50 or 60mm diameters. The 50mm ones have 40mm inner diameter, and 60mm ones I assume have 50mm inner.
2. Limited lengths. I've seen them as small as 6cm long all the way to 40cm long. The caps/lids range from 6-10mm thick.
Largest I've seen is 50mm and 400mm long. Useable diameter and length, let's say are 40mm and 380mm respectively. If you want a pH drop of 1.5, largest your surface area can be is 2690cm^2. Obviously you can stretch this if you don't need that large of a pH drop.
3. Standardized G 1/4" thread. This isn't as common a fitting (in the US at least). This thread size can be good or bad.
4. Some others mentioned later.
As for the upsides:
1. Clean look, no DIY necessary, no PVC glue, certain listings come with brackets and screws.
2. Inexpensive, I got a 210mm variant for ~$15USD
3. Outlet is offset to the side. You can rotate as necessary to control in overflow mode.
4. Others mentioned later.
Again, this is for PC water cooling. 95% of the parts I've seen are made of brass. They are however either chrome or nickel plated.
Not sure if this will be an issue since brass is ~60% copper. Hamfist's tank is also huge compared to my 60p and it may be dependent on water changes. Having the plating on the fittings will lower the corrosion rate since we are in acidic lower pH water. I honestly don't think this should be a problem at all. There are acrylic and stainless steel options out there if you look for them. I've heard nickel plating is best.
As of right now, I have my ADA 60P freshly cycling on a dark start. I was able to test the co2 functionality (not measure co2 levels). I am able to get a co2 bubble to develop inside and work with overflow. My "reactor" is 210mm long and has 50mm diameter. Calculating with the inner diameter (40mm on mine) and the useable length (190mm if you take away cap length), I should theoretically be able to get a ~1.4ph drop.
The filter I'm using is the Biomaster 350 thermo. Tubing is 5/8" for this, and this is one of the downsides I want to get into. This is for PC cooling like I mentioned and they generally don't use tubing that large. If you're running a filter that uses 12/16mm tubing instead of 5/8" (16/22mm) then you might have a much easier time finding fittings to work. G 1/4" thread is roughly a 1/2" opening. I'm not actually getting less flow with this because I realized the 16/22 quick tap valves I use actually have a 1/2" opening on the inside as well. This G 1/4" thread shouldn't be an issue then. FYI, G 1/4" is the same as 1/4" BSPP. (british standard pipe parallel)
I tried making my setup as NEATLY and good looking as possible. Above is my final work (as of now). I have some tube trimming to do though to make it nicer. Another thing I want to mention, the first time I tried this, I connected my outlet straight to the yugang reactor. I saw this thread reply (below) saying that their 2" pvc (~50mm) had no issue with the flow speed after adjusting their tap valve. That was not true in my experience. My reactor should be about the same size as this one, but the water rushes through very turbently:
And so I had to resort to making a simple bypass. One lesson I learned, don't get a cheap valve on amazon for $5. I placed the valve on the bypass initially:
It slowed the flow so much that almost all water was going through bypass even though valve was fully open. (Don't get cheap Y or T splitters either...)
Here's a video of the flow WITHOUT a bypass. Video starts with tap valve already slightly shut 25% of the way and slowly getting shut more as you can see:
View attachment IMG_7536.mov
It doesn't matter where you put the valve but I think it makes more sense to put it on the reactor side. You can control how slow the flow is that way. Ff you place it on bypass side, you can never slow down water through reactor that way - only more going to it.
You might ask, where's the co2 supposed to go if you don't have the inline accessory that I have? Well there's a threaded acrylic pipe that comes with this reactor if you look at listings. All you need to do is get a 4/6mm push connect to g1/4" male thread fitting for a few bucks and your issue is solved. The threaded acrylic pipe can also be screwed off and there are more extender fittings and such to replace that if you search them online. Options like the 60mm length reservoir I posted above may only have 2 outlets, but the larger 400mm example I gave has 4 holes with different hole positions too. You can place a purge valve that slightly works (there's literally a fitting for that too). The main outlet hole is still offset as well. (another example shown below) Any hole you don't want to use? Just buy a g1/4 plug. The benefit of using this PC cooling reservoir is the amount of fittings they have that can work for your needs.
For my setup, I ended up using a $3 dollar plastic garden hose splitter that has 3/4" GHT (garden hose thread) that was two valves on it (best of both worlds). I also bought the appropriate barbs to fit into it (so hosing can attach). Because I wanted to put this is my AquaForestAquarium Archaea cabinet, everything is packed really tight. Would be nicer if tubing had more room to move and didn't kink as easily. Just a tradeoff so you see I had to use elbow barbs and keep some tubing real short.
My fittings right now are brass but I found one seller on ebay (shipped from China) that has G 1/4" male thread to 5/8" barb in STAINLESS STEEL. However, it is BSPT (british standard pipe thread) so this one tapers inwards and will probably need teflon/very tight twist to seal with the o-ring. BSPT fitting can go into a BSPP threaded hole, but BSPP cannot go into BSPT. Someone correct me if I'm wrong about that, but I'm fairly certain that is the case.
If you've read to this point, I think this should be enough to understand what you can do with this PC cooling reservoir. It has limitations size wise and a need for a bypass if you don't want to slow the flow on your tank too much (depending on your filter), but it really is a nice cheap option that we can use for our hobby.
Please correct or question me anywhere!!!
--------------------------------------------
Just links to what I bought for anyone curious. I hope links are allowed. I don't have any commission to these. Just purely for info on what I have.
Amazon.com: uxcell G1/4 Inner Hex Head Pipe Fitting Plug, Universal 304 Stainless Steel Thread Socket Plug with Green O-Ring for Terminate Pipe Ends or Replacement Drains : Industrial & Scientific
Amazon.com: uxcell G1/4 Inner Hex Head Pipe Fitting Plug, Universal 304 Stainless Steel Thread Socket Plug with Green O-Ring for Terminate Pipe Ends or Replacement Drains : Industrial & Scientific
a.co
You can buy these for cheaper on AliExpress. I just didn't want to wait and paid a little more for the items. They're from the same supplier, but I also recommend finding a higher quality brand. The one I have is 50mm outer diameter. I think companies like Freezemod have higher quality ones, and they might be 60mm. Do your own research on this, I didn't do enough on this side.
Some other hard to find accessories:
- If you're trying to replace inlet cap, make sure the cap you find works. Here's one I found for 50mm diameter:
AGZ Alphacool Cape Coolplex Base POM 3 Bar EOL
Alphacool accessories and spare parts! The original accessories for your water cooling directly from the manufacturer!
AGZ Alphacool Ice Cream Cup Acrylic Tube 60x205mm
Alphacool accessories and spare parts! The original accessories for your water cooling directly from the manufacturer!
I also mentioned not wanting to have to drill anything. You might wonder how to attach those brackets without doing so. I bought adhesive stickers with screw ports from AliExpress, and used screws/washers that came with the reservoir:
Can probably get on Amazon as well. The adhesive first, then stack 3 washers next, bracket next, thread the screw through the bracket hole -> washers -> adhesive screw port.
-------------------------------
Random thought:
I found this one singular option that I've not tested. It looks so similar to the internal bypass option that yugang himself devised. (a prebuilt option at least) It's slotted but to be honest, I don't know if it would work well. If you search for aluminum pc water cooling reservoir, you will find this. Only comes in one size unfortunately. Again, I have NOT tested this.


17 replies
·
674 views
