
Welcome to ScapeCrunch
We are ScapeCrunch, the place where planted aquarium hobbyists come to build relationships and support each other. When you're tired of doom scrolling, you've found your home here.
Social Feed

AquaGirls
I'm back with another new setup! Well, sort of new. I ran out of space in my 20g long farm tank, to the point that I had bucephalandra suction cupped to the tank walls. Not only that, but the buce wasn't as happy as it should have been with inert sand, as I felt it isn't fast enough in regards to nutrient absorption that it was able to take what it needed just from the water column.
The buce that I keep are all rare collectors species as well, which really benefit from a more acidic environment to reach their full color potential. Taking those things into account, I knew my collection would benefit greatly by swapping over to a tank with aquasoil and RO water.
Here's the details of the setup:
Landen 90p (44 gallon)
36"×18"x18"
Netlea AT5
Netlea soil capped with Samurai Soil
Inline co2 diffuser
Oase Biomaster 350
Current water parameters:
76F
pH of 6.5, gH of 7, kH<1
The lights are currently running 8 hours, though I wish I could afford a PAR meter rental right now. For what it's worth, my Netlea app says my custom setting is at 70 watts. I'm aiming to run this tank at about 100 watts eventually, but since the buce is going to need some time to settle, slow and steady wins the race on this one. I did dark start the Netlea soil for about 2 weeks, using cycled filter media. When I break down the old farm tank, I'll be taking my Fluval canister off and adding it to this new tank and running 2 filters, to keep flow on the moderate end. I also made the decision to run my co2 24/7, to keep things as stable and consistent as possible for the buce. The only inhabitants I'll be keeping in this tank will be some ramshorn snails and my CRS colony.
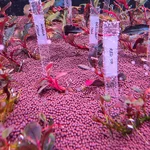
Currently I have a little over 40 rare to incredibly rare species in the tank, though I do have more on the way as you can see, I'm already running low on floor space.
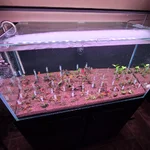
I'm not entirely sure how I feel about the ID stakes I made, truthfully I'm able to ID them by leaf shape and size, but I thought it may make things look more organized. That being said, they're itching my brain in a bad way, so I may end up removing them.
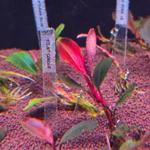
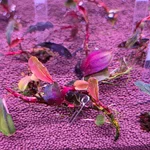
Here's some photos of species that managed to maintain some good color even in a more alkaline setup, so it can only get better from here! I've spent countless hours translating articles and posts in Chinese to figure out what kind of parameters the Chinese collectors use to get their crazy colors and leaf forms, so this will be a very interesting experiment for me!
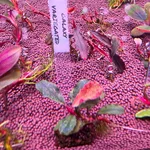
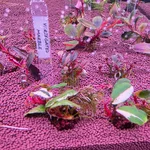
The buce that I keep are all rare collectors species as well, which really benefit from a more acidic environment to reach their full color potential. Taking those things into account, I knew my collection would benefit greatly by swapping over to a tank with aquasoil and RO water.
Here's the details of the setup:
Landen 90p (44 gallon)
36"×18"x18"
Netlea AT5
Netlea soil capped with Samurai Soil
Inline co2 diffuser
Oase Biomaster 350
Current water parameters:
76F
pH of 6.5, gH of 7, kH<1
The lights are currently running 8 hours, though I wish I could afford a PAR meter rental right now. For what it's worth, my Netlea app says my custom setting is at 70 watts. I'm aiming to run this tank at about 100 watts eventually, but since the buce is going to need some time to settle, slow and steady wins the race on this one. I did dark start the Netlea soil for about 2 weeks, using cycled filter media. When I break down the old farm tank, I'll be taking my Fluval canister off and adding it to this new tank and running 2 filters, to keep flow on the moderate end. I also made the decision to run my co2 24/7, to keep things as stable and consistent as possible for the buce. The only inhabitants I'll be keeping in this tank will be some ramshorn snails and my CRS colony.
Currently I have a little over 40 rare to incredibly rare species in the tank, though I do have more on the way
as you can see, I'm already running low on floor space.I'm not entirely sure how I feel about the ID stakes I made, truthfully I'm able to ID them by leaf shape and size, but I thought it may make things look more organized. That being said, they're itching my brain in a bad way, so I may end up removing them.
Here's some photos of species that managed to maintain some good color even in a more alkaline setup, so it can only get better from here! I've spent countless hours translating articles and posts in Chinese to figure out what kind of parameters the Chinese collectors use to get their crazy colors and leaf forms, so this will be a very interesting experiment for me!
27 Replies
·
1704 views


Wrapped up my AGA submittal a few weeks ago, and I just can't seem to bring myself to take care of my tank right now I think I'm experiencing burnout. I go through these cycles where my tank is all I can think about for a few weeks/months, and then I need a break, and I can't bring myself to do my usual water change and trim schedule. The good news is my tank has so much healthy plant mass that algae doesnt grow even after a few weeks of neglect.
Any tips on fighting this tendency? I think my first idea is to slow everything down, lower my nitrate to more of a zero-bound system and try to reduce my stem trimming frequency. My second idea is making my water change easier. Right now the hardest part is siphoning detritus into buckets that I walk to the toilet. After that I pump the tank down the rest of the way. How do you guys do this? I would siphon straight to the toilet but I'm bound to accidently send a shrimp to their doom that way.
I think I'm experiencing burnout. I go through these cycles where my tank is all I can think about for a few weeks/months, and then I need a break, and I can't bring myself to do my usual water change and trim schedule. The good news is my tank has so much healthy plant mass that algae doesnt grow even after a few weeks of neglect.Any tips on fighting this tendency? I think my first idea is to slow everything down, lower my nitrate to more of a zero-bound system and try to reduce my stem trimming frequency. My second idea is making my water change easier. Right now the hardest part is siphoning detritus into buckets that I walk to the toilet. After that I pump the tank down the rest of the way. How do you guys do this? I would siphon straight to the toilet but I'm bound to accidently send a shrimp to their doom that way.
13 Replies
·
124 views

Staff member
I Donated 2026
Founding Member
Hello Welcome, Scapesome
Welcome to ScapeCrunch, @Scapesome!
We would love to get to know you. Please tell us about yourself. What tank do you have?
We would love to get to know you. Please tell us about yourself. What tank do you have?
0 Replies
·
12 views

Rockstar
I mention this plant on occasion, but no one ever comments. So I thought I'd make a post for others and me for future reference.
It is my favorite Erio. It is a darker green, doesn't get too big, and for me it has never sent up any seed stalks.
I find it easy to grow. I have high light but nothing crazy at 124PAR and high CO2, 50+ppm. It gets about max 3-4" and makes side daughter plants when large. I'm not sure my dosing scheme is. Sort of an EI daily dosing kind of thing.
What gets me is every autumn, it starts to melt. I'm not sure how it knows it's autumn with consistent light and a heater, but it must get a little cooler in the tank or something. The plant starts to turn brown and sends up (I'm not sure of the correct term) vegetative stalks with little plantlets on the ends. I've found you can plant these stalks into the substrate with the plantlet on top, and it will grow into a new plant. They've been easy to grow. This is the third year this has happened to me.
Pic of plantlets below. I'll try to get a better one sometime. All I had time for tonight was a crappy phone pic.
This year I divided one of the mother plants in hopes that it wouldn't fully melt and would regrow. That is still in progress.
Anyone else's experiences are welcome.
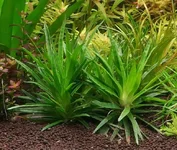
This plant is the same plant as the one on the right above.

It is my favorite Erio. It is a darker green, doesn't get too big, and for me it has never sent up any seed stalks.
I find it easy to grow. I have high light but nothing crazy at 124PAR and high CO2, 50+ppm. It gets about max 3-4" and makes side daughter plants when large. I'm not sure my dosing scheme is. Sort of an EI daily dosing kind of thing.
What gets me is every autumn, it starts to melt. I'm not sure how it knows it's autumn with consistent light and a heater, but it must get a little cooler in the tank or something. The plant starts to turn brown and sends up (I'm not sure of the correct term) vegetative stalks with little plantlets on the ends. I've found you can plant these stalks into the substrate with the plantlet on top, and it will grow into a new plant. They've been easy to grow. This is the third year this has happened to me.
Pic of plantlets below. I'll try to get a better one sometime. All I had time for tonight was a crappy phone pic.
This year I divided one of the mother plants in hopes that it wouldn't fully melt and would regrow. That is still in progress.
Anyone else's experiences are welcome.
This plant is the same plant as the one on the right above.
11 Replies
·
445 views


Got on the tree build kick in past 2 weeks to make somthing I like for 36g freebie build to replace the huge tree turd #2 in there. I got 6 stumps ready today to get built for smaller tanks, 3 done today 3 waiting. Built the larger 17 tall 16 wide tree pics added other day to journal but gonna a build 2-3 more larger trees and the 6 smaller. Sell the ones off on eBay and etsy I don't want.
The larger stump 2nd post pic s 16" tall 15 wide plan to use in future scapes smaller. I've been using Amazon branch packs 15.00 for 25-35 pieces and amazon spiderwood 6-8" 5 for 12.00 for small trees. The large tree I made was a 10.99 piece I tore apart and used the 3 larger branches and built onto them to get the large tree in added pics cost me in end around 22.00 .... I have 10 pieces coming in mail Friday 5 large and 5 medium all spiderwood to make larger trees with this weekend.
Bought a ton of Amazon wood on Amazon lol 2 for 17.00 10-14" so I glued some of them together for larger usable pieces. some came out cool and well worth the 17.00 for the pieces glued together.The 1 has natural plant pots on top. The v shape last 2 pics 12" deep and 16" wide
After literally glueing a finger to a rock today Imao I quit! I ended up used all the accelerator I had anyway so Friday or sat before I can finish my smaller trees. will update as it goes, It will be a forest of trees when its done.
The larger stump 2nd post pic s 16" tall 15 wide plan to use in future scapes smaller. I've been using Amazon branch packs 15.00 for 25-35 pieces and amazon spiderwood 6-8" 5 for 12.00 for small trees. The large tree I made was a 10.99 piece I tore apart and used the 3 larger branches and built onto them to get the large tree in added pics cost me in end around 22.00 .... I have 10 pieces coming in mail Friday 5 large and 5 medium all spiderwood to make larger trees with this weekend.
Bought a ton of Amazon wood on Amazon lol 2 for 17.00 10-14" so I glued some of them together for larger usable pieces. some came out cool and well worth the 17.00 for the pieces glued together.The 1 has natural plant pots on top. The v shape last 2 pics 12" deep and 16" wide
After literally glueing a finger to a rock today Imao I quit! I ended up used all the accelerator I had anyway so Friday or sat before I can finish my smaller trees. will update as it goes, It will be a forest of trees when its done.


18 Replies
·
485 views
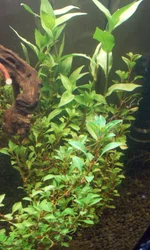
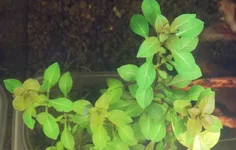
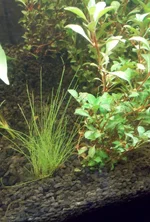
Ludwigia repens, hairgrass "eleocharis palustris" and ludwigia glandulosa all found locally growing emersed beside water and all growing submerged in water. Nice freebys if they survive the transition theres 20,000 stems in this tiny little pond. all clean no bugs put in tank with no fish to be safe will peroxide dip it before moving into other tank. 1 bunch l repens last pic I picked 8 days ago grown 2" and top turning more red with no melt at all. Well see how it goes. All found beside my local Lincoln dealer parking lot lol.
I've got local emersed plants before I know where theres a storm of lemon bacopa and anacharis is. Seems it always melted badly to mush. These plants are growing emersed for a week then submersed for days when water levels go up. Maybe they are more hardy being grown above and below water over and over? They may all melt to turds in weeks lol.
I've got local emersed plants before I know where theres a storm of lemon bacopa and anacharis is. Seems it always melted badly to mush. These plants are growing emersed for a week then submersed for days when water levels go up. Maybe they are more hardy being grown above and below water over and over? They may all melt to turds in weeks lol.
9 Replies
·
472 views


Supporting
I Donated 2026
AquaGirls
I follow several of my native Brit aquascapers, and Fish Shop Matt dropped this announcement via my Youtube feed yesterday, so just thought I would put it out there for those that haven't seen it. Apparently designed for tanks up to 40 gallons, and there has certainly been a void in Oase's Biomaster lineup for smaller tanks. Not sure when it will be available in the US. I do get hits on the Oase website, but no actual product availability yet, so I presume coming soon? Interesting, though, especially for those trying to save space in tight spaces with the prefilter and heater built in. Or just wanting something easier to open and maintain than the Filtosmarts, and more powerful than a small HOB. Of course my questions would be flow, and noise? We'll see.
2 Replies
·
56 views
Staff member
I Donated 2026
Founding Member
This is the future home for the announcements when someone obtains an achievement badge. Let the games begin!
2051 Replies
·
76532 views
Supporting
I Donated 2026
AquaGirls
Tank: ADA 60F (60 cm x 30 cm x 25 cm) - 10.8 gallons
Lighting: Chihiros WRGB II Slim
Hardscape: Sensei Stone (Magura sandstone, with quartz and feldspar). GH, KH, pH neutral
Substrate: Crushed lava stone (to support hardscape), AF Lava Soil, and maybe Controsoil Extra fine? Still deciding
Filter: Oase Filtosmart 100 with Jardli 12/16 glass lily pipes (modified intake for shrimp)
CO2: GLA GRO Cartridge (once it is in stock)
Primary plants:
Livestock: Neocaridina Ocean Blue; maybe +/- a few Least Rasbora (Boraras urophthalmoides)
Still in the idea/planning stage of this tank. For a challenge I am pushing myself outside of my own comfort zone here, so this will be entirely new territory for me. Modern Iwagumi/diorama is not something I thought I would want to try, but my interest has grown in recent months, so why not give it a try? It will work, or it won’t. If it doesn’t work it’s always an excuse to rescape.
I have an ADA 60F tank sitting on my kitchen counter.
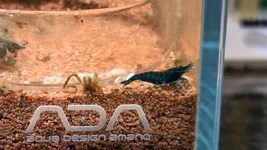
It was the first tank I purchased when I dunked my toes back into the hobby last year, that I scaped with some Ancient stone and driftwood for a few shrimp.
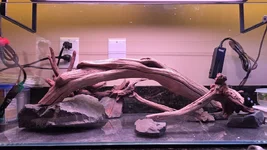
Once it was planted I quickly got in over my head on too many stems in the back, and moss growing too well on the rocks to maintain in a short, cramped space, and had some persistent CO2 related algae courtesy of a drifting needle valve. Thinking about rescaping the tank I had started to tear it down last week, removing most of the stems, and then found myself needing a temporary grow-out tank for some minnow fry, so the tank won’t be fully torn down and scaped for a few more weeks yet, but that gives me time to play around.
So, with an eye toward some sort of modern Iwagumi/diorama, I needed some hardscape. Without the luxury of walking into a store that caters to aquascapers, I am usually stuck with buying hardscape sight unseen. Rather than have a plan, and then try to find the materials, I ordered some rock to see what I would end up with, and let the hardscape inspire me.
Enter 55 lbs of Sensei stone in assorted shapes and sizes.
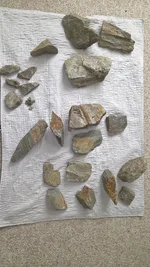
Why Sensei stone? I didn’t want to use Seiryu. It’s beautiful, easy to work with, and readily available, but I really needed this rock to be inert. Something in this tank’s original build sent GH and KH through the roof, and it had to be either the Controsand, or the or the ‘Ancient stone’ or both. I should have tested it in water first, and I learned that lesson the hard way. The 60F is a small and shallow tank, and shrimp loathe parameter swings, so this time I want to be able to control the water parameters a little more easily (especially the Ca/Mg ratios), so I am starting with inert rocks. Also, in case I wasn’t thrilled with the stones sent to me, I still wanted rocks that were easy to break into usable pieces, so no Hakkai stone this time. I did consider Frodo stone, but would like to use that in at least a 90P. So, hammer and cold chisel at the ready, Sensei turns out to have been a good choice.
The majority of the rocks were interesting either in color or texture, and reasonable in scale for a tank this size.
I did a quick speed-scape on Saturday afternoon with the majority of the larger stones, more for fit, and quickly ruled out some particularly chonky rocks. Thankfully, I saved the lid from the 60F tank when I ordered it, so it is currently my temporary dojo for now. I seriously need to build a real one, it is difficult to get much height in a cardboard lid!
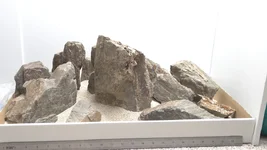
My phone doesn't do it justice here, but Sensei has some interesting character, with neutral greys, and warmer tones that run throughout the rock due to insoluble iron deposits. I think it’s pretty flexible in that it is easy to pair with a variety of sands or soils quite easily. I could use something like WIO Rocket sand to bring out the greys, or Colorado sand to accentuate the warm reddish brown tones. For playing around purposes I just opened an extra bag of La Plata from the 150 build.
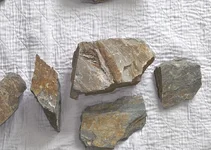
Not the all stone was well suited for use in a tank this size, though. That large stone center top in the image above is at least as thick as it is wide, and WAY too beefy and blocky to be useful, even if this was a 90P. Too many like that, and there would be no need for plants at all. It’s always difficult wanting to smash something you just purchased, but this morning I took a deep breath, and unleashed a hammer and cold chisel (honestly just the hammer works pretty darned well with with the strata in this stone) to see what I would end up with. Worse case scenario, I will end up with some accent gravel, because Sensei is difficult to match in color and texture with the accent gravels I have see out there.
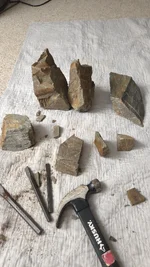
What do you know…smashing it worked pretty well, and I much prefer the shards that I broke off that blocky rock. Much more pointy potential there. There are a couple of other odd shaped stones I would be willing to resculpt into a more useable shape, too. It is actually quite fun bashing rocks with a hammer first thing on a Monday morning. I am now looking forward to playing around some more with these rocks, and seeing if I can up the drama a bit. We’ll see what I ultimately end up with. I don’t think the shrimp will mind too much regardless.
Lighting: Chihiros WRGB II Slim
Hardscape: Sensei Stone (Magura sandstone, with quartz and feldspar). GH, KH, pH neutral
Substrate: Crushed lava stone (to support hardscape), AF Lava Soil, and maybe Controsoil Extra fine? Still deciding
Filter: Oase Filtosmart 100 with Jardli 12/16 glass lily pipes (modified intake for shrimp)
CO2: GLA GRO Cartridge (once it is in stock)
Primary plants:
- Eleocharis pusilla
- Micranthemum tweedii ‘Monte Carlo’
- Hemianthus callitrichoides (HC) 'Cuba
- Staurogyne repens
- Gratiola viscidula
- Riccardia Chamedryfolia
- +/- Myriophyllum guyana
Livestock: Neocaridina Ocean Blue; maybe +/- a few Least Rasbora (Boraras urophthalmoides)
Still in the idea/planning stage of this tank. For a challenge I am pushing myself outside of my own comfort zone here, so this will be entirely new territory for me. Modern Iwagumi/diorama is not something I thought I would want to try, but my interest has grown in recent months, so why not give it a try? It will work, or it won’t. If it doesn’t work it’s always an excuse to rescape.
I have an ADA 60F tank sitting on my kitchen counter.
It was the first tank I purchased when I dunked my toes back into the hobby last year, that I scaped with some Ancient stone and driftwood for a few shrimp.
Once it was planted I quickly got in over my head on too many stems in the back, and moss growing too well on the rocks to maintain in a short, cramped space, and had some persistent CO2 related algae courtesy of a drifting needle valve. Thinking about rescaping the tank I had started to tear it down last week, removing most of the stems, and then found myself needing a temporary grow-out tank for some minnow fry, so the tank won’t be fully torn down and scaped for a few more weeks yet, but that gives me time to play around.
So, with an eye toward some sort of modern Iwagumi/diorama, I needed some hardscape. Without the luxury of walking into a store that caters to aquascapers, I am usually stuck with buying hardscape sight unseen. Rather than have a plan, and then try to find the materials, I ordered some rock to see what I would end up with, and let the hardscape inspire me.
Enter 55 lbs of Sensei stone in assorted shapes and sizes.
Why Sensei stone? I didn’t want to use Seiryu. It’s beautiful, easy to work with, and readily available, but I really needed this rock to be inert. Something in this tank’s original build sent GH and KH through the roof, and it had to be either the Controsand, or the or the ‘Ancient stone’ or both. I should have tested it in water first, and I learned that lesson the hard way. The 60F is a small and shallow tank, and shrimp loathe parameter swings, so this time I want to be able to control the water parameters a little more easily (especially the Ca/Mg ratios), so I am starting with inert rocks. Also, in case I wasn’t thrilled with the stones sent to me, I still wanted rocks that were easy to break into usable pieces, so no Hakkai stone this time. I did consider Frodo stone, but would like to use that in at least a 90P. So, hammer and cold chisel at the ready, Sensei turns out to have been a good choice.
The majority of the rocks were interesting either in color or texture, and reasonable in scale for a tank this size.
I did a quick speed-scape on Saturday afternoon with the majority of the larger stones, more for fit, and quickly ruled out some particularly chonky rocks. Thankfully, I saved the lid from the 60F tank when I ordered it, so it is currently my temporary dojo for now. I seriously need to build a real one, it is difficult to get much height in a cardboard lid!
My phone doesn't do it justice here, but Sensei has some interesting character, with neutral greys, and warmer tones that run throughout the rock due to insoluble iron deposits. I think it’s pretty flexible in that it is easy to pair with a variety of sands or soils quite easily. I could use something like WIO Rocket sand to bring out the greys, or Colorado sand to accentuate the warm reddish brown tones. For playing around purposes I just opened an extra bag of La Plata from the 150 build.
Not the all stone was well suited for use in a tank this size, though. That large stone center top in the image above is at least as thick as it is wide, and WAY too beefy and blocky to be useful, even if this was a 90P. Too many like that, and there would be no need for plants at all. It’s always difficult wanting to smash something you just purchased, but this morning I took a deep breath, and unleashed a hammer and cold chisel (honestly just the hammer works pretty darned well with with the strata in this stone) to see what I would end up with. Worse case scenario, I will end up with some accent gravel, because Sensei is difficult to match in color and texture with the accent gravels I have see out there.
What do you know…smashing it worked pretty well, and I much prefer the shards that I broke off that blocky rock. Much more pointy potential there. There are a couple of other odd shaped stones I would be willing to resculpt into a more useable shape, too. It is actually quite fun bashing rocks with a hammer first thing on a Monday morning. I am now looking forward to playing around some more with these rocks, and seeing if I can up the drama a bit. We’ll see what I ultimately end up with. I don’t think the shrimp will mind too much regardless.
18 Replies
·
1100 views

I have read an awful lot of warnings and conjectures by people. And “I used bdbs and a shrimp died so I got rid of it…”…
My personal experience with the product has been uneventful.
I have put rare earth magnets through a quart sample with no hint of any attraction and then washed it with no hint of oil slick or dustiness and then added the rest of the bag to a new aquarium with no treatment, no ill effect…
I have probably employed 7 bags by now with no hint of a problem. Dozens of corys sifting through the stuff as well as khuli loaches and yoyo loaches…. No hint of problems with them…
Other than it self leveling itself and being totally incapable of holding a slopeI love the stuff. The black always looks great. It costs about 1/4 aquarium specific substrates. I really haventexperienced anything negative about it…
I know it is popular here…. Has anybody here had bad experiences with it?
My personal experience with the product has been uneventful.
I have put rare earth magnets through a quart sample with no hint of any attraction and then washed it with no hint of oil slick or dustiness and then added the rest of the bag to a new aquarium with no treatment, no ill effect…
I have probably employed 7 bags by now with no hint of a problem. Dozens of corys sifting through the stuff as well as khuli loaches and yoyo loaches…. No hint of problems with them…
Other than it self leveling itself and being totally incapable of holding a slopeI love the stuff. The black always looks great. It costs about 1/4 aquarium specific substrates. I really haventexperienced anything negative about it…
I know it is popular here…. Has anybody here had bad experiences with it?
17 Replies
·
583 views

Supporting
I Donated 2026
Rockstar
Article Contributor
See this post regarding AR Mini trimming/planting, and this post regarding Cyperus helferi trimming and planting!
I have hardly seen this subject talked about enough, but I think that it's one of the biggest reasons contributing to beginner's algae-filled downfalls! If you're buying plants from big stores like Aquarium Plants Factory (really good btw), Buceplant, etc. 90% of the plants you are receiving are terrestrially-grown.
Here's an important fact about terrestrially-grown aquarium plants
100% of all terrestrial leaves, when submerged under water, for any plant, will eventually get algae and die.
Some can take a while (anubias, java fern, cyperus helferi), while others will either melt (Crypts) or quickly get algae (AR Mini, Staurogyne repens, stem plants, etc)
But what about buying submerged-growth plants? From hobbyists, or BurrAqua, for example?
There is still a chance that your tank's conditions are different enough that many, if not most leaves you plant, will melt/die/attract algae.
How do we fix this? By leaving only enough leaves for the plant to continue to absorb light and put out new growth. Usually the top 4-6 leaves for stem plants.
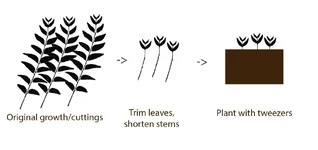
It's a lot of work up front, but you will MAJORLY reduce the amount of waste, DOC 's, and algae-inducing scenarios if you trim your plants before planting.
I've done this in ALL of my tanks in the last 4 years with great success.
The easiest way to do this is with stainless squeeze scissors over your sink:
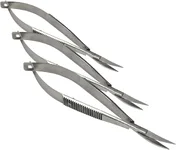
Here's the ones I recommend.
Yes, it takes a ton of patience. But if it could make a big difference in preventing the 2-3 month algae bloom in your tank, would you do it?
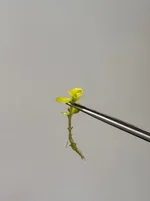
Lysimachia nummularia 'Aurea', only a few top leaves left, 3" of stem.
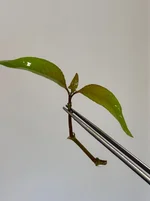
Hygrophila corymbosa. Note how I left the leaf nodes on the stem? That's where roots will grow from. Almost all stem plants need nodes to grow roots, even if you've removed the leaves from them.
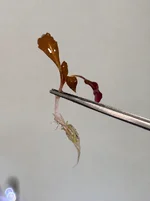
Terrestrially-grown AR 'Mini' from APF. See how I did the same in this thread for my previous tanks.
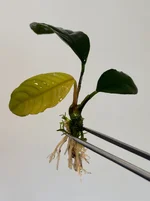
This Anubias barteri var. coffeefolia was grown terrestrially (often called 'emersed' or emergent) in a greenhouse. I removed all but the newest 3 leaves, and trimmed the roots too. Terrestrial roots are quite different from submerged with certain plants.
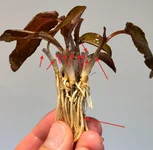
Almost ALL Cryptocoryne species are grown terrestrially. These plants grow as a Rosette, where the inner-most leaves on the "stem" are the freshest, and the outer-most are the oldest. I removed a TON of old terrestrial leaves, leaving just enough for the plant to be able to grow new submerged leaves in my tank as quickly as possible, while leaving as few algae-attracting terrestrial leaves as possible. I also trimmed the roots, which were 5" long upon receiving the plant.

Lobelia cardinalis 'mini'
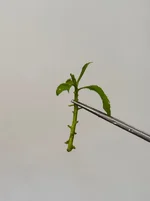
Penthorum sedoides. Would also look very similar for Staurogyne repens, too.
Did you know that Blyxa japonica is actually a stem plant? It looks like a rosette, but it's actually a squat, wide stem plant. The lowest/outermost leaves are the oldest, and even though this is a true aquatic plant with no terrestrial form in nature, I know that it likes to throw a fit and melt a good portion of it's oldest leaves when transitioning to my tank's conditions. Here's what it looked like when I received it from @Burr740:

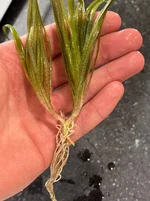
Nice and trimmed up. Less problematic at the 1-2 month mark in the tank's development, I know it!
What about delicate/feather plants?
They're super annoying to prep. I still only keep the top 3-4" max.
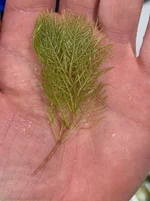
With Myriophyllum mattogrossense 'Golden', I only keep a few inches and still try to remove some of the lower leaves that would otherwise just rot by being buried in my inert sand.

What about Myriophyllum sp. "Roraima"? F*ck that. Nightmare to trim lower leaves, just trim it to 3" (not pictured) and discard the bottom when planting.
Curious what you guys think! I know I could receive plenty of "I've never done this, my tank has been fine" but I'd recommend trying it first before having a strong opinion of it
By the way, all plants pictured were actually used in my upcoming 120cm Showcase tank:
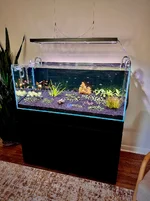
I have hardly seen this subject talked about enough, but I think that it's one of the biggest reasons contributing to beginner's algae-filled downfalls! If you're buying plants from big stores like Aquarium Plants Factory (really good btw), Buceplant, etc. 90% of the plants you are receiving are terrestrially-grown.
Here's an important fact about terrestrially-grown aquarium plants
100% of all terrestrial leaves, when submerged under water, for any plant, will eventually get algae and die.
Some can take a while (anubias, java fern, cyperus helferi), while others will either melt (Crypts) or quickly get algae (AR Mini, Staurogyne repens, stem plants, etc)
But what about buying submerged-growth plants? From hobbyists, or BurrAqua, for example?
There is still a chance that your tank's conditions are different enough that many, if not most leaves you plant, will melt/die/attract algae.
How do we fix this? By leaving only enough leaves for the plant to continue to absorb light and put out new growth. Usually the top 4-6 leaves for stem plants.
It's a lot of work up front, but you will MAJORLY reduce the amount of waste, DOC 's, and algae-inducing scenarios if you trim your plants before planting.
I've done this in ALL of my tanks in the last 4 years with great success.
The easiest way to do this is with stainless squeeze scissors over your sink:
Here's the ones I recommend.
Yes, it takes a ton of patience. But if it could make a big difference in preventing the 2-3 month algae bloom in your tank, would you do it?
Here are some specific plant examples:
For most true stem plants, I like to leave 3-4" of stem, trimming roots if necessary, and leaving only 4-6 of the freshest leaves. More than that, they will eventually be algae magnets. Less than that (like 2 leaves only) they might not survive the shock.Lysimachia nummularia 'Aurea', only a few top leaves left, 3" of stem.
Hygrophila corymbosa. Note how I left the leaf nodes on the stem? That's where roots will grow from. Almost all stem plants need nodes to grow roots, even if you've removed the leaves from them.
Terrestrially-grown AR 'Mini' from APF. See how I did the same in this thread for my previous tanks.
This Anubias barteri var. coffeefolia was grown terrestrially (often called 'emersed' or emergent) in a greenhouse. I removed all but the newest 3 leaves, and trimmed the roots too. Terrestrial roots are quite different from submerged with certain plants.
Almost ALL Cryptocoryne species are grown terrestrially. These plants grow as a Rosette, where the inner-most leaves on the "stem" are the freshest, and the outer-most are the oldest. I removed a TON of old terrestrial leaves, leaving just enough for the plant to be able to grow new submerged leaves in my tank as quickly as possible, while leaving as few algae-attracting terrestrial leaves as possible. I also trimmed the roots, which were 5" long upon receiving the plant.
Lobelia cardinalis 'mini'
Penthorum sedoides. Would also look very similar for Staurogyne repens, too.
Did you know that Blyxa japonica is actually a stem plant? It looks like a rosette, but it's actually a squat, wide stem plant. The lowest/outermost leaves are the oldest, and even though this is a true aquatic plant with no terrestrial form in nature, I know that it likes to throw a fit and melt a good portion of it's oldest leaves when transitioning to my tank's conditions. Here's what it looked like when I received it from @Burr740:
Nice and trimmed up. Less problematic at the 1-2 month mark in the tank's development, I know it!
What about delicate/feather plants?
They're super annoying to prep. I still only keep the top 3-4" max.
With Myriophyllum mattogrossense 'Golden', I only keep a few inches and still try to remove some of the lower leaves that would otherwise just rot by being buried in my inert sand.
What about Myriophyllum sp. "Roraima"? F*ck that. Nightmare to trim lower leaves, just trim it to 3" (not pictured) and discard the bottom when planting.
Curious what you guys think! I know I could receive plenty of "I've never done this, my tank has been fine" but I'd recommend trying it first before having a strong opinion of it
By the way, all plants pictured were actually used in my upcoming 120cm Showcase tank:
22 Replies
·
1526 views
