
Welcome to ScapeCrunch
We are ScapeCrunch, the place where planted aquarium hobbyists come to build relationships and support each other. When you're tired of doom scrolling, you've found your home here.
Social Feed

I Donated 2026
Journal 80cm (32”) collectoritis tank
I have rarely kept journals for my tanks, mostly because I tend to not think about it until it’s too late. I have missed the jump on this one too, but as it has only been running for 2-3 months now I think it’s newish enough to start a journal.
Tank:
80cm x 45cm x 40cm (32” x 18” x 16”)
About 130L of water, or 34 US gallons.
I upgraded from a 60L tank that had been running for about 7 years, fairly steadily. I have always enjoyed smaller tanks and so kept this upgrade fairly modest.
Here is a picture of the tank as it is today:


As you can see, I suffer from collectoritis, and have definitely prioritised lots of plant species over ‘scaping’. One of the joys for me in this hobby is growing lots of different plants, so I tend to end up with jungles with many different stems.
The tank is just beginning to stabilise now, with the fresh soil finally not messing around with the water parameters so violently.
I use remineralised RO water cut slightly with tap water at the moment, as I find that ‘matures’ the soil faster in the beginning of a tank.
Below is the running sheet for this tank, which gives a good idea of the water parameters.

Tank:
80cm x 45cm x 40cm (32” x 18” x 16”)
About 130L of water, or 34 US gallons.
I upgraded from a 60L tank that had been running for about 7 years, fairly steadily. I have always enjoyed smaller tanks and so kept this upgrade fairly modest.
Here is a picture of the tank as it is today:
As you can see, I suffer from collectoritis, and have definitely prioritised lots of plant species over ‘scaping’. One of the joys for me in this hobby is growing lots of different plants, so I tend to end up with jungles with many different stems.
The tank is just beginning to stabilise now, with the fresh soil finally not messing around with the water parameters so violently.
I use remineralised RO water cut slightly with tap water at the moment, as I find that ‘matures’ the soil faster in the beginning of a tank.
Below is the running sheet for this tank, which gives a good idea of the water parameters.
66 Replies
·
5139 views


Journal Quantum Entanglement
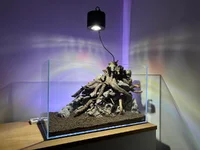
My new scape. It’s been a while. I’ve been busy finishing my novel. It’s published now so back to scaping.
It’s a classic triangular scape and I’m calling it Quantum Entanglement. It’s a working title, so I might change that. Sorry mods.
The real star is the light. Off Amazon for around $130. Fully controllable with a remote. Great value. https://amzn.eu/d/0eRX5eCo
I want to plant it with mainly buces and small anubias spp. on the rocks and wood and MC carpet, with some crypt nevellii or C. X Willisii, and stauro in the shady parts and maybe a ludwigia mini super red highlight behind the last rock on the left.
It’s a classic triangular scape and I’m calling it Quantum Entanglement. It’s a working title, so I might change that. Sorry mods.
The real star is the light. Off Amazon for around $130. Fully controllable with a remote. Great value. https://amzn.eu/d/0eRX5eCo
I want to plant it with mainly buces and small anubias spp. on the rocks and wood and MC carpet, with some crypt nevellii or C. X Willisii, and stauro in the shady parts and maybe a ludwigia mini super red highlight behind the last rock on the left.
12 Replies
·
198 views

Supporting
I Donated 2026
Rockstar
I hadn't seen it mentioned by others that attended Aquashella, but if you hadn't already heard about it or seen it in Aquashella videos, ADA has come out with Amazonia Pro. It's not a replacement for Version 2, but an addition. It is essentially Version 2 on steroids with higher nutrients and of course the negative side effect of potentially higher initial ammonia leaching and, if your not prepared and skilled, more chance of algae. That's even from the mouth of Homma-san himself. The scaping competitors were using it in the competition and AFA was selling 9l bags at the show. They said it would be available on the website within the next couple weeks.
39 Replies
·
885 views
I have read an awful lot of warnings and conjectures by people. And “I used bdbs and a shrimp died so I got rid of it…”…
My personal experience with the product has been uneventful.
I have put rare earth magnets through a quart sample with no hint of any attraction and then washed it with no hint of oil slick or dustiness and then added the rest of the bag to a new aquarium with no treatment, no ill effect…
I have probably employed 7 bags by now with no hint of a problem. Dozens of corys sifting through the stuff as well as khuli loaches and yoyo loaches…. No hint of problems with them…
Other than it self leveling itself and being totally incapable of holding a slopeI love the stuff. The black always looks great. It costs about 1/4 aquarium specific substrates. I really haventexperienced anything negative about it…
I know it is popular here…. Has anybody here had bad experiences with it?
My personal experience with the product has been uneventful.
I have put rare earth magnets through a quart sample with no hint of any attraction and then washed it with no hint of oil slick or dustiness and then added the rest of the bag to a new aquarium with no treatment, no ill effect…
I have probably employed 7 bags by now with no hint of a problem. Dozens of corys sifting through the stuff as well as khuli loaches and yoyo loaches…. No hint of problems with them…
Other than it self leveling itself and being totally incapable of holding a slopeI love the stuff. The black always looks great. It costs about 1/4 aquarium specific substrates. I really haventexperienced anything negative about it…
I know it is popular here…. Has anybody here had bad experiences with it?
12 Replies
·
242 views

Rockstar
Journal 22 gallon long bookshelf
Time to start a new thread.
I’ll fill in some details later, but I’m working on the hardscape now. Any and all criticism is appreciated. The vision is nothing more, and nothing less, than something appealing to the eye.
90cm x 30cm x 30cm Lifegard Aquatics ultra clear bookshelf tank. Buce and anubias on the hardscape, stems towards the back and center, mid to front carpet with some changes in shade and texture down to a flat grade on the right side of the tank.
Lily pipe inlet and skimmer will be in the back left corner with the outflow in the front left to hopefully achieve circular flow. I’ll be running an in-line diffuser. Light will be the P600 Pro that I regrettably did not upside to 900. Oh well. I’ll mount it high and hopefully it’ll have enough spread.
I have some dragon stone and red lava rock rubble I’ll use at the base to blend into the substrate, as well as some stratum I may or may not cap with.


I’ll fill in some details later, but I’m working on the hardscape now. Any and all criticism is appreciated. The vision is nothing more, and nothing less, than something appealing to the eye.
90cm x 30cm x 30cm Lifegard Aquatics ultra clear bookshelf tank. Buce and anubias on the hardscape, stems towards the back and center, mid to front carpet with some changes in shade and texture down to a flat grade on the right side of the tank.
Lily pipe inlet and skimmer will be in the back left corner with the outflow in the front left to hopefully achieve circular flow. I’ll be running an in-line diffuser. Light will be the P600 Pro that I regrettably did not upside to 900. Oh well. I’ll mount it high and hopefully it’ll have enough spread.
I have some dragon stone and red lava rock rubble I’ll use at the base to blend into the substrate, as well as some stratum I may or may not cap with.
298 Replies
·
33356 views

In my never ending quest to piddle around, I have been looking at setting up a nano eco tank/bowl with minimum maintenance. The main issue I have is controlling the temp. The temps in my house fluctuate between 68 - 71 degree regularly and can drop to lower 60s a few weeks in the fall and spring when we do not have the heater on.
Has anyone thought about or had success using an animal heating pad under the bowl/tank? While most are designed for reptiles and regulate between 100-120F, there are some for more mixed use that can be controlled from 68F and up. I don't think this would be too hard to set up. Could be to keep the inside of the tank clear of equipment. Radiant floor heating for your shrimp/fish.
Heating Pad
Has anyone thought about or had success using an animal heating pad under the bowl/tank? While most are designed for reptiles and regulate between 100-120F, there are some for more mixed use that can be controlled from 68F and up. I don't think this would be too hard to set up. Could be to keep the inside of the tank clear of equipment. Radiant floor heating for your shrimp/fish.
Heating Pad
5 Replies
·
82 views

Staff member
Supporting
Founding Member
Expert in Residence
MOTM Winner
Rockstar
As some people may know I had a long running journal on another forum. Glad to see Art get this new site started. A fresh beginning and loads of possibilities ahead. I'll be updating with thoughts here but for today just wanted to share my latest tank pics.


353 Replies
·
64334 views

Supporting
I Donated 2026
Rockstar
Article Contributor
Like my no-tech bowl scaping thread where I have a list of inspiring bowl scapers, I thought it would be awesome to do the same with a Dutch-inspired / True Dutch thread! I have a ton, but I'll post them over time. If anyone else finds good examples of dutch tanks, post them here, too!
First up:
I translated the transcript and got as much info as I could. Here's the things I find interesting:
50% WC weekly
He front-load doses the incoming fresh water volume to:
If you were to look at it through full-volume dosing lens, it's:
Micros are dosed 3x per week, but nothing specific provided. Probably ~0.3-0.5ppm/week? He does say the iron is all gone/undetectable by the evening.
Beautiful tank! I love the balance of colors, textures, and plant groupings. That tiger lily is amazing. Very little algae, too!
First up:
I translated the transcript and got as much info as I could. Here's the things I find interesting:
50% WC weekly
He front-load doses the incoming fresh water volume to:
- NO3: ~30 ppm
- PO4: ~4.2 ppm
- K: ~34 ppm
- Mg: ~3.4 ppm
If you were to look at it through full-volume dosing lens, it's:
- NO3: ~15 ppm
- PO4: ~2.1 ppm
- K: ~17 ppm
- Mg: ~1.7 ppm
Micros are dosed 3x per week, but nothing specific provided. Probably ~0.3-0.5ppm/week? He does say the iron is all gone/undetectable by the evening.
Beautiful tank! I love the balance of colors, textures, and plant groupings. That tiger lily is amazing. Very little algae, too!
13 Replies
·
827 views


Staff member
I Donated 2026
Founding Member
Hello Welcome, tṛtīyāya
Welcome to ScapeCrunch, @tṛtīyāya!
We would love to get to know you. Please tell us about yourself. What tank do you have?
We would love to get to know you. Please tell us about yourself. What tank do you have?
0 Replies
·
13 views
I understand that the process of aquasoil neutralizing kh is basically it turning it into co2 through chemical reactions.
However, in practice it just seems to raise the ph if the soil if the ph buffering capacity is exhausted?
If I pre-acidify RO water with HCL the aquasoil seems to raise the ph back up to around where it normally is after a day or 2.
However, in practice it just seems to raise the ph if the soil if the ph buffering capacity is exhausted?
If I pre-acidify RO water with HCL the aquasoil seems to raise the ph back up to around where it normally is after a day or 2.
1 Replies
·
105 views
Staff member
I Donated 2026
Founding Member
Hello Welcome, Forest Alex
Welcome to ScapeCrunch, @Forest Alex!
We would love to get to know you. Please tell us about yourself. What tank do you have?
We would love to get to know you. Please tell us about yourself. What tank do you have?
0 Replies
·
20 views