
Welcome to ScapeCrunch
We are ScapeCrunch, the place where planted aquarium hobbyists come to build relationships and support each other. When you're tired of doom scrolling, you've found your home here.
Social Feed

About me:
I've been keeping planted aquariums and shrimp breeding tanks for almost a decade and for the majority of that time aquariums were my primary hobby. In 2021 I had ~30 tanks running simultaneously containing almost 200 types of plants that I had collected over a 5 year period and more than a dozen types of shrimp. In this time, it was harder for me to not setup new tanks than it was to grow any aquatic plant sent my way. Below are some of the tanks I've kept over the years.


At the end of 2021 I moved from Texas to Massachusetts and gave away all of my plants, tanks, and shrimp to friends I had made over the years. It took some time to find a permanent place to live so I didn't have any tanks until I was unexpectedly given an ADA 120P in summer of 2023.
The early days of the 120P:
I went through the typical tank start growing pains with a diatoms phase, green hair algae, and every other issue one would expect from a new tank. Even with the new tank difficulties, it only took me 2 months to get to a healthy tank again. For the next 1.5 years, everything went smoothly and the tank went through many iterations.

Setup on June 28th

Diatoms outbreak on July 19th

Green hair algae outbreak by August 18th

Everything was cleaned up and growing great by September 1st
The start of the disaster:
In February 2025, I started running into issues. BBA started growing in small tufts on the substrate and green hair algae started attacking the old growth on the plants. I'd run into this issue in the past and was usually able to fix it pretty quickly by dialing in the CO2, cleaning the substrate, cleaning filters, and replanting only the most healthy tops of the plants. Even after doing this multiple times, I haven't had any luck fixing the algae. It always comes back


The start of the algae

Multiple trim and replant cycles along with some new plants

Relatively clean after a trim and replant cycle

10 days later
Where I am today:
I'm getting so frustrated by the persistent issues that I'm about ready to shut down this tank. As a last ditch effort, I purchased a pack of healthy plants from Burr740 to see if healthy plants can help me get through the algae phase and get back into a good place.

The tank as of January 2nd 2026. The healthiest plants in the tank were received earlier this week from Burr740.

Really poor color on my plants with a lot of green algae on the lower leaves. The nice looking bacopa is from Burr740. The original stems of Bacopa have barely grown in the last month. If I pull them up, there are very few roots.

Another example of the old growth issues. The Limnophila mini vietnam also has not grown at all in the last month. Lots of algae grows on the substrate as well.

Another comparison of Burr's Ludwigia sp. red vs mine. Very slow growth and poor rooting.

Really weak older growth on Rotala sp. singapore and poor coloration compared to Burr's plants. This plant has always been very easy for me to keep and this is part of why I'm thinking there is something big that I'm missing. Didiplis diandra is another easy plant that keeps melting at the base and its making very little progress because of this.
Below is the key information about the tank.
Tank size: ADA 120P (120 cm x 45 cm x 45 cm)
Lighting: 3x NiloCG Prizms ran at the lowest setting for each channel. Lights are on for 7 hours a day. I want to increase the lighting, but any time I do the algae gets significantly worse
Filtration: Oase Biomaster 600 and a SunSun HW-303B. There's a spraybar on the bottom left that points along the length of the tank at substrate level and the other output is on the top right corner of the tank pushing the opposite direction.
CO2: Vertical reactor on the SunSun filter and a Sera reactor on the Oase. CO2 comes on 4 hours before lights on and turns off 1 hr before lights off. Drop checker is yellow when lights turn on. The pH drop is ~1.4-1.5 at lights on (5.8 at lights on and 7.3 when water is fully degassed). Plants start pearling within 10 minutes of the lights coming on.
Substrate: A mix of ADA aquasoil, Fluval stratum, and Controsoil. A bag of Controsoil was added ~2 months ago to try and give the plants a boost. The remaining substrate is from when I setup the tank and is almost certainly not providing much nutrition or buffering capacity.
Water change schedule: Weekly 70-80% water changes with tap water coming from the MWRA (water report here). KH is ~2. GH is less than 1(3.7 PPM Ca, 0.7 PPM Mg based on the report). Water is treated with sodium carbonate at the water treatment plant to increase the pH to ~9.2, but the pH rapidly decreases after the water comes out of the tap. One potential issue is the tap water is extremely cold. It comes out at ~50F and I add a mix of water from the tap along with heated water. The temperature drops to ~60F for 2-3 hours whenever I water change. I don't keep any livestock so I'm not sure if this is a problem. This was not something I needed to consider back in Texas.
Remineralization: I add 22 PPM calcium and 6 PPM magnesium at water change
Fertilization: 20N-6P-26K is added immediately after water change. A second dose at 10N-3P-13K is added halfway through the week. Micros are Burr740's most recent recipe dosed at 0.15 PPM Fe 3x per week.
Temperature: Tank is heated to 73F during the winter. During the more mild parts of the year I remove the heater and go with whatever the ambient temperature is.
It looks like I'm doing everything right on paper and based on my past experience keeping tanks, but there is clearly some major issue ongoing. Right now I'm thinking its inconsistency in the CO2 that I'm just not seeing (I just started the CO2 2 hours earlier last week because I was noticing the drop checker wasn't always yellow at lights on), not enough light, or too cold of water during water changes. I want to keep some records through this journal to keep myself engaged with the tank and to make sure I'm being consistent with everything. I'm also hoping some additional eyes can help me see where I'm going wrong because I really, really miss having a nice looking tank.
I've been keeping planted aquariums and shrimp breeding tanks for almost a decade and for the majority of that time aquariums were my primary hobby. In 2021 I had ~30 tanks running simultaneously containing almost 200 types of plants that I had collected over a 5 year period and more than a dozen types of shrimp. In this time, it was harder for me to not setup new tanks than it was to grow any aquatic plant sent my way. Below are some of the tanks I've kept over the years.
At the end of 2021 I moved from Texas to Massachusetts and gave away all of my plants, tanks, and shrimp to friends I had made over the years. It took some time to find a permanent place to live so I didn't have any tanks until I was unexpectedly given an ADA 120P in summer of 2023.
The early days of the 120P:
I went through the typical tank start growing pains with a diatoms phase, green hair algae, and every other issue one would expect from a new tank. Even with the new tank difficulties, it only took me 2 months to get to a healthy tank again. For the next 1.5 years, everything went smoothly and the tank went through many iterations.
Setup on June 28th
Diatoms outbreak on July 19th
Green hair algae outbreak by August 18th
Everything was cleaned up and growing great by September 1st
The start of the disaster:
In February 2025, I started running into issues. BBA started growing in small tufts on the substrate and green hair algae started attacking the old growth on the plants. I'd run into this issue in the past and was usually able to fix it pretty quickly by dialing in the CO2, cleaning the substrate, cleaning filters, and replanting only the most healthy tops of the plants. Even after doing this multiple times, I haven't had any luck fixing the algae. It always comes back
The start of the algae
Multiple trim and replant cycles along with some new plants
Relatively clean after a trim and replant cycle
10 days later
Where I am today:
I'm getting so frustrated by the persistent issues that I'm about ready to shut down this tank. As a last ditch effort, I purchased a pack of healthy plants from Burr740 to see if healthy plants can help me get through the algae phase and get back into a good place.
The tank as of January 2nd 2026. The healthiest plants in the tank were received earlier this week from Burr740.
Really poor color on my plants with a lot of green algae on the lower leaves. The nice looking bacopa is from Burr740. The original stems of Bacopa have barely grown in the last month. If I pull them up, there are very few roots.
Another example of the old growth issues. The Limnophila mini vietnam also has not grown at all in the last month. Lots of algae grows on the substrate as well.
Another comparison of Burr's Ludwigia sp. red vs mine. Very slow growth and poor rooting.
Really weak older growth on Rotala sp. singapore and poor coloration compared to Burr's plants. This plant has always been very easy for me to keep and this is part of why I'm thinking there is something big that I'm missing. Didiplis diandra is another easy plant that keeps melting at the base and its making very little progress because of this.
Below is the key information about the tank.
Tank size: ADA 120P (120 cm x 45 cm x 45 cm)
Lighting: 3x NiloCG Prizms ran at the lowest setting for each channel. Lights are on for 7 hours a day. I want to increase the lighting, but any time I do the algae gets significantly worse
Filtration: Oase Biomaster 600 and a SunSun HW-303B. There's a spraybar on the bottom left that points along the length of the tank at substrate level and the other output is on the top right corner of the tank pushing the opposite direction.
CO2: Vertical reactor on the SunSun filter and a Sera reactor on the Oase. CO2 comes on 4 hours before lights on and turns off 1 hr before lights off. Drop checker is yellow when lights turn on. The pH drop is ~1.4-1.5 at lights on (5.8 at lights on and 7.3 when water is fully degassed). Plants start pearling within 10 minutes of the lights coming on.
Substrate: A mix of ADA aquasoil, Fluval stratum, and Controsoil. A bag of Controsoil was added ~2 months ago to try and give the plants a boost. The remaining substrate is from when I setup the tank and is almost certainly not providing much nutrition or buffering capacity.
Water change schedule: Weekly 70-80% water changes with tap water coming from the MWRA (water report here). KH is ~2. GH is less than 1(3.7 PPM Ca, 0.7 PPM Mg based on the report). Water is treated with sodium carbonate at the water treatment plant to increase the pH to ~9.2, but the pH rapidly decreases after the water comes out of the tap. One potential issue is the tap water is extremely cold. It comes out at ~50F and I add a mix of water from the tap along with heated water. The temperature drops to ~60F for 2-3 hours whenever I water change. I don't keep any livestock so I'm not sure if this is a problem. This was not something I needed to consider back in Texas.
Remineralization: I add 22 PPM calcium and 6 PPM magnesium at water change
Fertilization: 20N-6P-26K is added immediately after water change. A second dose at 10N-3P-13K is added halfway through the week. Micros are Burr740's most recent recipe dosed at 0.15 PPM Fe 3x per week.
Temperature: Tank is heated to 73F during the winter. During the more mild parts of the year I remove the heater and go with whatever the ambient temperature is.
It looks like I'm doing everything right on paper and based on my past experience keeping tanks, but there is clearly some major issue ongoing. Right now I'm thinking its inconsistency in the CO2 that I'm just not seeing (I just started the CO2 2 hours earlier last week because I was noticing the drop checker wasn't always yellow at lights on), not enough light, or too cold of water during water changes. I want to keep some records through this journal to keep myself engaged with the tank and to make sure I'm being consistent with everything. I'm also hoping some additional eyes can help me see where I'm going wrong because I really, really miss having a nice looking tank.
120 Replies
·
12752 views


Journal Quantum Entanglement
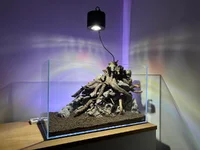
My new scape. It’s been a while. I’ve been busy finishing my novel. It’s published now so back to scaping.
It’s a classic triangular scape and I’m calling it Quantum Entanglement. It’s a working title, so I might change that. Sorry mods.
The real star is the light. Off Amazon for around $130. Fully controllable with a remote. Great value. https://amzn.eu/d/0eRX5eCo
I want to plant it with mainly buces and small anubias spp. on the rocks and wood and MC carpet, with some crypt nevellii or C. X Willisii, and stauro in the shady parts and maybe a ludwigia mini super red highlight behind the last rock on the left.
It’s a classic triangular scape and I’m calling it Quantum Entanglement. It’s a working title, so I might change that. Sorry mods.
The real star is the light. Off Amazon for around $130. Fully controllable with a remote. Great value. https://amzn.eu/d/0eRX5eCo
I want to plant it with mainly buces and small anubias spp. on the rocks and wood and MC carpet, with some crypt nevellii or C. X Willisii, and stauro in the shady parts and maybe a ludwigia mini super red highlight behind the last rock on the left.
12 Replies
·
181 views


Supporting
I Donated 2026
Rockstar
I hadn't seen it mentioned by others that attended Aquashella, but if you hadn't already heard about it or seen it in Aquashella videos, ADA has come out with Amazonia Pro. It's not a replacement for Version 2, but an addition. It is essentially Version 2 on steroids with higher nutrients and of course the negative side effect of potentially higher initial ammonia leaching and, if your not prepared and skilled, more chance of algae. That's even from the mouth of Homma-san himself. The scaping competitors were using it in the competition and AFA was selling 9l bags at the show. They said it would be available on the website within the next couple weeks.
39 Replies
·
868 views
I have read an awful lot of warnings and conjectures by people. And “I used bdbs and a shrimp died so I got rid of it…”…
My personal experience with the product has been uneventful.
I have put rare earth magnets through a quart sample with no hint of any attraction and then washed it with no hint of oil slick or dustiness and then added the rest of the bag to a new aquarium with no treatment, no ill effect…
I have probably employed 7 bags by now with no hint of a problem. Dozens of corys sifting through the stuff as well as khuli loaches and yoyo loaches…. No hint of problems with them…
Other than it self leveling itself and being totally incapable of holding a slopeI love the stuff. The black always looks great. It costs about 1/4 aquarium specific substrates. I really haventexperienced anything negative about it…
I know it is popular here…. Has anybody here had bad experiences with it?
My personal experience with the product has been uneventful.
I have put rare earth magnets through a quart sample with no hint of any attraction and then washed it with no hint of oil slick or dustiness and then added the rest of the bag to a new aquarium with no treatment, no ill effect…
I have probably employed 7 bags by now with no hint of a problem. Dozens of corys sifting through the stuff as well as khuli loaches and yoyo loaches…. No hint of problems with them…
Other than it self leveling itself and being totally incapable of holding a slopeI love the stuff. The black always looks great. It costs about 1/4 aquarium specific substrates. I really haventexperienced anything negative about it…
I know it is popular here…. Has anybody here had bad experiences with it?
12 Replies
·
230 views

Rockstar
Journal 22 gallon long bookshelf
Time to start a new thread.
I’ll fill in some details later, but I’m working on the hardscape now. Any and all criticism is appreciated. The vision is nothing more, and nothing less, than something appealing to the eye.
90cm x 30cm x 30cm Lifegard Aquatics ultra clear bookshelf tank. Buce and anubias on the hardscape, stems towards the back and center, mid to front carpet with some changes in shade and texture down to a flat grade on the right side of the tank.
Lily pipe inlet and skimmer will be in the back left corner with the outflow in the front left to hopefully achieve circular flow. I’ll be running an in-line diffuser. Light will be the P600 Pro that I regrettably did not upside to 900. Oh well. I’ll mount it high and hopefully it’ll have enough spread.
I have some dragon stone and red lava rock rubble I’ll use at the base to blend into the substrate, as well as some stratum I may or may not cap with.


I’ll fill in some details later, but I’m working on the hardscape now. Any and all criticism is appreciated. The vision is nothing more, and nothing less, than something appealing to the eye.
90cm x 30cm x 30cm Lifegard Aquatics ultra clear bookshelf tank. Buce and anubias on the hardscape, stems towards the back and center, mid to front carpet with some changes in shade and texture down to a flat grade on the right side of the tank.
Lily pipe inlet and skimmer will be in the back left corner with the outflow in the front left to hopefully achieve circular flow. I’ll be running an in-line diffuser. Light will be the P600 Pro that I regrettably did not upside to 900. Oh well. I’ll mount it high and hopefully it’ll have enough spread.
I have some dragon stone and red lava rock rubble I’ll use at the base to blend into the substrate, as well as some stratum I may or may not cap with.
298 Replies
·
33348 views

In my never ending quest to piddle around, I have been looking at setting up a nano eco tank/bowl with minimum maintenance. The main issue I have is controlling the temp. The temps in my house fluctuate between 68 - 71 degree regularly and can drop to lower 60s a few weeks in the fall and spring when we do not have the heater on.
Has anyone thought about or had success using an animal heating pad under the bowl/tank? While most are designed for reptiles and regulate between 100-120F, there are some for more mixed use that can be controlled from 68F and up. I don't think this would be too hard to set up. Could be to keep the inside of the tank clear of equipment. Radiant floor heating for your shrimp/fish.
Heating Pad
Has anyone thought about or had success using an animal heating pad under the bowl/tank? While most are designed for reptiles and regulate between 100-120F, there are some for more mixed use that can be controlled from 68F and up. I don't think this would be too hard to set up. Could be to keep the inside of the tank clear of equipment. Radiant floor heating for your shrimp/fish.
Heating Pad
5 Replies
·
78 views

Staff member
Supporting
Founding Member
Expert in Residence
MOTM Winner
Rockstar
As some people may know I had a long running journal on another forum. Glad to see Art get this new site started. A fresh beginning and loads of possibilities ahead. I'll be updating with thoughts here but for today just wanted to share my latest tank pics.


353 Replies
·
64306 views

Supporting
I Donated 2026
Rockstar
Article Contributor
Like my no-tech bowl scaping thread where I have a list of inspiring bowl scapers, I thought it would be awesome to do the same with a Dutch-inspired / True Dutch thread! I have a ton, but I'll post them over time. If anyone else finds good examples of dutch tanks, post them here, too!
First up:
I translated the transcript and got as much info as I could. Here's the things I find interesting:
50% WC weekly
He front-load doses the incoming fresh water volume to:
If you were to look at it through full-volume dosing lens, it's:
Micros are dosed 3x per week, but nothing specific provided. Probably ~0.3-0.5ppm/week? He does say the iron is all gone/undetectable by the evening.
Beautiful tank! I love the balance of colors, textures, and plant groupings. That tiger lily is amazing. Very little algae, too!
First up:
I translated the transcript and got as much info as I could. Here's the things I find interesting:
50% WC weekly
He front-load doses the incoming fresh water volume to:
- NO3: ~30 ppm
- PO4: ~4.2 ppm
- K: ~34 ppm
- Mg: ~3.4 ppm
If you were to look at it through full-volume dosing lens, it's:
- NO3: ~15 ppm
- PO4: ~2.1 ppm
- K: ~17 ppm
- Mg: ~1.7 ppm
Micros are dosed 3x per week, but nothing specific provided. Probably ~0.3-0.5ppm/week? He does say the iron is all gone/undetectable by the evening.
Beautiful tank! I love the balance of colors, textures, and plant groupings. That tiger lily is amazing. Very little algae, too!
13 Replies
·
817 views


Staff member
I Donated 2026
Founding Member
Hello Welcome, tṛtīyāya
Welcome to ScapeCrunch, @tṛtīyāya!
We would love to get to know you. Please tell us about yourself. What tank do you have?
We would love to get to know you. Please tell us about yourself. What tank do you have?
0 Replies
·
13 views
I understand that the process of aquasoil neutralizing kh is basically it turning it into co2 through chemical reactions.
However, in practice it just seems to raise the ph if the soil if the ph buffering capacity is exhausted?
If I pre-acidify RO water with HCL the aquasoil seems to raise the ph back up to around where it normally is after a day or 2.
However, in practice it just seems to raise the ph if the soil if the ph buffering capacity is exhausted?
If I pre-acidify RO water with HCL the aquasoil seems to raise the ph back up to around where it normally is after a day or 2.
1 Replies
·
103 views
Staff member
I Donated 2026
Founding Member
Hello Welcome, Forest Alex
Welcome to ScapeCrunch, @Forest Alex!
We would love to get to know you. Please tell us about yourself. What tank do you have?
We would love to get to know you. Please tell us about yourself. What tank do you have?
0 Replies
·
19 views