
Welcome to ScapeCrunch
We are ScapeCrunch, the place where planted aquarium hobbyists come to build relationships and support each other. When you're tired of doom scrolling, you've found your home here.
Social Feed

Hello folks!
This is my first journal on the forum though I've been active on TPT and some other venues online for a few years now. Having just found this place, it's the perfect time to post a journal on a tank I am just starting up!
I recently decided to consolidate 5 smaller tanks into one large tank. This gives me significantly more real estate to aquascape while simultaneously lowering my maintenance routine. I frankly much rather do one water change on a big tank then 5 much smaller water changes on different tanks, even if they are all in the same room.
When it came time to decide on which tank to use exactly, I was of two minds. On the one hand, a regular 75 gallon tank would likely do the trick, but the 'perfect' tank would be a 150cm tank as it would fit the available space. But a 150 cm tank would cost a lot more..... in the end The Wife gave a green light and I contacted "Aquarium and Terrarium Builder" of Yorktown Virginia, my only 'local' custom tank builder. The builder only works with acrylic, but for reasons that will be explained, that's not a bad thing.
Since this was a custom tank, I was not limited to standard dimensions and asked for a tank that would be 150cm x 50cm x 45cm. Or roughly 60 inches x 20 inches x 18 inches. Or roughly 90 gallons. Why these dimensions? Well the 150 for the length fit the available room. 20 inches wide because any wider and my short arms have trouble reaching the back wall, and 18 inches high in part for the same access issues and in part because I already had a tank 45 cm high and I knew the newts did fine in that depth of water.
The builder quoted me 1000 dollars for the tank and I would pick it up.
The first thing I needed to do after ordering the tank was build a stand so I would have somewhere to put the darn thing
At this point I don't remember what got me started on extruded aluminum, but I got a bug for making the stand out of the stuff. For those who are not aware, extruded aluminum is aluminum tubing with 't'-slots cut into it. It looks like this:

The advantage of this stuff is that you can use the t-slots to attach things, it's strong, it looks slick, and its waterproof. Even after building it, I still prefer a proper stand made of hardwood. BUT, an extruded aluminum stand is pretty easy to make better looking then a 2x4 stand. And significantly faster to build then a hardwood stand. So there is that.
Anyway, like all my bits of furniture, I make, the first step was making a 3d drawing in sketchup so I would know how to put the thing together. That looked like this:

The wood panels are meant to be doors in this picture.
I definitely did not invent this design as there are companies that offer to sell you precut and drilled extruded aluminum stands. The only reason I didn't go with them is expense. I wanted to try and save myself some money by buying the extruded aluminum and then cutting, tapping, and drilling it myself. I did this, and did save some money, just not as much as I was hoping. I thought I could do it all for around 300 dollars, but sadly the actual price of the stand all-in is closer to 700. That's still a lot cheaper then the 1500 to 2500 that various companies wanted, but not quite as good as I thought I was going to get for all the effort I put into tapping this darn critter.
Anyway, here are some pictures of the stand being built:


Not pictured here are the magnetic clasps the side panels are held onto. They are not pictured because I forgot to add them until after it was built. One of the downsides to extruded aluminum is that in order to access those t-slots where 'everything' is attached, is you need an exposed end. If you build the darn thing and forgot to add something in....like a magnetic clasp... then you get the joy of taking it apart before you can add it back on.
So that was fun. And because I forgot to add a few things I got the joy of taking it apart and putting it back together like 5 times...
Anyway, after a few weeks the builder contacted me letting me know the tank was ready!
There was much excitement.
There was also much driving. While this is my only 'local' builder, that didn't make him super close. It was 3.5 hours each way to get from my house in Maryland to the builder. That made for a long day of driving, but it was totally worth it.
One of the nice things about acrylic is that its significantly lighter then glass. This 5 foot long tank probably only weighs around 90 lbs. With a hand truck I was easily able to get the tank into my basement by myself. Here is how it looked when first arrived:

And here are what those magnetic clasps looked like on the stand:

And finally what the tank looked like unwrapped and in place:

The white board under the tank are two pieces of pvc trim-board. I wanted to use pvc because its completely waterproof. It's two pieces because I couldn't fit a 4x8 sheet in my car and home depot no longer cuts the stuff with their panel saw. I am still only mostly bitter on that discovery.
After that I started the process of taking down my multiple smaller tanks. In order to significantly shorten my cycle, I reused the substrate (all pool filter sand) and added it into the new tank. I also drilled 4 holes in the euro bracing so I could use 2 canister filters with lily pipes. Here is what that looked like:

Before I could slide the tank into place I needed to put on the background. I really like privacy window film for tank backgrounds. It's cheap, it looks good, it's easy to apply and to remove, and it's easy to get online. For this tank I decided on frosted white. This stuff goes on with just water and a squeegee. Here is how it looked:


After that I slid the tank into place, filled it and started working on the filters and plumbing. It's not very complicated but I wanted to make sure it would be in good shape for the foreseeable future. The canister filters are stainless steel filters with dc pumps. I love this type of filter because the steel filter itself is built like a tank, and the only part that can break is the pump which is entirely modular and easily replaced. DC pumps are ultra quiet, like you need to touch them to feel a vibration to even know they are on kind of quiet. I already owned both filters and they were in active use on the tanks I took down, so again, more reasons to believe the cycle would be quick.
I also took this time and began to play with aquascapes. Because I had so much room, I really wanted to use some big pieces of hardscape to show off the length of the tank. That ended up taking the form of two large pieces of wood that would stretch the length. Initial scape looked like this:

However, after a day I decided I didn't like the right hand side because it just didn't photograph well So I switched it up and settled on this:


I like the look of the 'broken' log in no small part because it reminded me of several scenes I have seen when out walking in parks. All the rock work will allow lots of places to add epiphytes as well.
All the plants in the tank are all from the existing tanks I took down so, so far I haven't spent anything on this except for the tank itself and the stand (and the light... to be talked about later).
The plant list for this tank is currently: Cryptocoryne spiralis, eriocaulon vietnam, amazon sword compacta, Cryptocoryne parva, tiger lily, anubias nana petite, and some species of fern like moss, and some species of plant I was told was 'like buce' but not, and that I totally forgot the name of. But its variegated which is cool for a completely submersed plant. Still to add is Marsilea Angustifolia for a carpet, Helvola Pygmy water lilies, and mayaca fluviatilis. Those are all in my 30 gallon tank with all my newts. I will be taking that tank down shortly and adding the newts once I'm sure the cycle is done (this will be soon, as the cycle is likely already completed as of the writing of this post).
Regarding the background, I didn't choose it entirely because I like the color white for this tank. I chose it because I planned to add some LED mood lighting to the tank
For a couple of years now I have admired the LED backgrounds you can buy for tanks, but I've not wanted to spend the money they cost (typically a few hundred dollars for even a small tank). So I decided to make my own. With an LED strip light adhered to the back top of the stand I got some nice effects! You can kind of notice the blue in the full tank shots near the bottom back of the tank. It's a little more noticeable in person. Here is a picture with the other lights off in the room which really makes it clear what it's doing:

Meanwhile I also started working on the lights for this tank. Well more specifically the light hanging system which is just 1/2" conduit attached to the wall:

That ended up definitely being the easiest light stand I've made so far. As for what will be going there? Well I went ahead and ordered a Twinstar V 1200S which I'm pretty excited about! I've been a twinstar fanboy for years, so when I figured out that there are very very very few 150cm lights... I decided my best bet was just buying a twinstar and hanging it up a bit higher then normal. Sadly it's not here yet. Happily it 'should' arrive on Wednesday.
AND.. that brings me to current. This is a LONG first post because I decided to combine several previous journal posts elsewhere to get me to where I'm at right now. Next time I will post more about the newts and my thoughts on acrylic tanks. Hopefully those that actually read to this point have enjoyed it so far
This is my first journal on the forum though I've been active on TPT and some other venues online for a few years now. Having just found this place, it's the perfect time to post a journal on a tank I am just starting up!
I recently decided to consolidate 5 smaller tanks into one large tank. This gives me significantly more real estate to aquascape while simultaneously lowering my maintenance routine. I frankly much rather do one water change on a big tank then 5 much smaller water changes on different tanks, even if they are all in the same room.
When it came time to decide on which tank to use exactly, I was of two minds. On the one hand, a regular 75 gallon tank would likely do the trick, but the 'perfect' tank would be a 150cm tank as it would fit the available space. But a 150 cm tank would cost a lot more..... in the end The Wife gave a green light and I contacted "Aquarium and Terrarium Builder" of Yorktown Virginia, my only 'local' custom tank builder. The builder only works with acrylic, but for reasons that will be explained, that's not a bad thing.
Since this was a custom tank, I was not limited to standard dimensions and asked for a tank that would be 150cm x 50cm x 45cm. Or roughly 60 inches x 20 inches x 18 inches. Or roughly 90 gallons. Why these dimensions? Well the 150 for the length fit the available room. 20 inches wide because any wider and my short arms have trouble reaching the back wall, and 18 inches high in part for the same access issues and in part because I already had a tank 45 cm high and I knew the newts did fine in that depth of water.
The builder quoted me 1000 dollars for the tank and I would pick it up.
The first thing I needed to do after ordering the tank was build a stand so I would have somewhere to put the darn thing
At this point I don't remember what got me started on extruded aluminum, but I got a bug for making the stand out of the stuff. For those who are not aware, extruded aluminum is aluminum tubing with 't'-slots cut into it. It looks like this:
The advantage of this stuff is that you can use the t-slots to attach things, it's strong, it looks slick, and its waterproof. Even after building it, I still prefer a proper stand made of hardwood. BUT, an extruded aluminum stand is pretty easy to make better looking then a 2x4 stand. And significantly faster to build then a hardwood stand. So there is that.
Anyway, like all my bits of furniture, I make, the first step was making a 3d drawing in sketchup so I would know how to put the thing together. That looked like this:
The wood panels are meant to be doors in this picture.
I definitely did not invent this design as there are companies that offer to sell you precut and drilled extruded aluminum stands. The only reason I didn't go with them is expense. I wanted to try and save myself some money by buying the extruded aluminum and then cutting, tapping, and drilling it myself. I did this, and did save some money, just not as much as I was hoping. I thought I could do it all for around 300 dollars, but sadly the actual price of the stand all-in is closer to 700. That's still a lot cheaper then the 1500 to 2500 that various companies wanted, but not quite as good as I thought I was going to get for all the effort I put into tapping this darn critter.
Anyway, here are some pictures of the stand being built:
Not pictured here are the magnetic clasps the side panels are held onto. They are not pictured because I forgot to add them until after it was built. One of the downsides to extruded aluminum is that in order to access those t-slots where 'everything' is attached, is you need an exposed end. If you build the darn thing and forgot to add something in....like a magnetic clasp... then you get the joy of taking it apart before you can add it back on.
So that was fun. And because I forgot to add a few things I got the joy of taking it apart and putting it back together like 5 times...
Anyway, after a few weeks the builder contacted me letting me know the tank was ready!
There was much excitement.
There was also much driving. While this is my only 'local' builder, that didn't make him super close. It was 3.5 hours each way to get from my house in Maryland to the builder. That made for a long day of driving, but it was totally worth it.
One of the nice things about acrylic is that its significantly lighter then glass. This 5 foot long tank probably only weighs around 90 lbs. With a hand truck I was easily able to get the tank into my basement by myself. Here is how it looked when first arrived:
And here are what those magnetic clasps looked like on the stand:
And finally what the tank looked like unwrapped and in place:
The white board under the tank are two pieces of pvc trim-board. I wanted to use pvc because its completely waterproof. It's two pieces because I couldn't fit a 4x8 sheet in my car and home depot no longer cuts the stuff with their panel saw. I am still only mostly bitter on that discovery.
After that I started the process of taking down my multiple smaller tanks. In order to significantly shorten my cycle, I reused the substrate (all pool filter sand) and added it into the new tank. I also drilled 4 holes in the euro bracing so I could use 2 canister filters with lily pipes. Here is what that looked like:
Before I could slide the tank into place I needed to put on the background. I really like privacy window film for tank backgrounds. It's cheap, it looks good, it's easy to apply and to remove, and it's easy to get online. For this tank I decided on frosted white. This stuff goes on with just water and a squeegee. Here is how it looked:
After that I slid the tank into place, filled it and started working on the filters and plumbing. It's not very complicated but I wanted to make sure it would be in good shape for the foreseeable future. The canister filters are stainless steel filters with dc pumps. I love this type of filter because the steel filter itself is built like a tank, and the only part that can break is the pump which is entirely modular and easily replaced. DC pumps are ultra quiet, like you need to touch them to feel a vibration to even know they are on kind of quiet. I already owned both filters and they were in active use on the tanks I took down, so again, more reasons to believe the cycle would be quick.
I also took this time and began to play with aquascapes. Because I had so much room, I really wanted to use some big pieces of hardscape to show off the length of the tank. That ended up taking the form of two large pieces of wood that would stretch the length. Initial scape looked like this:
However, after a day I decided I didn't like the right hand side because it just didn't photograph well
So I switched it up and settled on this:
I like the look of the 'broken' log in no small part because it reminded me of several scenes I have seen when out walking in parks. All the rock work will allow lots of places to add epiphytes as well.
All the plants in the tank are all from the existing tanks I took down so, so far I haven't spent anything on this except for the tank itself and the stand (and the light... to be talked about later).
The plant list for this tank is currently: Cryptocoryne spiralis, eriocaulon vietnam, amazon sword compacta, Cryptocoryne parva, tiger lily, anubias nana petite, and some species of fern like moss, and some species of plant I was told was 'like buce' but not, and that I totally forgot the name of. But its variegated which is cool for a completely submersed plant. Still to add is Marsilea Angustifolia for a carpet, Helvola Pygmy water lilies, and mayaca fluviatilis. Those are all in my 30 gallon tank with all my newts. I will be taking that tank down shortly and adding the newts once I'm sure the cycle is done (this will be soon, as the cycle is likely already completed as of the writing of this post).
Regarding the background, I didn't choose it entirely because I like the color white for this tank. I chose it because I planned to add some LED mood lighting to the tank
For a couple of years now I have admired the LED backgrounds you can buy for tanks, but I've not wanted to spend the money they cost (typically a few hundred dollars for even a small tank). So I decided to make my own. With an LED strip light adhered to the back top of the stand I got some nice effects! You can kind of notice the blue in the full tank shots near the bottom back of the tank. It's a little more noticeable in person. Here is a picture with the other lights off in the room which really makes it clear what it's doing:
Meanwhile I also started working on the lights for this tank. Well more specifically the light hanging system which is just 1/2" conduit attached to the wall:
That ended up definitely being the easiest light stand I've made so far. As for what will be going there? Well I went ahead and ordered a Twinstar V 1200S which I'm pretty excited about! I've been a twinstar fanboy for years, so when I figured out that there are very very very few 150cm lights... I decided my best bet was just buying a twinstar and hanging it up a bit higher then normal. Sadly it's not here yet. Happily it 'should' arrive on Wednesday.
AND.. that brings me to current. This is a LONG first post because I decided to combine several previous journal posts elsewhere to get me to where I'm at right now. Next time I will post more about the newts and my thoughts on acrylic tanks. Hopefully those that actually read to this point have enjoyed it so far
22 replies
·
1286 views


I'm having quite a bit of trouble with the subtle shade differences in the Nitrate test kits. I've tried API, NT, and Salifert to no avail; I'm guessing most of the time. As much as I'd like a Hanna HI97728, the $525 price doesn't fit the budget. I've seen a few anecdotal reports that the HI782 Marine Nitrate High Range Checker is viable in freshwater. Any firsthand experience?
I'm already using the Hanna PO4 Checker; for me, it's been a game-changer for readability.
I'm already using the Hanna PO4 Checker; for me, it's been a game-changer for readability.
23 replies
·
1587 views

Journal Farmer D. Singh's journal
Ive reorganized the order of my tanks so I can better keep track of them ie. Tank 2 moss tank is now tank 3. This helps in any confusion I had when tracking tanks they are in a sort of order now. Rather than taking time editing my old journal id rather create a new thread. Pics will be current (for the most part) as they are posted. I am not aquascaping. I am just farming.
6 replies
·
273 views

I've been consuming tons of information from this amazing forum and decided its time to start my own journal.
One, to get constructive criticism/suggestions on how to improve which would be most welcome and two, just to show other approaches to starting a new tank as everyone thinks a bit differently and to see other peoples perspective.
I only started using pressurised CO2 about 18 months ago so haven't been in the hobby that long.
The first pic below was of said attempt starting with CO2. The other reason for showing that tank is I'm using the same physical tank and also starting off the new setup with plants from that tank.
Speaking of the tank, as you will see in the first pic of the new build it is an old second hand rimmed tank with less than stellar glass. In my list of planned upgrades one of them will be to order a low iron rimless tank so I can actually appreciate what's inside it. I can never get a photo to show a clear shot of the tank. Its not a great tank but it is definitely clearer than what the photos show. I think the camera really highlights how crappy the glass is lol.
No direct inspiration here apart from including a reasonable amount of hardscape and probably having a more nature style tank, so not so formal.
I've had a large piece of driftwood hanging around that I've wanted to use in a scape. I've used it previously in a larger tank but was a fish only tank. I do know after a year submerged (tied down) it still went straight to the top when released/untied so is basically unsinkable. Not sure of the type of wood though.
I also cut it in half depth wise as it was too large for a 4 foot tank.
After trying to glue it to rocks around it etc I filled the tank...and of course all went to hell. The driftwood wanted to get to the surface so bad it broke away from the glue LOL. So I had to start the scape with a large rock sitting on it and the driftwood in a different position from where it started. Temporary at first but now I plan to cover the rock with epiphytes etc so it should be ok eventually, just not so much right now. One of those it is what it is. I'm only playing around here anyways.
I'll also say, as per the heading of this journal, I'm treating this as an experimental tank, not even close to a show tank. I'll purchase a nice tank when I think I'm at a level where I deserve to bring it justice so not yet. Hopefully this tank will bring me a long way towards that point.
I've only previously used organic soil capped with sand (so the classic dirted tank). That provides good growth for around 6 months or so but if a lot of the organics start rising up and leaching into the water column, its not such a great setup for high tech tanks. Ask how I know!
I've never used aqua soil. I would like to try one day but for now decided to skip that and go straight to inert. Encouraged purely by some of you on here that have been using BDBS. That is what I would like to have used but not readily available in Aus so I'm using pool filter sand for this rendition.
Apologies for the rambling, onto the details.
Started around 5th January, did the full changeover from the old setup
Tank size:
Filter
Wave maker / power head
- Aqua One 8000 reef sim (apart from obviously to help circulation - was mainly put in here to help with the CO2 distribution - so is now situated at the opposite end of the tank to the filter outlet/inlet) Flow from 528 G/H to 2113 G/H. Have it on the lowest setting and probably still too strong
CO2
Water
- Tap (GH 7 KH 6), PH is around 7.6-7.8 out of the tank - at the moment
Substrate
- Pool filter sand only
Lighting
Initial plant list (as mentioned just selecting some from previous iteration of this tank)
I've deliberately not used what i call starter plants to kick it off as I find they can take over easily in a high tech tank, then you have to gradually rip them all out. I know a higher risk of more algae without them but lets go!
Ferts
Water change
- Currently around 55% weekly (I will be refining this a bit more too. I have a TDS meter now so will be working out exact water change volume using Rocco's TDS method which will also help with refining the fert dosing)
Current fish list
I plan to gradually increase the rainbow collection a bit too over time. Love the Boseman's
Other miscellaneous stuff
Upgrades planned
Ferts uptake and adjusting over time:
My initial aim is to try and avoid the infamous diatom stage by using a slightly reduced light schedule and ferts to start the tank.
First impressions for me is the driftwood is too large for this tank but it is a different piece so will persevere whilst in this tank.
Anyways the pic of the tank before I pulled it down;

Start of the new scape.

You can really see the crappy condition of the tank here with the scratches, water stains etc. I'm not too bothered though. It will make me more look forward when I eventually get a nice tank.
Just after filling up and initial planting. You can see the big heavy rock on the right. Without it, the driftwood shoots all over the place.

Noting that entire lot of MC melted soon after this, it wasn't in the best condition when it started though. Hoping it will eventually start up again. I'm patient, uhmm kind of!
One, to get constructive criticism/suggestions on how to improve which would be most welcome and two, just to show other approaches to starting a new tank as everyone thinks a bit differently and to see other peoples perspective.
I only started using pressurised CO2 about 18 months ago so haven't been in the hobby that long.
The first pic below was of said attempt starting with CO2. The other reason for showing that tank is I'm using the same physical tank and also starting off the new setup with plants from that tank.
Speaking of the tank, as you will see in the first pic of the new build it is an old second hand rimmed tank with less than stellar glass. In my list of planned upgrades one of them will be to order a low iron rimless tank so I can actually appreciate what's inside it. I can never get a photo to show a clear shot of the tank. Its not a great tank but it is definitely clearer than what the photos show. I think the camera really highlights how crappy the glass is lol.
No direct inspiration here apart from including a reasonable amount of hardscape and probably having a more nature style tank, so not so formal.
I've had a large piece of driftwood hanging around that I've wanted to use in a scape. I've used it previously in a larger tank but was a fish only tank. I do know after a year submerged (tied down) it still went straight to the top when released/untied so is basically unsinkable. Not sure of the type of wood though.
I also cut it in half depth wise as it was too large for a 4 foot tank.
After trying to glue it to rocks around it etc I filled the tank...and of course all went to hell. The driftwood wanted to get to the surface so bad it broke away from the glue LOL. So I had to start the scape with a large rock sitting on it and the driftwood in a different position from where it started. Temporary at first but now I plan to cover the rock with epiphytes etc so it should be ok eventually, just not so much right now. One of those it is what it is. I'm only playing around here anyways.
I'll also say, as per the heading of this journal, I'm treating this as an experimental tank, not even close to a show tank. I'll purchase a nice tank when I think I'm at a level where I deserve to bring it justice so not yet. Hopefully this tank will bring me a long way towards that point.
I've only previously used organic soil capped with sand (so the classic dirted tank). That provides good growth for around 6 months or so but if a lot of the organics start rising up and leaching into the water column, its not such a great setup for high tech tanks. Ask how I know!
I've never used aqua soil. I would like to try one day but for now decided to skip that and go straight to inert. Encouraged purely by some of you on here that have been using BDBS. That is what I would like to have used but not readily available in Aus so I'm using pool filter sand for this rendition.
Apologies for the rambling, onto the details.
Started around 5th January, did the full changeover from the old setup
Tank size:
- 122 cm x 47 cm deep x 45 cm high (uhmm so in imperial 48" x 18.5" x 17.5")
- Litres/gallons - 258 litres / 68 Gallons
Filter
- Just what I have on hand and had been using in the tank (Aqua One Nautilus 1100) so around 290 G/H so of course in reality a lot less than that. Only filled mainly with sponges though, limited the bio media.
- I have a perfectly working FX5 sitting in the shed gathering dust but I think too powerful for this size tank. That connected to a Yugang reactor though and one inch lily pipes could be a good combo. Will have to think about that for the future.
Wave maker / power head
- Aqua One 8000 reef sim (apart from obviously to help circulation - was mainly put in here to help with the CO2 distribution - so is now situated at the opposite end of the tank to the filter outlet/inlet) Flow from 528 G/H to 2113 G/H. Have it on the lowest setting and probably still too strong
CO2
- Aqualabs Pro dual stage regulator (recently added this, replacing a cheap chinese one from ebay - about 6 times the cost!)
- Aqualabs inline diffuser
- Gets to around 45 ppm but I need to do some more refined testing ( I only have the JBL CO2 kit but seems to be working ok)
- CO2 starts 3.5 hours before lights start and 4 hours before lights build up to their set level.
Water
- Tap (GH 7 KH 6), PH is around 7.6-7.8 out of the tank - at the moment
Substrate
- Pool filter sand only
Lighting
- Week Aqua L1200 (using Red preset at R - 64%, G - 71% B - 44% and UV - 90%) TBH not sure the UV light does much but it is what it is.
- So the lights aren't on that high, I started off the tank even lower but crept it up to what it is now.
Initial plant list (as mentioned just selecting some from previous iteration of this tank)
- MC as the front carpet
- Hygrophila corymbosa (restricted this quite a bit as it grows too fast with direct CO2 access) so hidden in the opposite corner to CO2 lol
- One amazon sword - I wanted to keep one in here to prove you don't need rich substrate
- Crypt wendtii brown - similar to above
- Ludwigia repens
- Helanthium bolivianum 'Quadricostatus (I think thats what it is or similar. produces runners like nothing on earth but a nice looking plant. Thats the one in the back right corner in the first photo of the new setup)
- AR Mini
- Hydrocotyle tripartite mini
- Limnophila Aromatica
I've deliberately not used what i call starter plants to kick it off as I find they can take over easily in a high tech tank, then you have to gradually rip them all out. I know a higher risk of more algae without them but lets go!
Ferts
- DIY Macros and micro mix - Rexolin APN (dosed for water tank volume)
- Started 9/2/20 now 10/2.5/20 (yes I know quite low for an inert substrate compared to most and will gradually increase this in time)
- Front load around 50% Macros, then the rest dosed throughout the week - only just started this method to try and limit the swings during the week
- Micros dose evenly throughout the week adding up to 0.45 fe / week
Water change
- Currently around 55% weekly (I will be refining this a bit more too. I have a TDS meter now so will be working out exact water change volume using Rocco's TDS method which will also help with refining the fert dosing)
Current fish list
- Around maybe 15 Rummy nose
- 4 SAE's
- Couple of oto's
- 4 Corys
- 6 Crimson spotted Rainbows ( i received these in a swap, plants for rainbows )
I plan to gradually increase the rainbow collection a bit too over time. Love the Boseman's
Other miscellaneous stuff
- Fluval SK400 surface skimmer (seemed like a little toy when I first set it up but does an ok job actually)
- Aqualabs pro skim lily pipes, and added quick release to the filter hosing to get to these easily. They are glass.
- Inkbird wifi heater control
Upgrades planned
- RO/DI - Just received but need a few more bits and pieces then I'll introduce the RO water over a 4 week period (25/50/75/100). I plan to remineralise to around 5dGH (4:1 for CA:MG), wont be adding any dKH, again following you guys lead here. I think this will be a huge upgrade as my tap water is sourced from a creek and is inconsistent. PH varies between 7 and 8 and KH has risen from 4 to 6 over the last few months.
- CO2 reactor - Looking at the Yugang of course. This will also I think make a big difference compared to inline diffusers. When setting up the tank I put in some work to try and determine the best flow to maximise CO2 distribution but still think I haven't got it right.
- New tank - as mentioned above
- Possible auto fert doser for the next tank
Ferts uptake and adjusting over time:
- The NO3 seems to provide a consistent 10 ppm before each water change which is the same amount I'm dosing now. Coincidence or is it only using what's readily available in the system. I know with slower growing plants and not a huge plant mass the uptake is obviously less.
- PO4 - similar story, test (which I'm not sure how accurate it is) seems to provide a consistent result of 2 ppm, again similar to what I have been dosing.
- I'll gradually increase both and see where I can find the sweet spot but may wait mainly till after the RO/DI is running.
My initial aim is to try and avoid the infamous diatom stage by using a slightly reduced light schedule and ferts to start the tank.
First impressions for me is the driftwood is too large for this tank but it is a different piece so will persevere whilst in this tank.
Anyways the pic of the tank before I pulled it down;
Start of the new scape.
You can really see the crappy condition of the tank here with the scratches, water stains etc. I'm not too bothered though. It will make me more look forward when I eventually get a nice tank.
Just after filling up and initial planting. You can see the big heavy rock on the right. Without it, the driftwood shoots all over the place.
Noting that entire lot of MC melted soon after this, it wasn't in the best condition when it started though. Hoping it will eventually start up again. I'm patient, uhmm kind of!
30 replies
·
1663 views

Sale Alert Cryptocoryne Pink Flamingo
This thread is for the general discussion of the classified ad Cryptocoryne Pink Flamingo. Please add to the discussion here.
0 replies
·
27 views
replies
Legacy View

Hello Welcome, FatherOfLies
Welcome to ScapeCrunch, @FatherOfLies!
We would love to get to know you. Please tell us about yourself. What tank do you have?
We would love to get to know you. Please tell us about yourself. What tank do you have?
1 replies
·
21 views
Hello Welcome, nivliw
Welcome to ScapeCrunch, @nivliw!
We would love to get to know you. Please tell us about yourself. What tank do you have?
We would love to get to know you. Please tell us about yourself. What tank do you have?
1 replies
·
14 views
Both tanks contain a lot of bucephalandra stems I have recently melted by feeding my caridina tanks with mulberry leaves. I have no idea what the heck happened but all buces melted in those tanks heavily over 3 days with every other plant + shrimp being fine. Don't wanna risk the plants dying so I'm throwing them back into high tech for a few months to recover.
Set Up:
Both tanks uses heavy co2 misting
Horticulture LED lights (dimmed, so probably 25-30 watts?)
Will steadily increase light weekly if I see no issues, max is 40 watts.
Dual sponge filters. (Air bubbles help prevent co2 gassing, also seems to really help stabilize tank, so less algae)
1 Internal filter with an atomizer for misting.
Regime:
All tanks get a 30-50% water change, twice per week.
Micros dosed daily (unless I forget, which happens fairly often.)
Macros Front Loaded and only in new incoming water.
6 Gallon bucket water change:
~350tds (Using seachem equilibrium remineralizer)
~22ppm KNO3, using KNO3 + KH2PO4
~40-50 ppm Potassium due to remineralizer
~4-5GH
Buce Lottery Colors
Lots of buces, various names, collected over the years. A lot of them were ultra rare and I cannot buy them anymore. Most of the ultra rare I probably accidentally killed from trying to grow them in a "no filter, no co2" style tank. Either way, not much color in low tech, will see what lottery colors we pull once they get going with better colors in higher lights + co2.
Both tanks are planted tightly front to back with bucephalandra. Kinda hard to see it all with moss blocking the way, but my view will be your view.
Random Mosses
Some mosses I've collected as well, honestly I grow a lot of them free floating so they kinda look the same. We will find out how they look after I attach them to something.
15 Gallon, very aged sand + pebble tank.
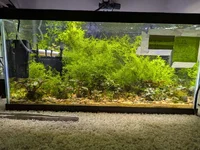
20 Gallon long, aged aquasoil I pulled from an existing caridina tank.

Wanted to take some macro shots, but does anyone know how to take an angle show on the glass without distortion? I have a DSLR long tube lens that works under water but color rendition is really bad.
Why so much moss?
Mostly to help stabilize the tank and to reduce light bleed. Less surface for algae to grow.
Set Up:
Both tanks uses heavy co2 misting
Horticulture LED lights (dimmed, so probably 25-30 watts?)
Will steadily increase light weekly if I see no issues, max is 40 watts.
Dual sponge filters. (Air bubbles help prevent co2 gassing, also seems to really help stabilize tank, so less algae)
1 Internal filter with an atomizer for misting.
Regime:
All tanks get a 30-50% water change, twice per week.
Micros dosed daily (unless I forget, which happens fairly often.)
Macros Front Loaded and only in new incoming water.
6 Gallon bucket water change:
~350tds (Using seachem equilibrium remineralizer)
~22ppm KNO3, using KNO3 + KH2PO4
~40-50 ppm Potassium due to remineralizer
~4-5GH
Buce Lottery Colors
Lots of buces, various names, collected over the years. A lot of them were ultra rare and I cannot buy them anymore. Most of the ultra rare I probably accidentally killed from trying to grow them in a "no filter, no co2" style tank. Either way, not much color in low tech, will see what lottery colors we pull once they get going with better colors in higher lights + co2.
Both tanks are planted tightly front to back with bucephalandra. Kinda hard to see it all with moss blocking the way, but my view will be your view.
Random Mosses
Some mosses I've collected as well, honestly I grow a lot of them free floating so they kinda look the same. We will find out how they look after I attach them to something.
15 Gallon, very aged sand + pebble tank.
20 Gallon long, aged aquasoil I pulled from an existing caridina tank.
Wanted to take some macro shots, but does anyone know how to take an angle show on the glass without distortion? I have a DSLR long tube lens that works under water but color rendition is really bad.
Why so much moss?
Mostly to help stabilize the tank and to reduce light bleed. Less surface for algae to grow.
10 replies
·
633 views
Hi all,
First of all thanks so much for the amazing threads and input from all the super knowledgeable and experienced scapers on here.
My question and apologies if this has been specifically discussed previously, but I'm wondering if an RO system would be a worthwhile investment for a high tech planted tank.
My town water which I currently use is not on the grid with the main city water supply that I used to access. Our town water is sourced from a creek, not a huge reservoir, and can vary from time to time, more than I would like. For example, the PH can be anywhere from 7-8, KH when measured some months ago was 4dKH, is now 6. GH 7dGH.
I know they are still within reasonable bounds though.
I could look at ways to just lower KH using HCL for an example but that doesn't fix the stability of the water supply for the other elements.
I'm also not able to obtain a water report.
I've just put in a plant order for my new scape (which I think I'll start a journal on soon) that includes plants like Syngonanthus macrocaulon which prefers lower KH.
Ro a good investment or am I over thinking it?
First of all thanks so much for the amazing threads and input from all the super knowledgeable and experienced scapers on here.
My question and apologies if this has been specifically discussed previously, but I'm wondering if an RO system would be a worthwhile investment for a high tech planted tank.
My town water which I currently use is not on the grid with the main city water supply that I used to access. Our town water is sourced from a creek, not a huge reservoir, and can vary from time to time, more than I would like. For example, the PH can be anywhere from 7-8, KH when measured some months ago was 4dKH, is now 6. GH 7dGH.
I know they are still within reasonable bounds though.
I could look at ways to just lower KH using HCL for an example but that doesn't fix the stability of the water supply for the other elements.
I'm also not able to obtain a water report.
I've just put in a plant order for my new scape (which I think I'll start a journal on soon) that includes plants like Syngonanthus macrocaulon which prefers lower KH.
Ro a good investment or am I over thinking it?
82 replies
·
4445 views
For 95% of people in this hobby, running an aquarium appears to be guess work, casual observations and not a lot of data driven applications.
That's where scapecrunch is amazing and so many like minded people here.
I love the tech side of it too which I'm only just starting to get into to help me progress the hobby further.
I was thinking about this as I was in our big box hardware store today just to pick up a minor plumbing item and ended up walking out the door with 90% of the material required for a Yugang reactor lol. Don't ask me how that happened! That will be another thread in the future I'm sure.
For now, my point is that when I get around to implementing the reactor, I don't want to rely only on CO2 kits to let me know what is happening.
I've seen some of you showing the PH charts which I think would be super helpful. Atleast to me as that is how my brain works best.
Which brings me to the equipment discussion. I was thinking about a PH probe (but not really as much to control CO2, just as a fail safe for that). More to log the PH data. Most stand alone PH controllers like Milwaukee do not log the data far as I can see.
Also, will be looking at fert dosing. For this I was considering something like the chihiros system.
I have a decent regulator to start with. Well I think it is lol. Also a flow meter (which i still haven't tested yet) so that side should be ok.
I also don't want to spend a fortune on an aquarium computer if I don't really need it. Most are starting at around $1,500 AUD here.
Do I just find a stand alone PH probe that will do what I want and the doser and call it a day?
What monitoring/automation systems do you use?
That's where scapecrunch is amazing and so many like minded people here.
I love the tech side of it too which I'm only just starting to get into to help me progress the hobby further.
I was thinking about this as I was in our big box hardware store today just to pick up a minor plumbing item and ended up walking out the door with 90% of the material required for a Yugang reactor lol. Don't ask me how that happened! That will be another thread in the future I'm sure.
For now, my point is that when I get around to implementing the reactor, I don't want to rely only on CO2 kits to let me know what is happening.
I've seen some of you showing the PH charts which I think would be super helpful. Atleast to me as that is how my brain works best.
Which brings me to the equipment discussion. I was thinking about a PH probe (but not really as much to control CO2, just as a fail safe for that). More to log the PH data. Most stand alone PH controllers like Milwaukee do not log the data far as I can see.
Also, will be looking at fert dosing. For this I was considering something like the chihiros system.
I have a decent regulator to start with. Well I think it is lol. Also a flow meter (which i still haven't tested yet) so that side should be ok.
I also don't want to spend a fortune on an aquarium computer if I don't really need it. Most are starting at around $1,500 AUD here.
Do I just find a stand alone PH probe that will do what I want and the doser and call it a day?
What monitoring/automation systems do you use?
9 replies
·
133 views

Journal 350 liter planted tank
Hello everybody im new here and wanted to introduce my tank,
The tank is a 350 liter Juwel rio (120x50x60)
Pretty high tank but wanted to have 50 cm wide
Lights: 3 daytime onex (1x plant 2x colour)
Good for 180 par at the bottom, 1.5 hour build up/5 hours full and 1.5 hour build off
Co2 by Inline with a co2art series pro dual stage regulator dropping 1.4 in ph
Filtration: 2 external filters (1x crystal profi 900, 1x tetra ex 1500 on a spraybar) and a eheim skim 350
Substrate: mastersoil black powder with masterline root tabs
Fertilizer: apt e
Fish: cherry barbels, siamese algae eaters, kuhli, ottociclus and some bloody mary shrimps
Plants: rotala macandra, anubias tinto, reineckii mini, reineckki rosenarvig, rotala blood red, ludwigia repens super red, bacopa carolinia, lobelia cardinalis, crypto flamingo, crypto rosen maiden, staurogene repens, spiralus tiger, ludwigia inclinata meta, samolus parvifloris red.
Might have forgotten something
Currently battling algae and unhappy plants due to nutrient inbalances and a no3 tester that was not correct.
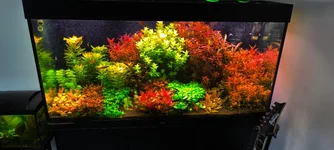
Under a pic of the current state and the state it was a little better in balance (not as it should tho)
The tank is a 350 liter Juwel rio (120x50x60)
Pretty high tank but wanted to have 50 cm wide
Lights: 3 daytime onex (1x plant 2x colour)
Good for 180 par at the bottom, 1.5 hour build up/5 hours full and 1.5 hour build off
Co2 by Inline with a co2art series pro dual stage regulator dropping 1.4 in ph
Filtration: 2 external filters (1x crystal profi 900, 1x tetra ex 1500 on a spraybar) and a eheim skim 350
Substrate: mastersoil black powder with masterline root tabs
Fertilizer: apt e
Fish: cherry barbels, siamese algae eaters, kuhli, ottociclus and some bloody mary shrimps
Plants: rotala macandra, anubias tinto, reineckii mini, reineckki rosenarvig, rotala blood red, ludwigia repens super red, bacopa carolinia, lobelia cardinalis, crypto flamingo, crypto rosen maiden, staurogene repens, spiralus tiger, ludwigia inclinata meta, samolus parvifloris red.
Might have forgotten something
Currently battling algae and unhappy plants due to nutrient inbalances and a no3 tester that was not correct.
Under a pic of the current state and the state it was a little better in balance (not as it should tho)

45 replies
·
2773 views
